Hyvor Blogs, our blogging platform, comes with support for custom domains. From an end-user standpoint, configuring a custom domain is straightforward. However, in the backend, we have to handle routing requests, generating and renewing TLS certificates, using those TLS certificates, etc. This article is about how Hyvor Blogs solves those problems.
TL;DR
A single Hyvor Blogs instance can handle many custom domains.
TLS certificates are generated using Let's Encrypt / ACME.
The app saves them internally and renews automatically before expiry.
Caddy's
get_certificatefetches the TLS certificate from the app.
Custom Domain Routing
One instance of Hyvor Blogs can handle an unlimited number of blogs hosted on custom domains. When routing an HTTPS request, we first check whether the current host is the app domain (where the app itself is hosted, including the console and API). If it isn't, we treat the request as a custom-domain request.
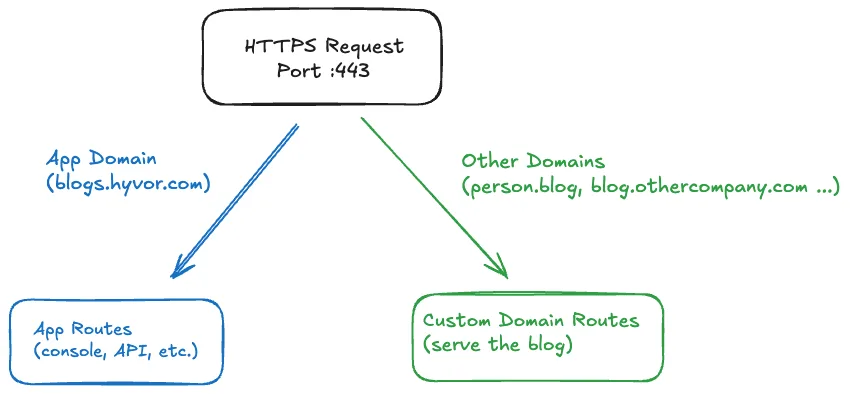
We let Caddy handle the initial routing:
${APP_DOMAIN} {
# hey Symfony, serve app routes
}
:443 {
# hey Symfony, serve custom-domain routes for the current host
}
Our application, written in Symfony, then handles the request according to Caddy's routing decision. Caddy passes a dynamic environment variable to the PHP runtime to indicate the current routing context. You may check our full Caddyfile config for more context.
On Symfony side, we have a conditional routing system:
// app routes
$routes
->import('./app.php')
->condition('service("app_router").isApp()');
// custom domain delivery
$routes
->import('./custom-domain.php')
->condition('service("app_router").isCustomDomain()');
// local endpoints
$routes
->import('./local.php')
->condition('service("app_router").isLocal()');
TLS Certificates
To handle an HTTPS request, we need a valid TLS certificate for the domain. This is where the Automated Certificate Management Environment (ACME) protocol comes in. Hyvor Blogs uses Let's Encrypt as its certificate authority (CA) through ACME. Let's Encrypt is a free service and does not require API keys, making it a straightforward choice for a self-hosted blogging platform like Hyvor Blogs.
When you visit a website using HTTPS, the server presents a TLS certificate to your browser. This certificate is issued by a certificate authority (CA), in our case, Let's Encrypt. Then your browser verifies the certificate against its trusted CA list. Chrome, Firefox, and the operating system each maintain their own trust stores, and they all trust Let's Encrypt.
If you are interested in learning more about TLS, I recommend this comic series at howhttps.works.
Blog's perspective
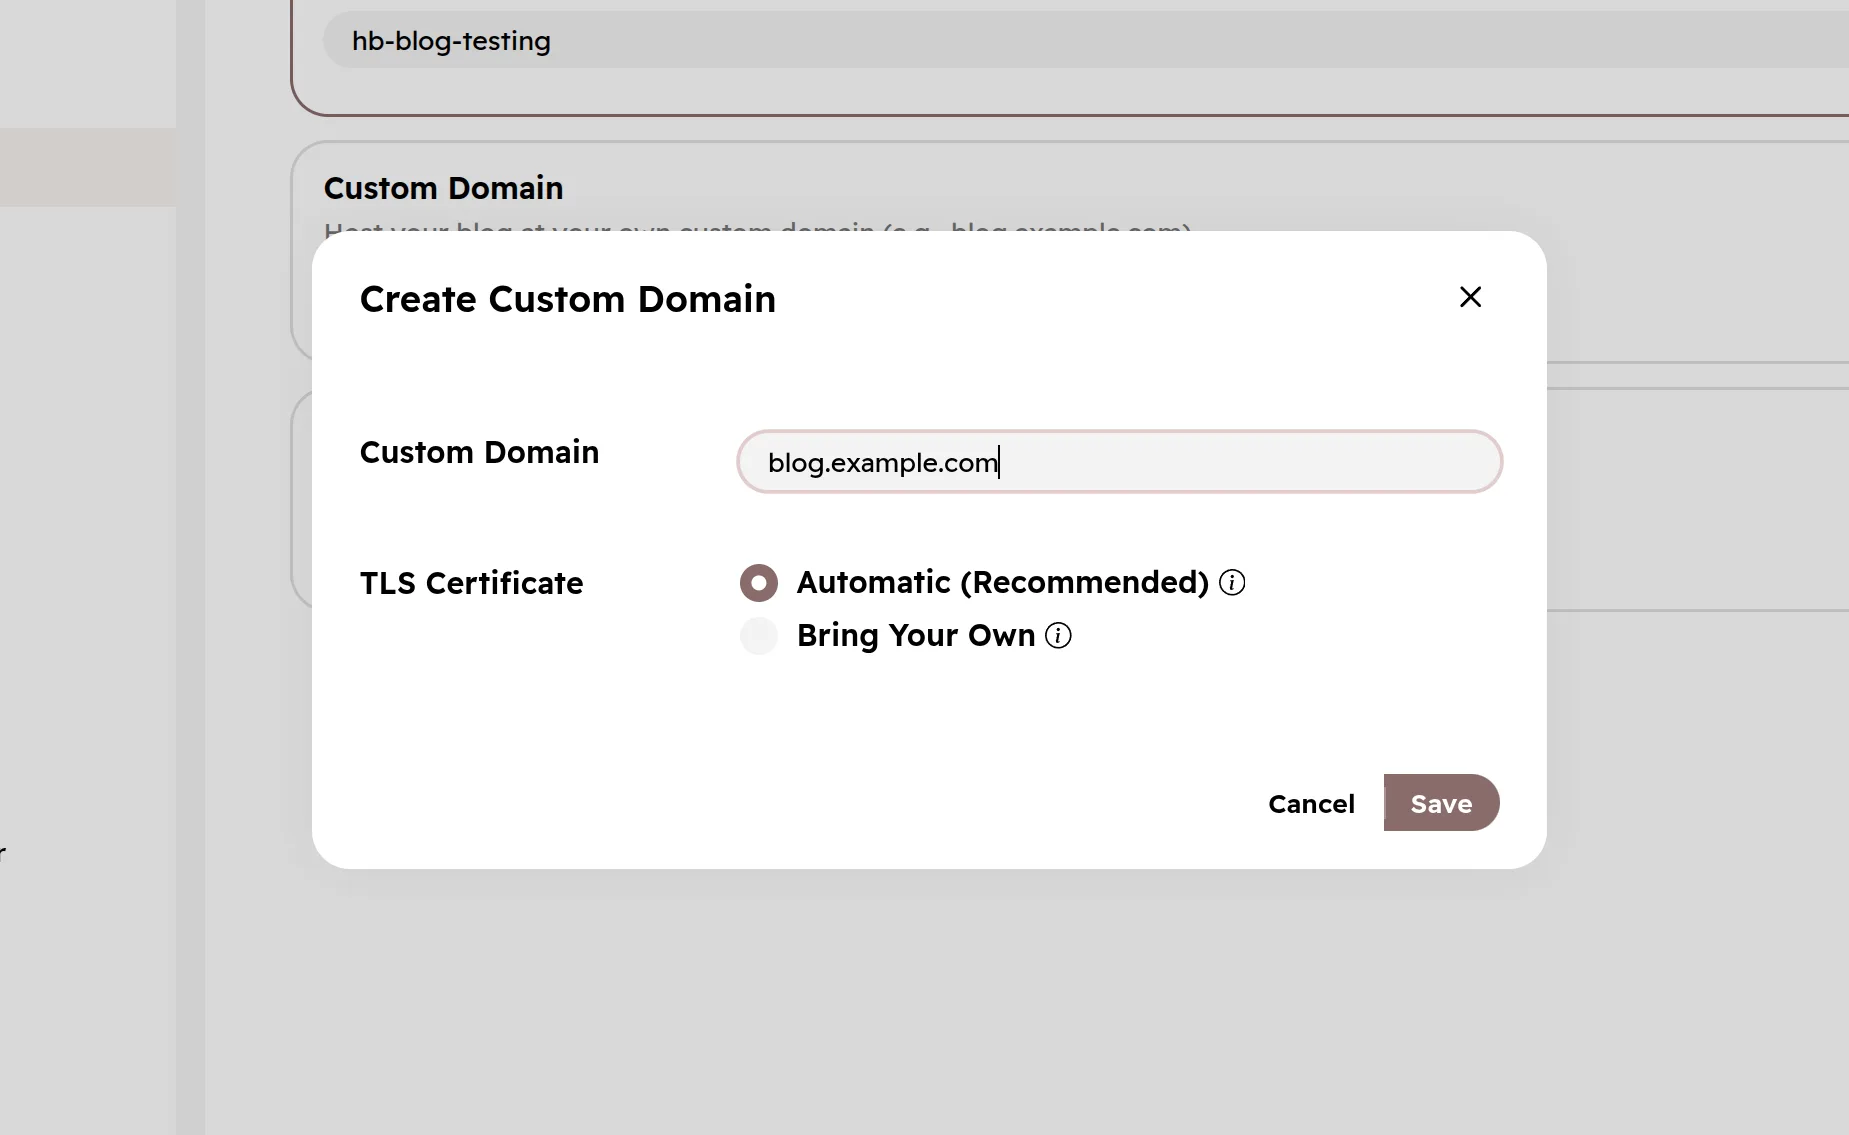
A user (e.g., admin) of a blog sets up a custom domain in the UI:
Then, we show the user instructions to configure DNS:
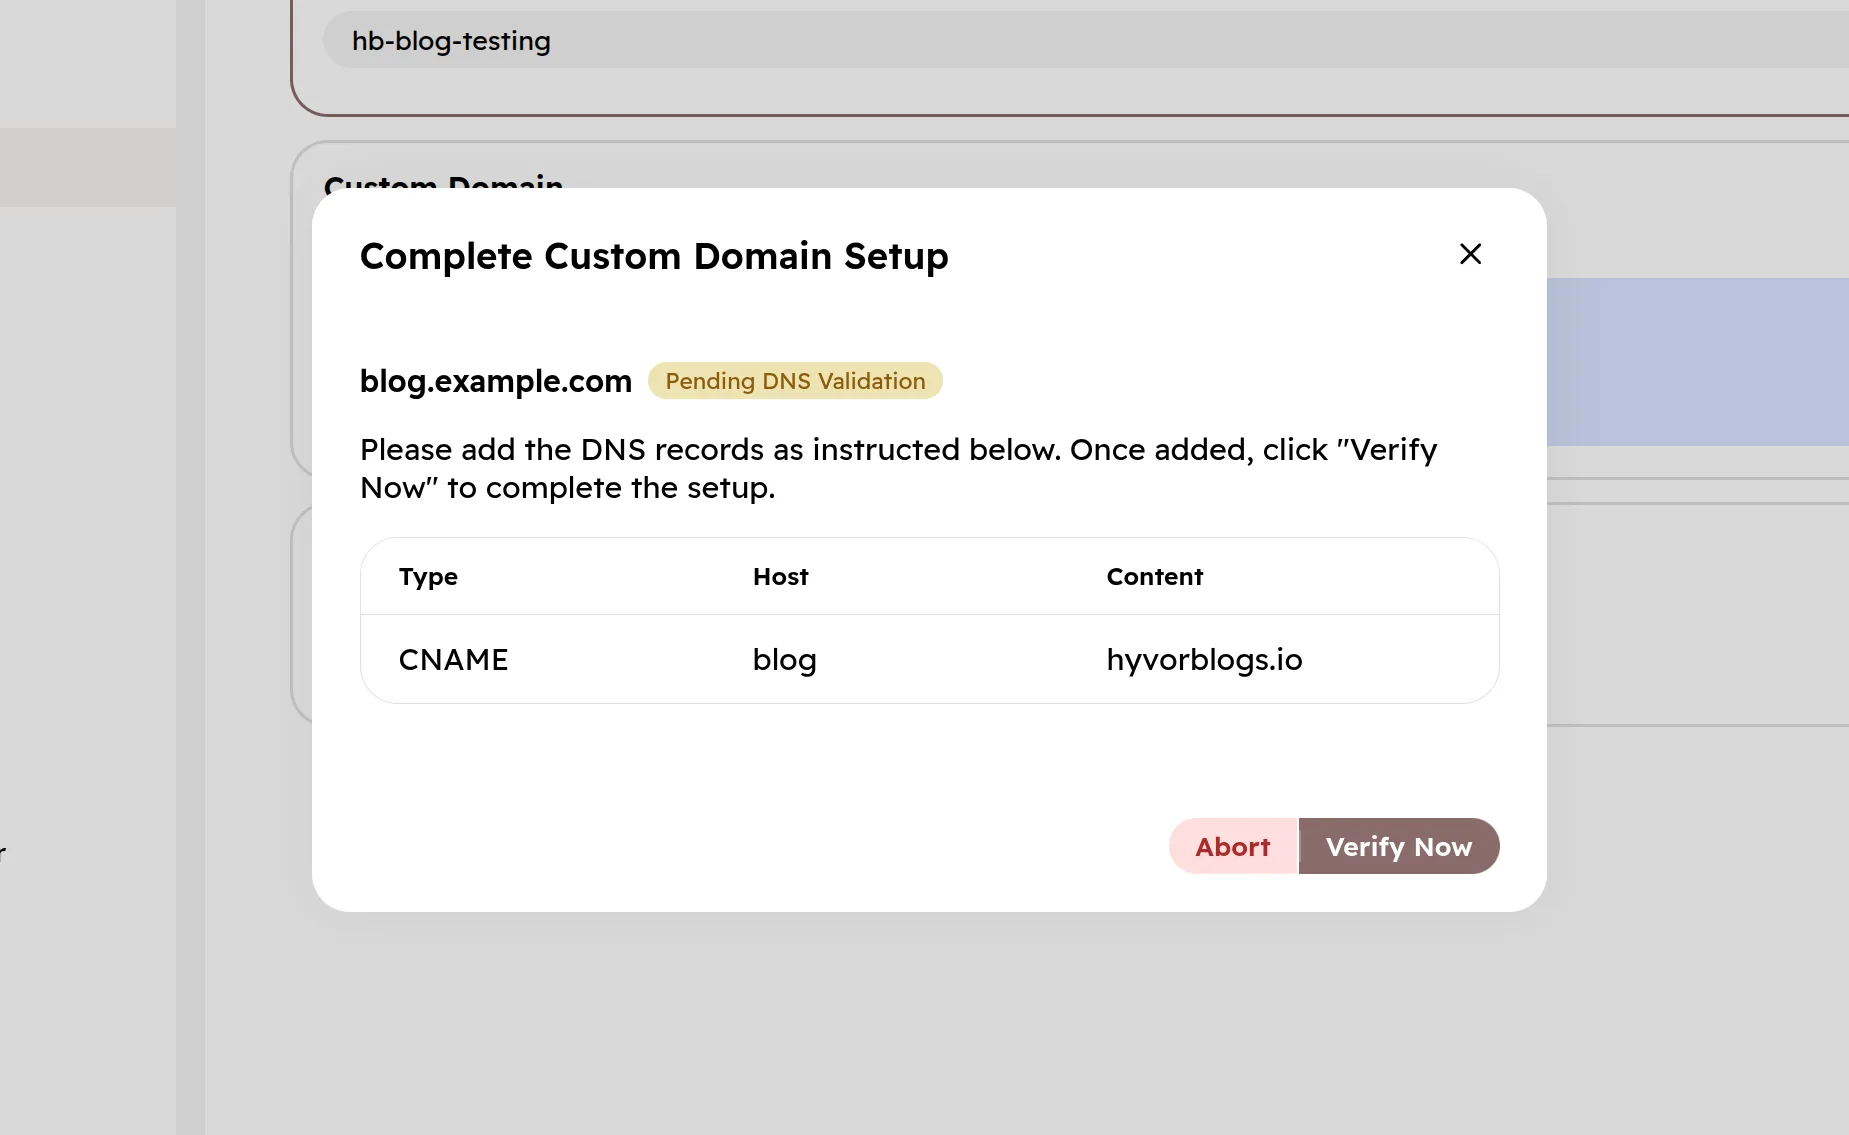
On Hyvor Blogs cloud, we ask the user to add a CNAME record to point their domain to our servers. So, any HTTP/HTTPs requests sent to the custom domain will reach our load balancer's port 80 and 443 respectively. For self-hosted instances, it generally depends on the specific setup, but mostly an A record pointing to the Hyvor Blogs server works.
How we generate TLS certificates
Hyvor Blogs uses the ACME protocol, defined in RFC 8555, to generate TLS certificates.
The ACME protocol is essentially a back-and-forth communication between the client and the CA. Every CA requires some kind of challenge to prove ownership of the domain before issuing a certificate. There are 3 challenge types supported by ACME:
HTTP-01: verified via a file hosted at
/.well-known/acme-challenge/<TOKEN>on port 80 (http)DNS-01: verified via a DNS TXT record
TLS-ALPN-01: verified via port 443 using a custom ALPN protocol
In Hyvor Blogs, we use HTTP-01. Here's why:
DNS-01 requires adding a custom TXT record that includes a unique token to that order while the order is in progress. While it's technically possible to ask the user to do so, it's fragile and requires user's attention and patience. The way to automate it is by using a DNS API key, which comes with its own security problems. Most providers don't support DNS management API keys restricted to a subdomain, so one key gives access to the full DNS zone. Also, this is again manual work, and also we will have to deal with the nuances of different DNS providers.
TLS-ALPN-01 is interesting, but we did not go this route because of our specific Caddy setup.
HTTP-01 is simple. The certificate order generates a token, and we are to host a file at /.well-known/acme-challenge/<TOKEN> over HTTP (port 80 of the server). File's content is a hash of the token and our private key. Practically, in Hyvor Blogs, we don't "host a file" manually. Instead, when the order begins, we save the token in our cache, and then respond to the /.well-known/ endpoint using what we have in our cache.
How ACME Protocol Works
ACME protocol is based on HTTP and JSON.
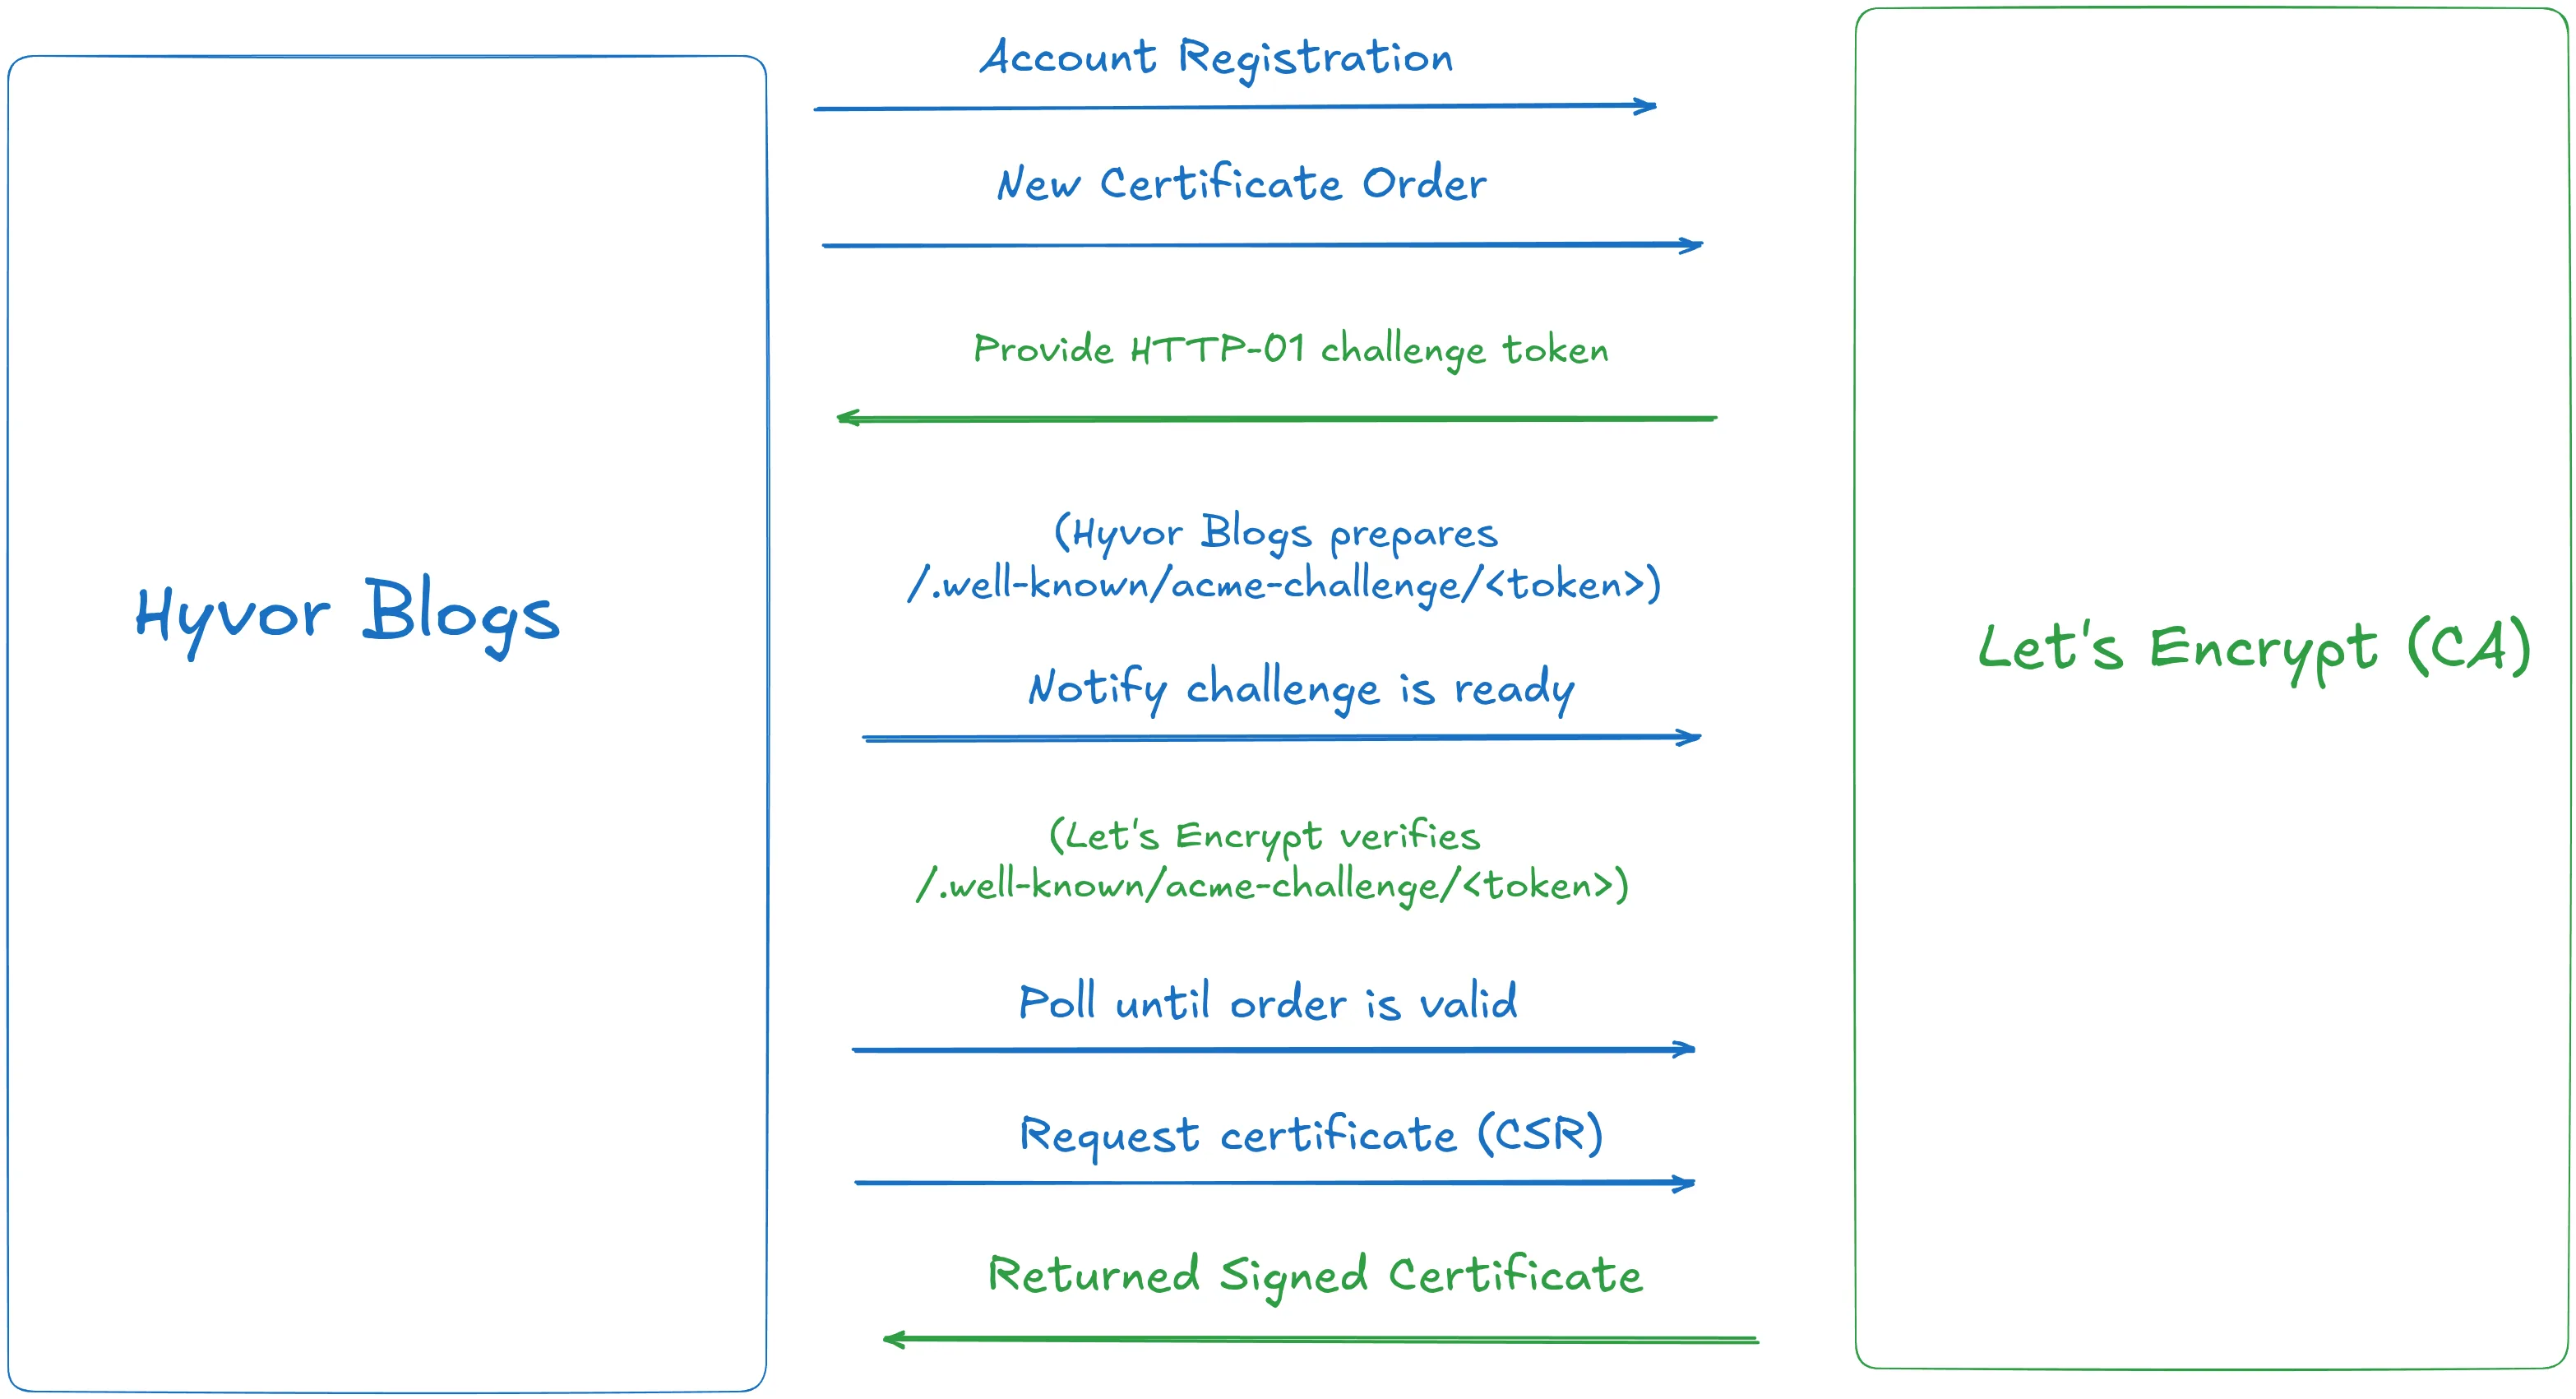
Before starting verification, we internally verify that the domain points to our servers. This is done using a dedicated temporary route added to the blog (
/.well-known/hyvor-blogs-verification.txt). This makes sure we don't initiate orders on Let's Encrypt unnecessarily (Let's Encrypt also has rate limits to be aware of). Once that's confirmed, we start generating a certificate with Let's Encrypt.First, we register our account on Let's Encrypt, which is only required once per Hyvor Blogs instance. The account is secured by a private key that is private to that Hyvor Blogs instance.
Then, we initiate a new certificate order for the custom domain (let's say
blog.example.com)Let's Encrypt sends us instructions for each challenge. We find the instructions for the HTTP-01 challenge, which includes the token we need. We save this token in our cache along with the thumbprint we need later. The thumbprint is calculated as
sha256(json(account_private_key_jwk)).Then, we notify Let's Encrypt we are ready for the challenge.
Let's Encrypt calls
http://blog.example.com/.well-known/acme-challenge/{token}. We respond with{token}.{thumbprint}in a 200 HTTP response.Once we confirm that Let's Encrypt has validated our order, we create a new Certificate Signing Request (CSR) using a new private key dedicated to this certificate. Then, we call the finalize endpoint.
Once it's ready, we call the certificate endpoint to download the certificate.
Finally, we save the encrypted private key and the certificate in the custom domain record of our database and activate the domain.
All of this is implemented in PHP in about 500 lines, including comments. See AcmeClient.php if you'd rather see the code.
Serving the blog with HTTPS
By now, we have a custom domain record in our database:
custom_domain:
- blog_id
- domain: blog.example.com
- status: active
- certificate
- private_key_encrypted
Next step is to configure Caddy to use this certificate for this domain.
It is possible to configure a custom certificate storage backend for Caddy, but there is an easier option: get_certificate http. We point that to a local-only route in our Symfony application that will respond back with the certificate and private key.
:443 {
tls {
get_certificate http http://localhost:8080/api/local/caddy-certificate
}
# Symfony
}
Our endpoint looks something like this:
#[Route('/api/local/caddy-certificate', methods: ['GET'])]
public function getCaddyCertificate(
#[MapQueryParameter] string $server_name,
Request $request,
): Response {
$customDomain = $this->customDomainService->getCustomDomain($server_name);
if ($customDomain === null) {
return new Response('domain not found', 404);
}
if ($customDomain->getCertificate() === null || $customDomain->getPrivateKeyEncrypted() === null) {
return new Response('certificate not found', 404);
}
$privateKeyPem = $this->customDomainService->getDecryptedPrivateKeyPem($customDomain);
$certificatePem = $customDomain->getCertificate();
$responseContent = $privateKeyPem . "\n" . $certificatePem;
return new Response($responseContent, 200, [
'Content-Type' => 'application/x-pem-file',
]);
}
Based on the server_name provided by Caddy, we send the private key and certificate back to Caddy in PEM format. Caddy uses it to continue TLS termination. It's important that this route is not exposed outside.
Certificate Renewal
Let's Encrypt certificates are only valid for 90 days. We run a job every day to renew certificates that expire within 30 days. Renewal requires a challenge the same way. As long as the DNS records are still in place, renewal works.
How do we know when to renew? The certificate (X.509) contains this data as notBefore and notAfter parameters. In addition to the certificate, we save this in the database so we can query expiring certificates and renew them.
Why did we built it this way?
If this implementation seems too complex or involved, there are reasons why we decided to implement certificate generation within our app, instead of relying on a pre-built solution.
Why not Caddy's on-demand TLS
Caddy's on demand TLS can automate TLS certificate generation for custom domains. It is actually a great solution for getting started without much hassle. In fact, we used this method before Hyvor Blogs 2.0. We ran into some limitations.
We cannot easily hook into the certificate lifecycle to know what's happening and when the next renewal is, etc. It's nice to keep the user updated on the status of their TLS certificates.
Then, Caddy saves certificates in a local directory. When scaling across servers, we need a central cache.
Both of those problems can actually be solved by using or writing a custom Caddy plugin. For example, there is a redis plugin to save certificates in a central Redis store. However, it's much easier if our application controlled things. Meddling with Caddy modules or maintaining a custom build was not worth the effort.
Why not a hosted solution
A solution like Cloudflare for SaaS automates most of this complexity of generating and managing certificates. Hyvor Blogs, however, is designed to be self-hosted. Adding such an opinionated dependency would make it harder for self-hosters to adopt Hyvor Blogs.
Therefore, we let our application handle certificates and used Caddy's get_certificate to plug it into Caddy.
Bring your own certificates
Blogs can set up a custom domain using their own certificates. This use case fits perfectly with our existing setup. We skip the TLS generation and renewal part via Let's Encrypt fully and save the user-provided certificate and private key the same way as above. The Caddy setup works the same way - quite beautiful if you ask me.
References
Did you know? Hyvor Blogs is a WordPress Alternative that's built solely for blogging. Get started with Hyvor Blogs Cloud or self-host on your own infrastructure.

Comments