I admit that Mailchimp is a great tool with lots of features and capabilities. It has all the features that a marketing suite needs. But what if you do not need such a load of features to send newsletters to your subscribers at a budget-friendly price without making things too complicated? This is where Hyvor Post comes in. We are a focused, independent alternative to Mailchimp. As we're a small team based in France building a tight-knit product, we care deeply about every single detail. We deeply care that your experience with us is a great one.
- Why Switch from Mailchimp to Hyvor Post?
- Before You Begin
- Step 1: Set Up Your Hyvor Post Newsletter
- Step 2: Clean Your Mailchimp Audience
- Step 3: Export Your Subscribers from Mailchimp
- Step 4: Import a Small Test Batch
- Step 5: Import Your Full Audience
- Step 6: Replace Your Signup Forms
- What Doesn't Migrate from Mailchimp to Hyvor Post
- Troubleshooting Common Migration Issues
- Frequently Asked Questions
- Final Migration Checklist
- Conclusion
Why Switch from Mailchimp to Hyvor Post?
While Mailchimp has grown into a complex, feature-heavy marketing suite, Hyvor Post offers a refreshing alternative built around four core principles.
Privacy-first, zero-tracking policy - Hyvor Post is built for publishers who believe privacy should be fundamental in newsletters. Therefore, we don't support link or opens tracking by design, and all emails are sent via Hyvor Relay, our own SMTP platform. (Yes, you can run a newsletter without tracking - wrote a full guide on that).
Refreshing Simplicity - Avoid bloated CRMs, ad tools, and complex sales funnels. Hyvor Post provides a simple interface to write and deliver emails to your subscribers.
Fair, Budget-Friendly Pricing - You can send emails with Hyvor Post for the lowest cost. With our own infrastructure, we have offered our customers the lowest prices in the market.
Emails/month
Mailchimp
Hyvor Post
25k
€53/month
€10/month
100k
€118/month
€35/month
300k
€230/month
€90/month
1m
€550/month
€225/month
This guide walks you through the complete migration: preparing your Hyvor Post newsletter, exporting your audience, importing subscribers, replacing signup forms, and verifying everything works before you retire your Mailchimp account.
Before You Begin
A little preparation can save you from having to repeat parts of the migration later.
Prerequisites - A Mailchimp account with permission to export your audience, a HYVOR account, and access to the website where your signup forms are embedded. If you want to configure a custom domain for email sending, you'll also need access to your domain's DNS settings.
Large imports require approval - Imports of more than 50 subscribers require manual approval, usually within one working day. You don't have to wait to begin. While waiting, you can configure your newsletter, create subscriber metadata, and test with a small sample.
Prepare Hyvor Post before exporting - Hyvor Post stores subscriber information differently from Mailchimp. Create your lists and metadata fields before importing, so your data maps correctly.
You don't need a paid subscription to prepare - You can create your newsletter, import subscribers, draft newsletters, and send test emails to yourself without one. A subscription is only required to send to your subscribers.
Keep your original export - Store the original ZIP file somewhere safe as a backup, in case you need to repeat the migration or check subscriber information later.
Estimated time - Most migrations take 30 to 60 minutes, excluding approval time for large imports.
Step 1: Set Up Your Hyvor Post Newsletter
Setting up your newsletter first helps ensure your subscriber data imports correctly and avoids having to repeat the migration later.
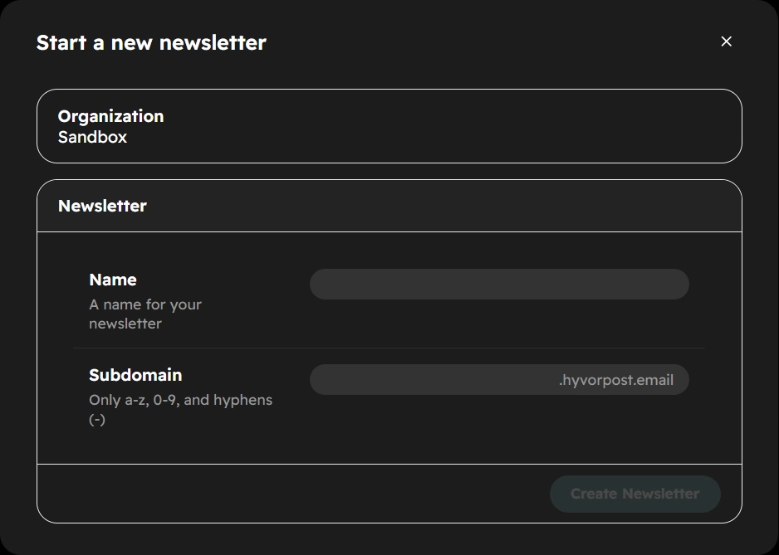
Create your newsletter
If you haven't already, create your Hyvor Post account and set up a new newsletter. During setup, configure your organization name,
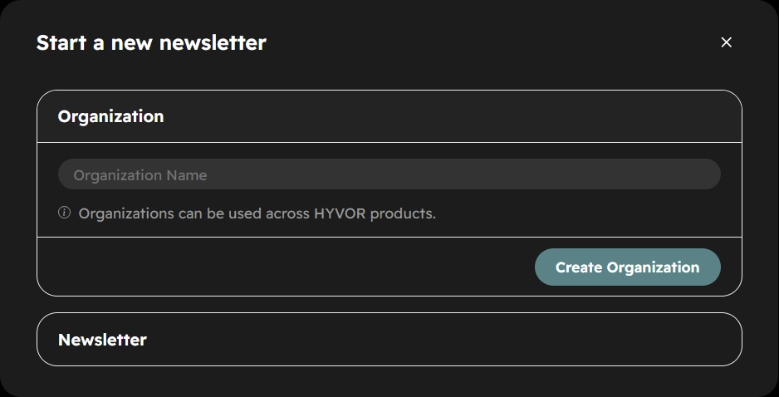
and then the newsletter name and newsletter subdomain.
Create your subscriber lists
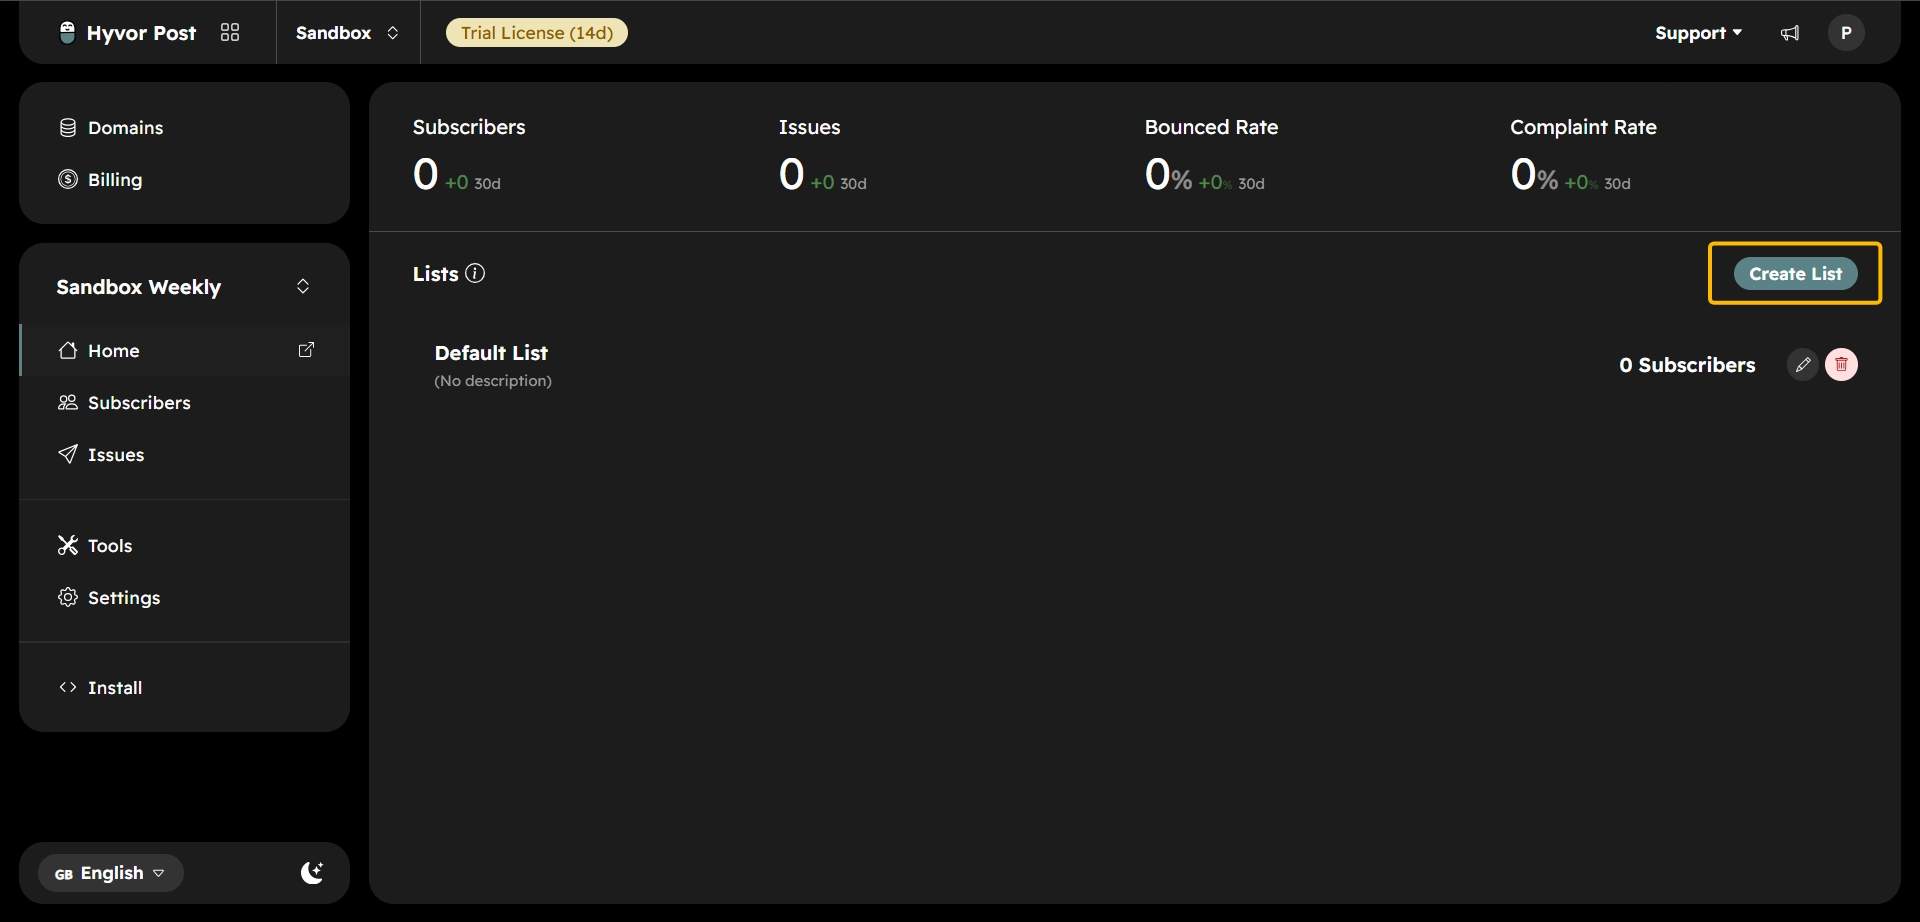
If you use multiple Mailchimp tags, recreate the corresponding lists in Hyvor Post first. If a list doesn't exist before importing, subscribers can't be assigned to it.
Click Create List in the console.
Enter a name and, optionally, a description.
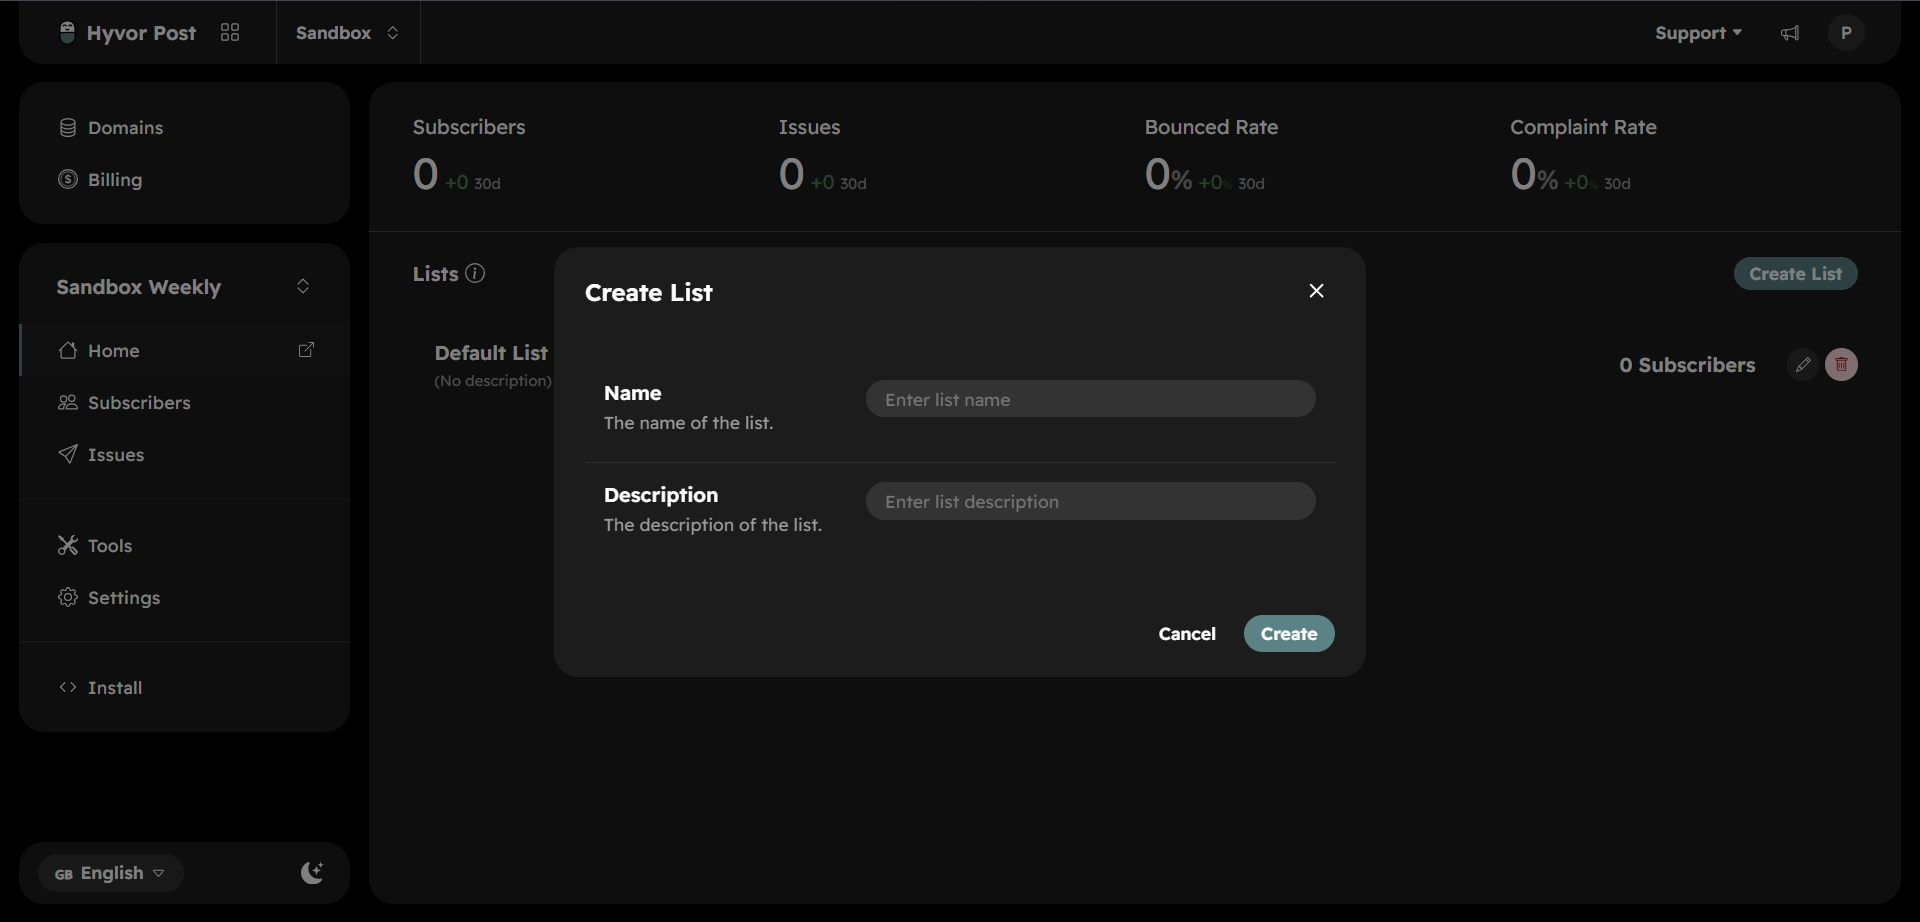
Save the list.
Create subscriber metadata
Mailchimp stores information such as first and last names alongside each subscriber. In Hyvor Post, this is stored as subscriber metadata, and you can only map CSV columns to metadata fields that already exist.
Open Settings → Subscriber Metadata.
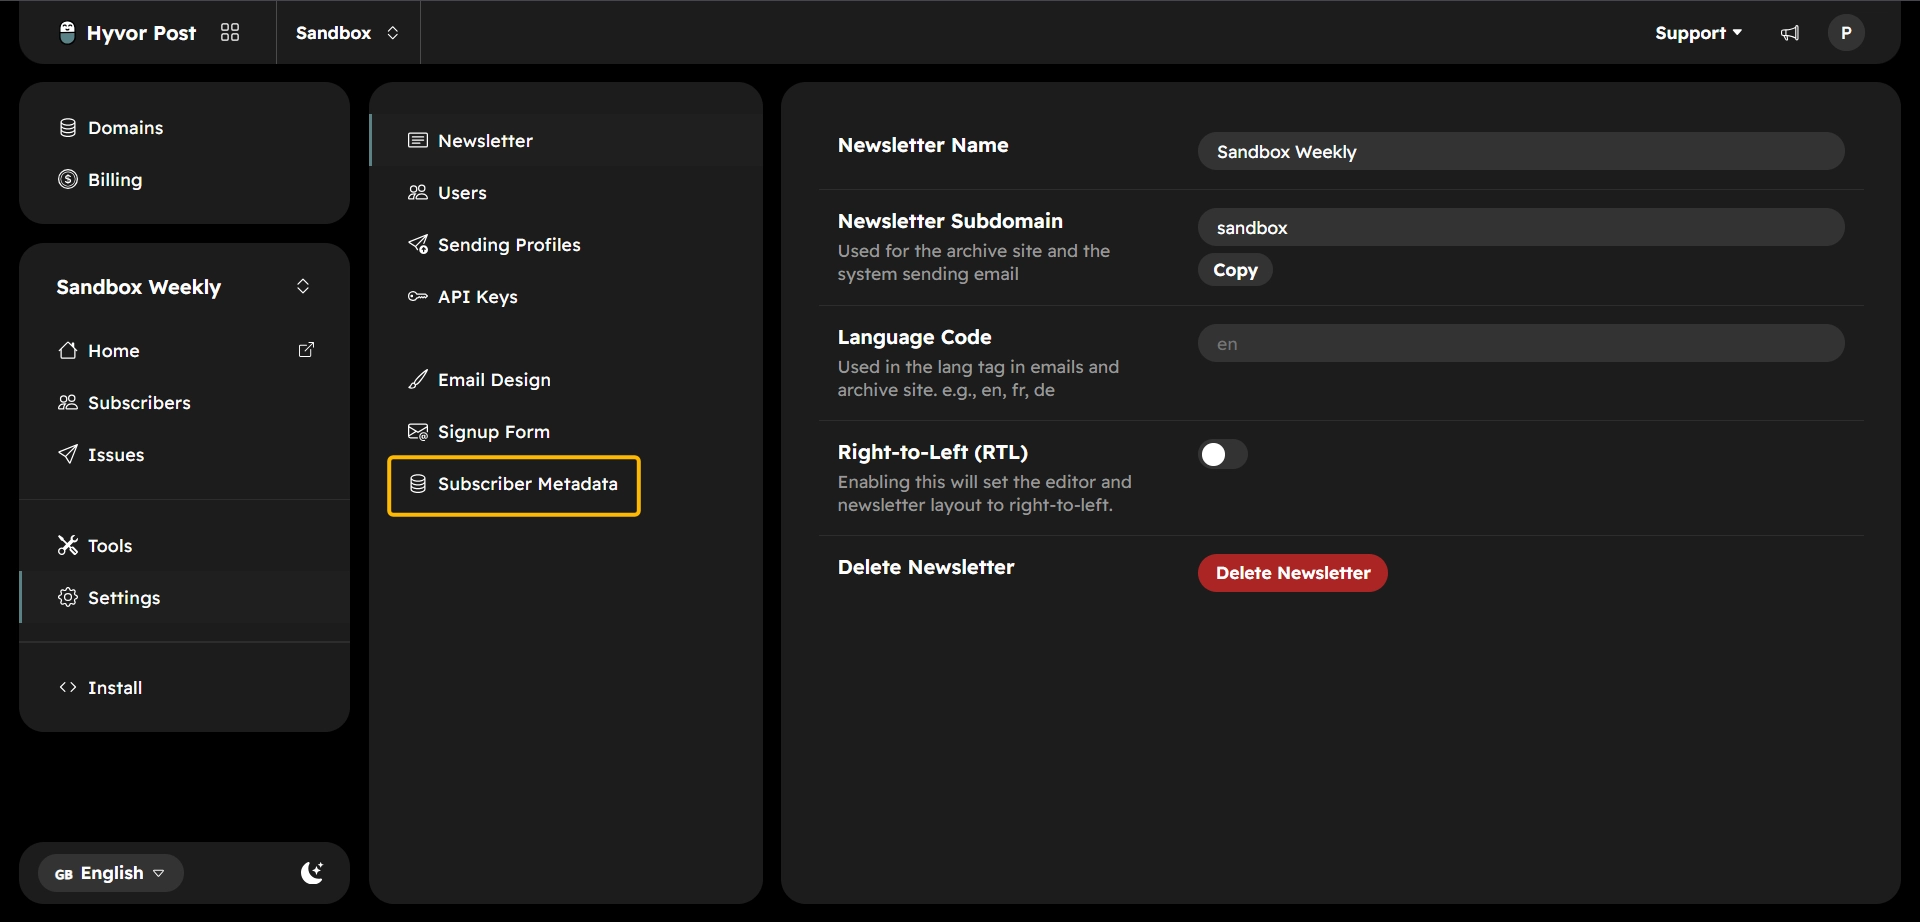
Click Add Metadata.
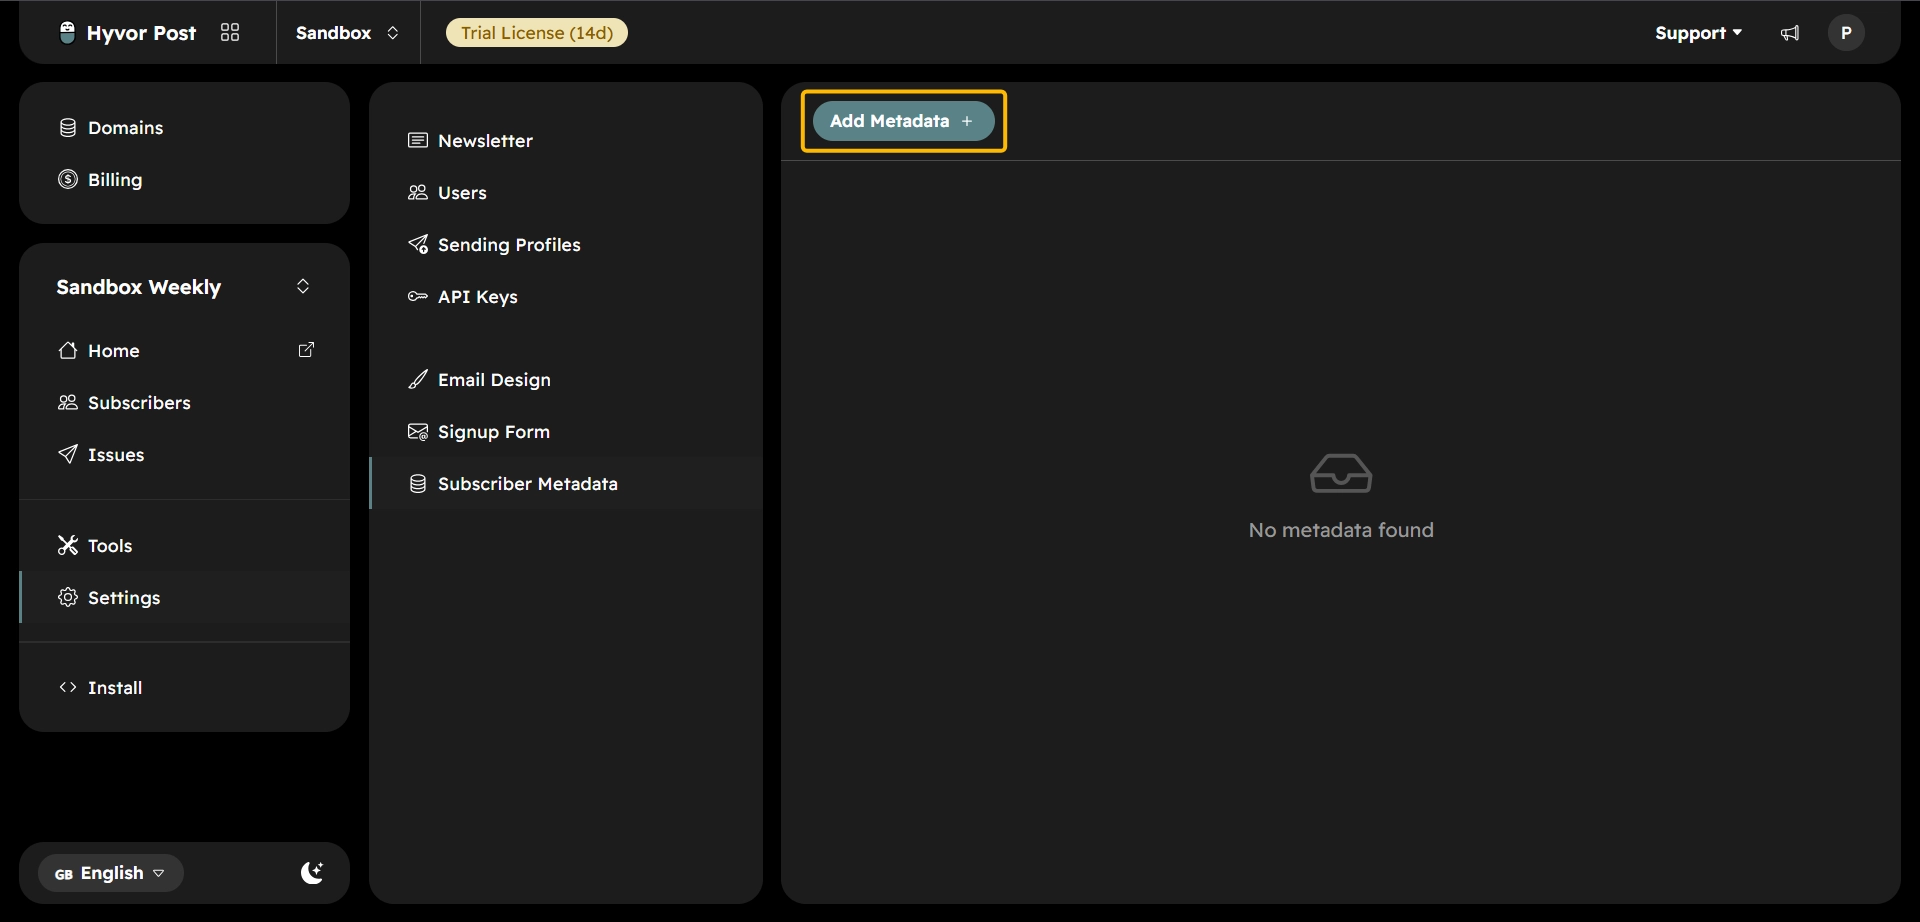
Enter a unique key and display name.
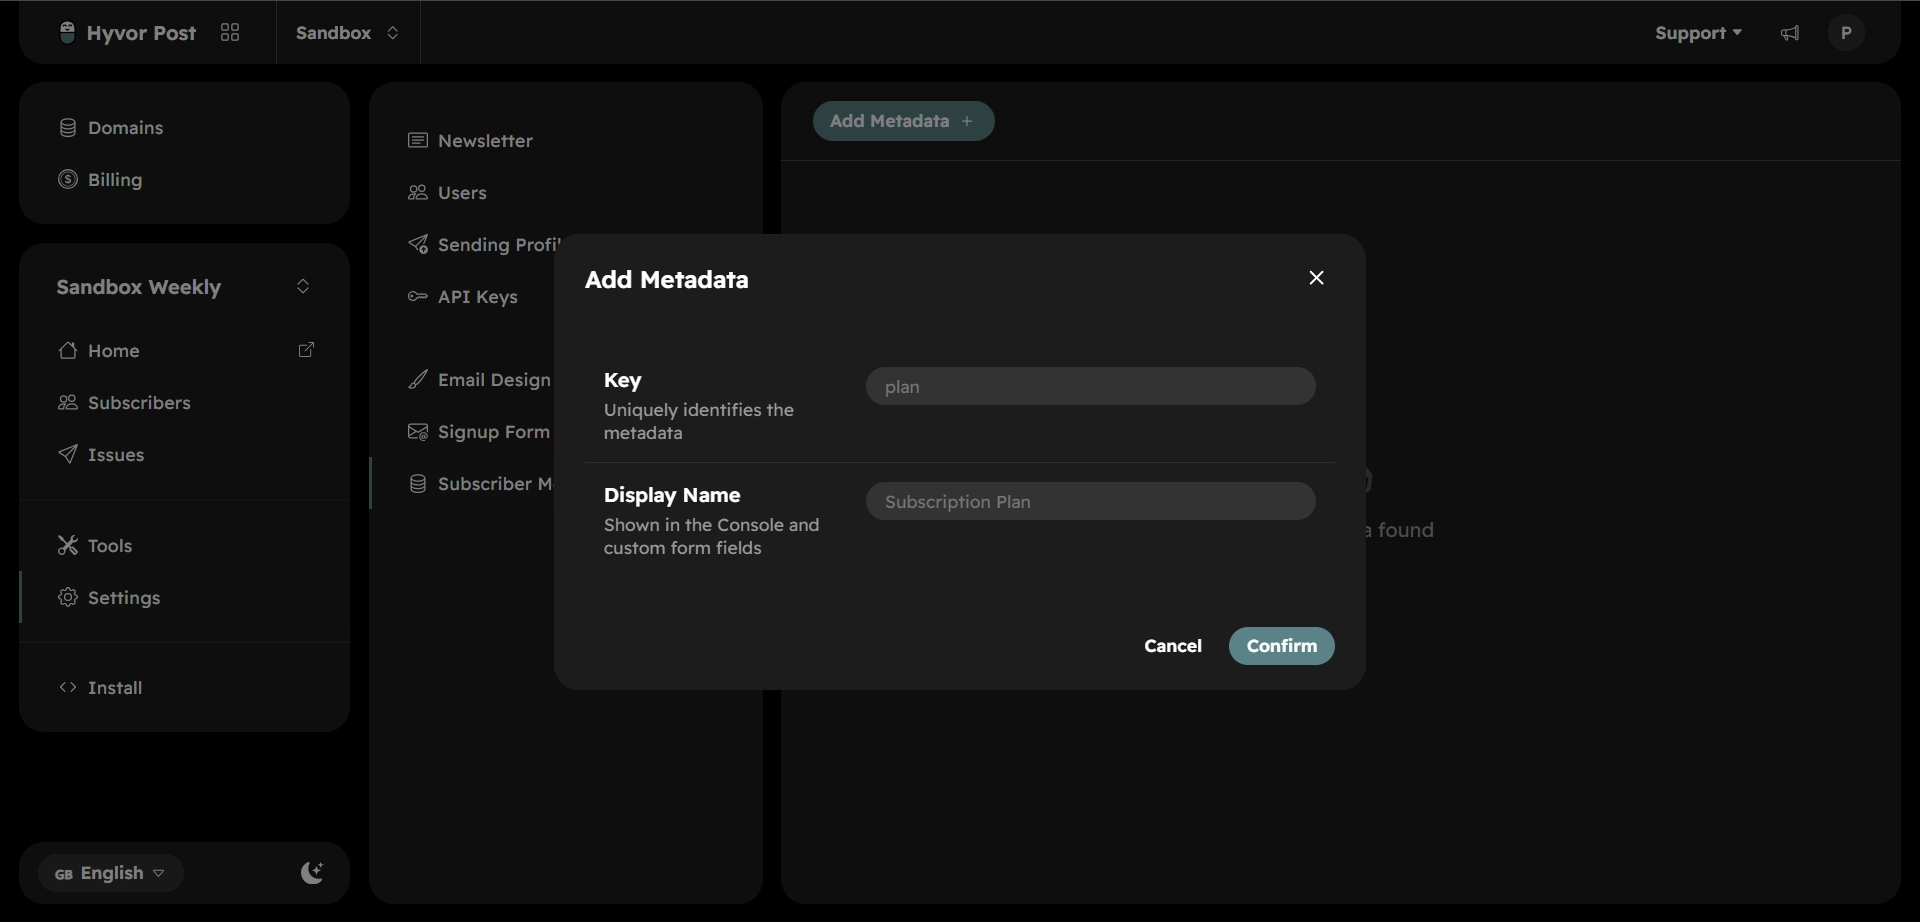
Save the field.
Create a field for every Mailchimp column you want to keep, such as first name, last name, address, etc.
Pay attention to these two mappings
Two import fields deserve special attention: Lists and Subscribed At. Both are optional, but skipping them leads to unexpected results.
If Lists isn't mapped, subscribers will be assigned to all available lists. If Subscribed At isn't mapped, Hyvor Post records the import date as the subscription date, and your original signup history is lost.
We'll map these in Step 4.
(Optional) Send from your own domain
By default, Hyvor Post sends your newsletters from a subdomain, such as yourpublication@hyvorpost.email. That works fine on its own, but if you'd rather send from your own domain, go to the Domain section, add your domain, and add the DNS record it generates to your existing DNS settings.
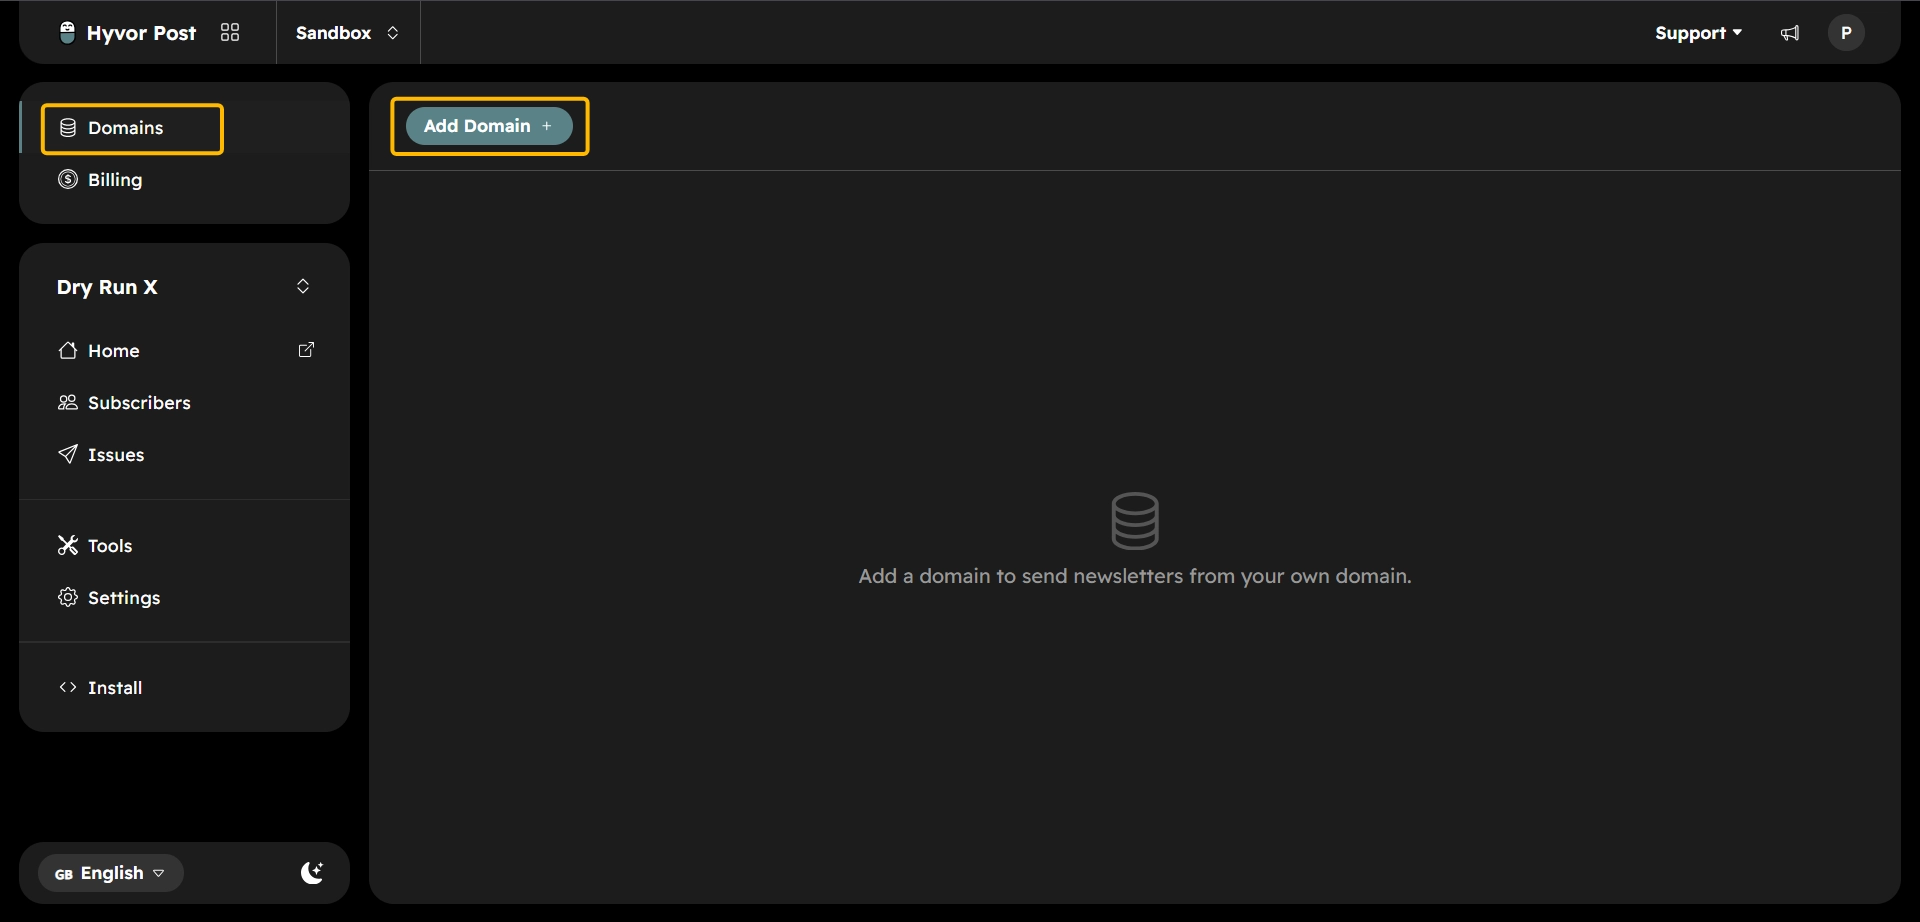
Once you verify it, you can use it to send emails from any newsletter in your organization.
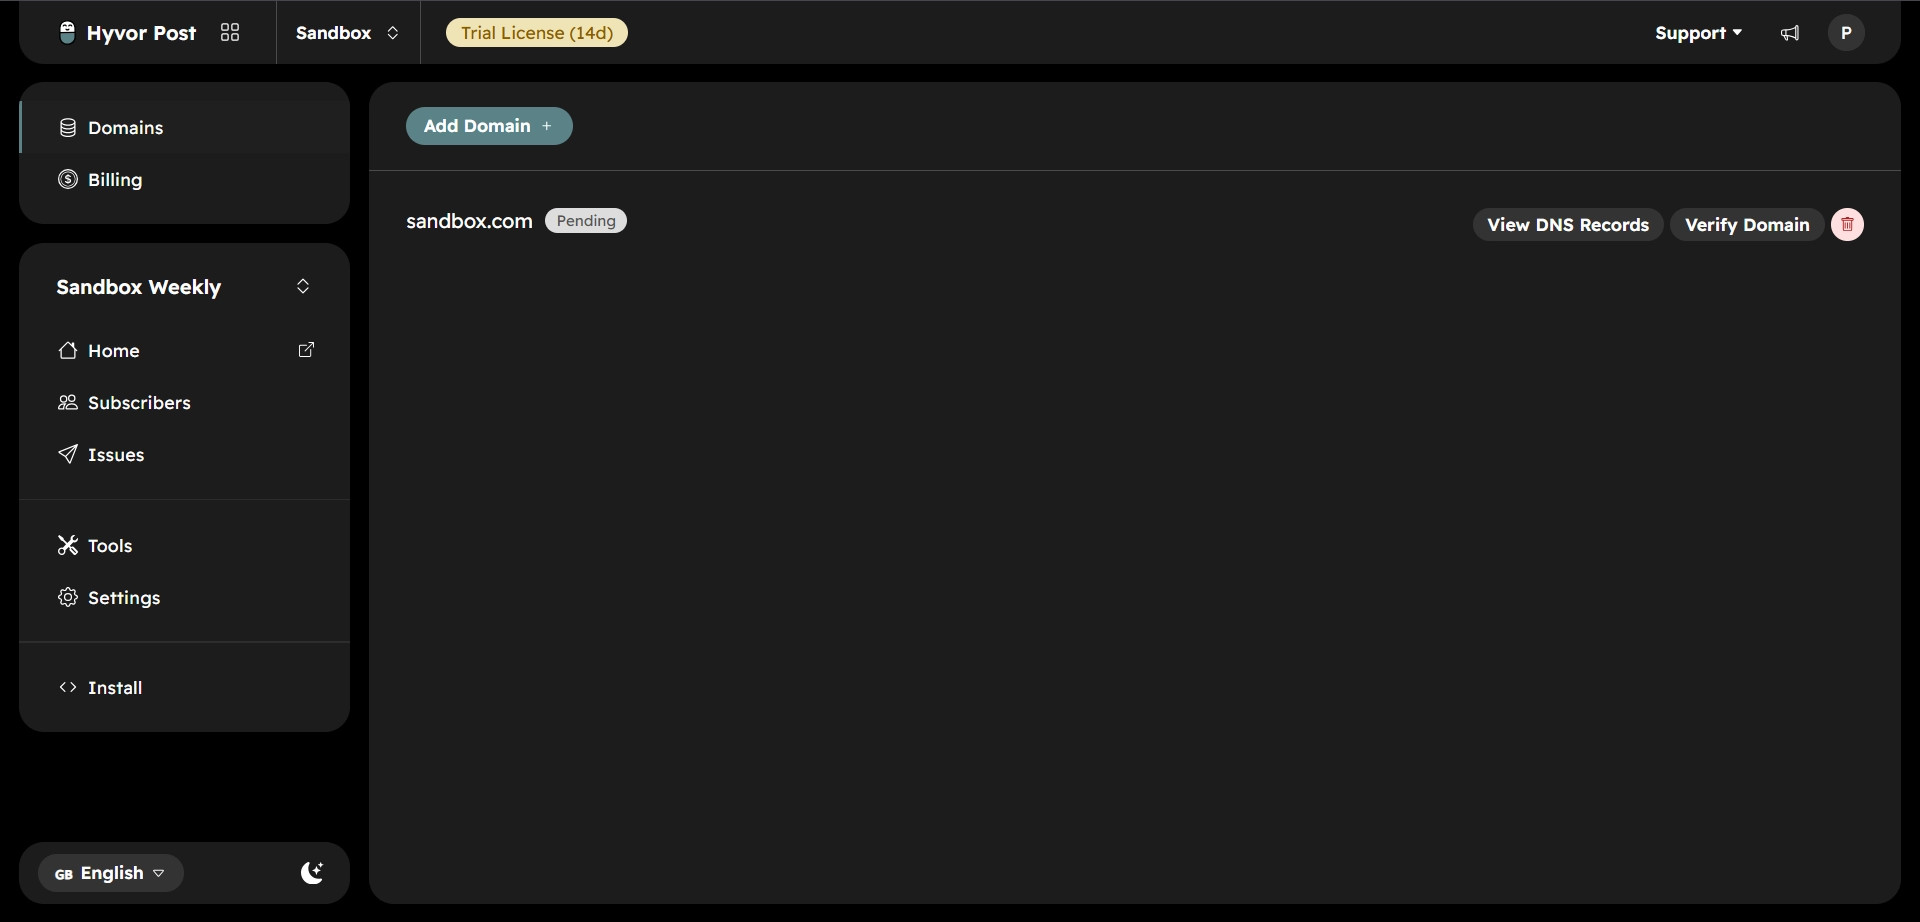
This isn't required to migrate your subscribers or to start sending, so it's fine to skip it for now and come back to it later. If you do set it up, leave extra time: DNS changes can take anywhere from a few minutes to a few hours to propagate before verification succeeds.
Step 2: Clean Your Mailchimp Audience
Migrating is a good opportunity to tidy up your mailing list. Hyvor Post imports your subscribers, but not Mailchimp's engagement history, so if you plan to remove inactive subscribers based on opens or clicks, now is the time.
Open your Mailchimp audience and consider removing invalid addresses, contacts that previously bounced, subscribers inactive for a long period, and anyone who shouldn't receive future newsletters. The exact criteria depend on how frequently you send, but it's generally better to migrate an engaged audience than an outdated one.
While you're there, look through the custom fields stored for each subscriber. Cleaning up unused columns now makes the import simpler.
If you plan to send to different groups, such as customers, event attendees, or beta users, make sure those groups exist as tags in Mailchimp, and that you've recreated the same structure in Hyvor Post lists.
Step 3: Export Your Subscribers from Mailchimp
With your newsletter ready and your audience cleaned up, you're ready to export.
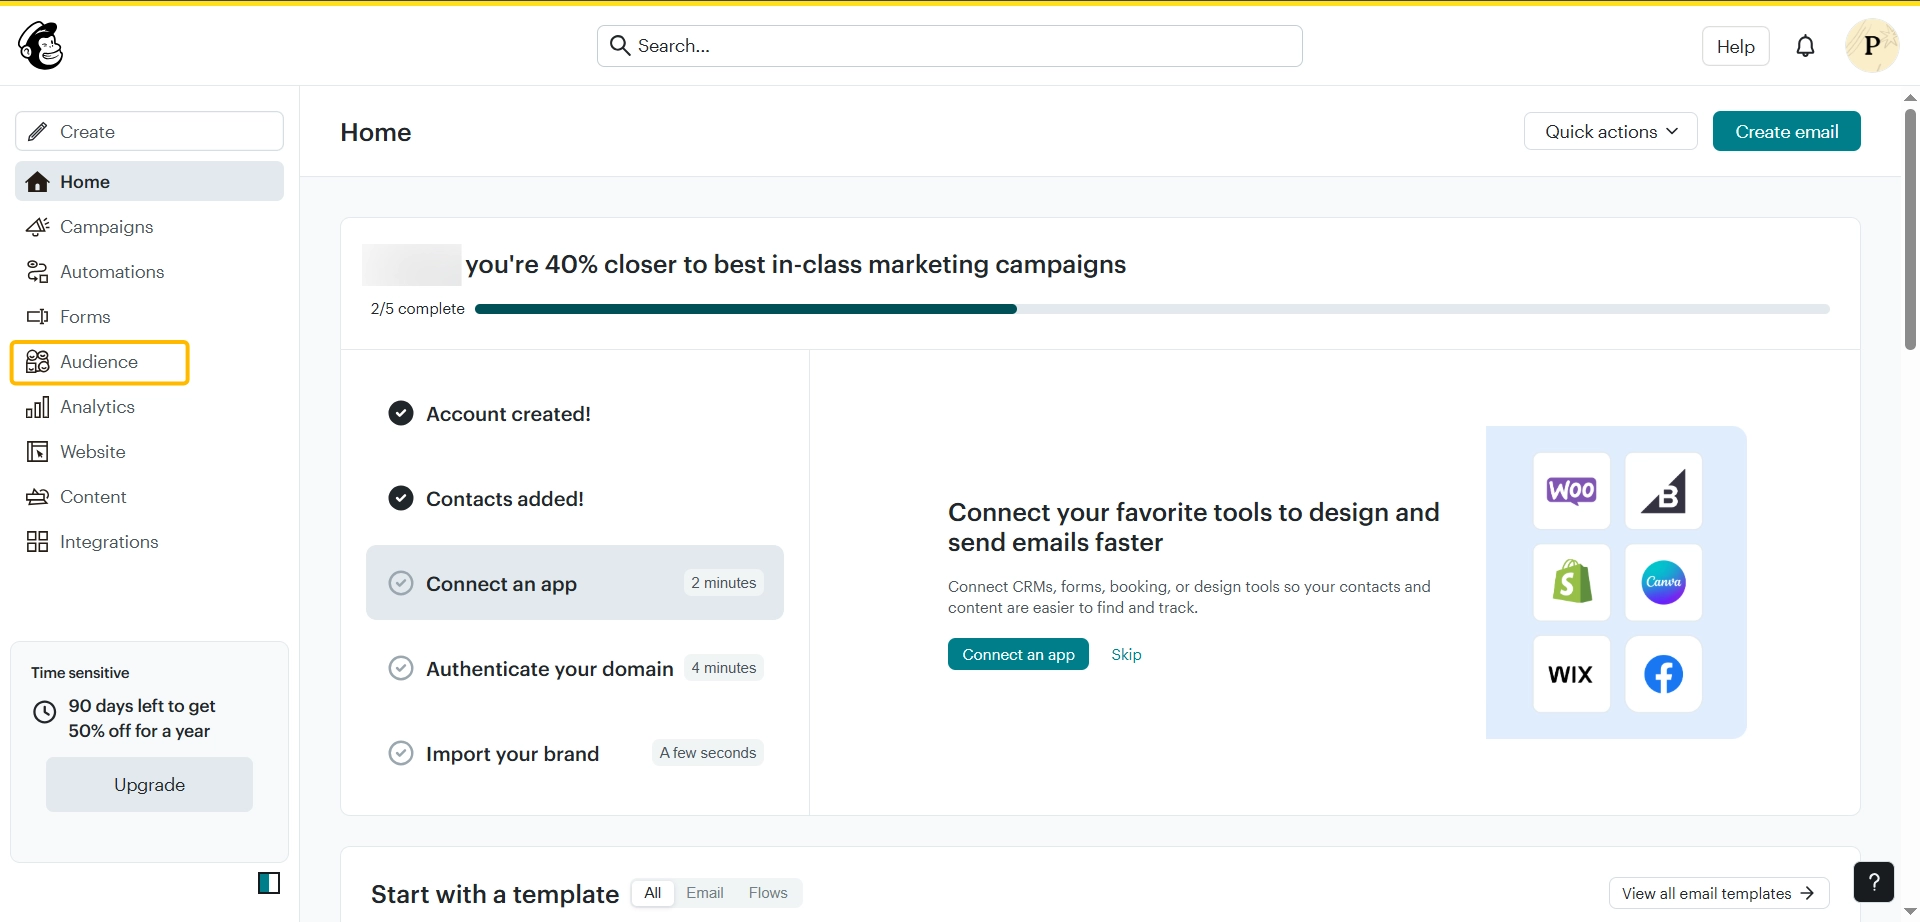
Open Audience and select the audience you want to migrate.
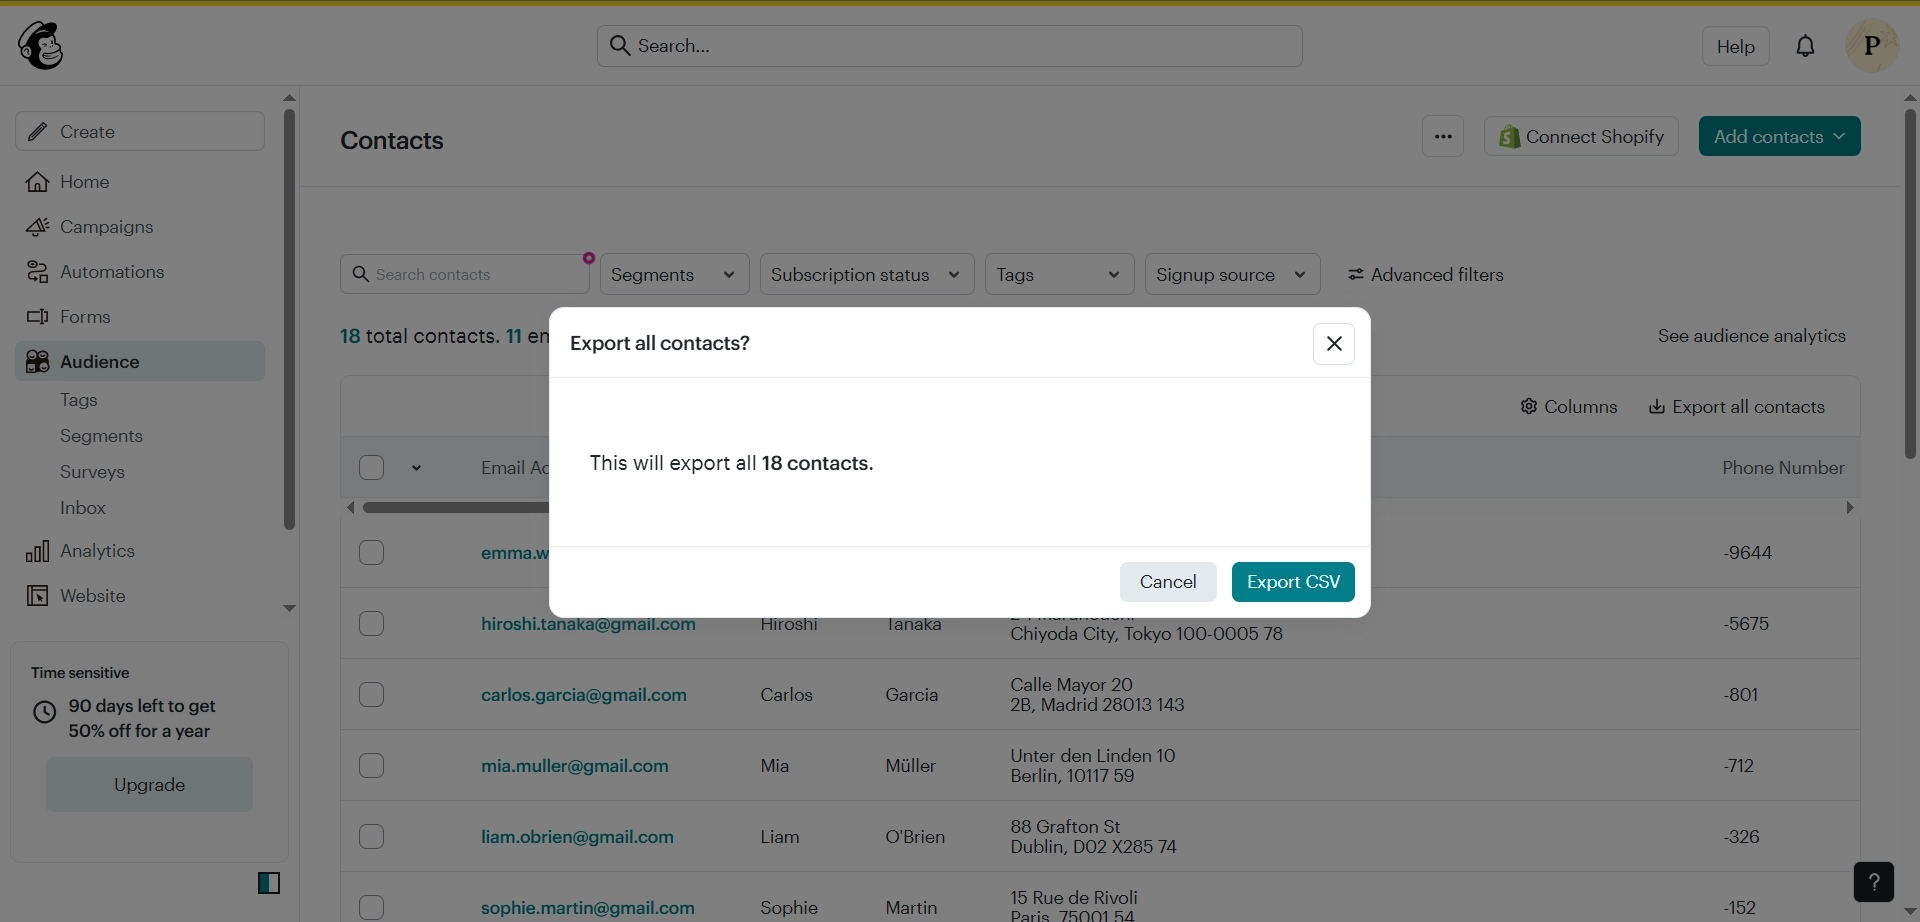
Click Export all contacts, and then Export CSV.
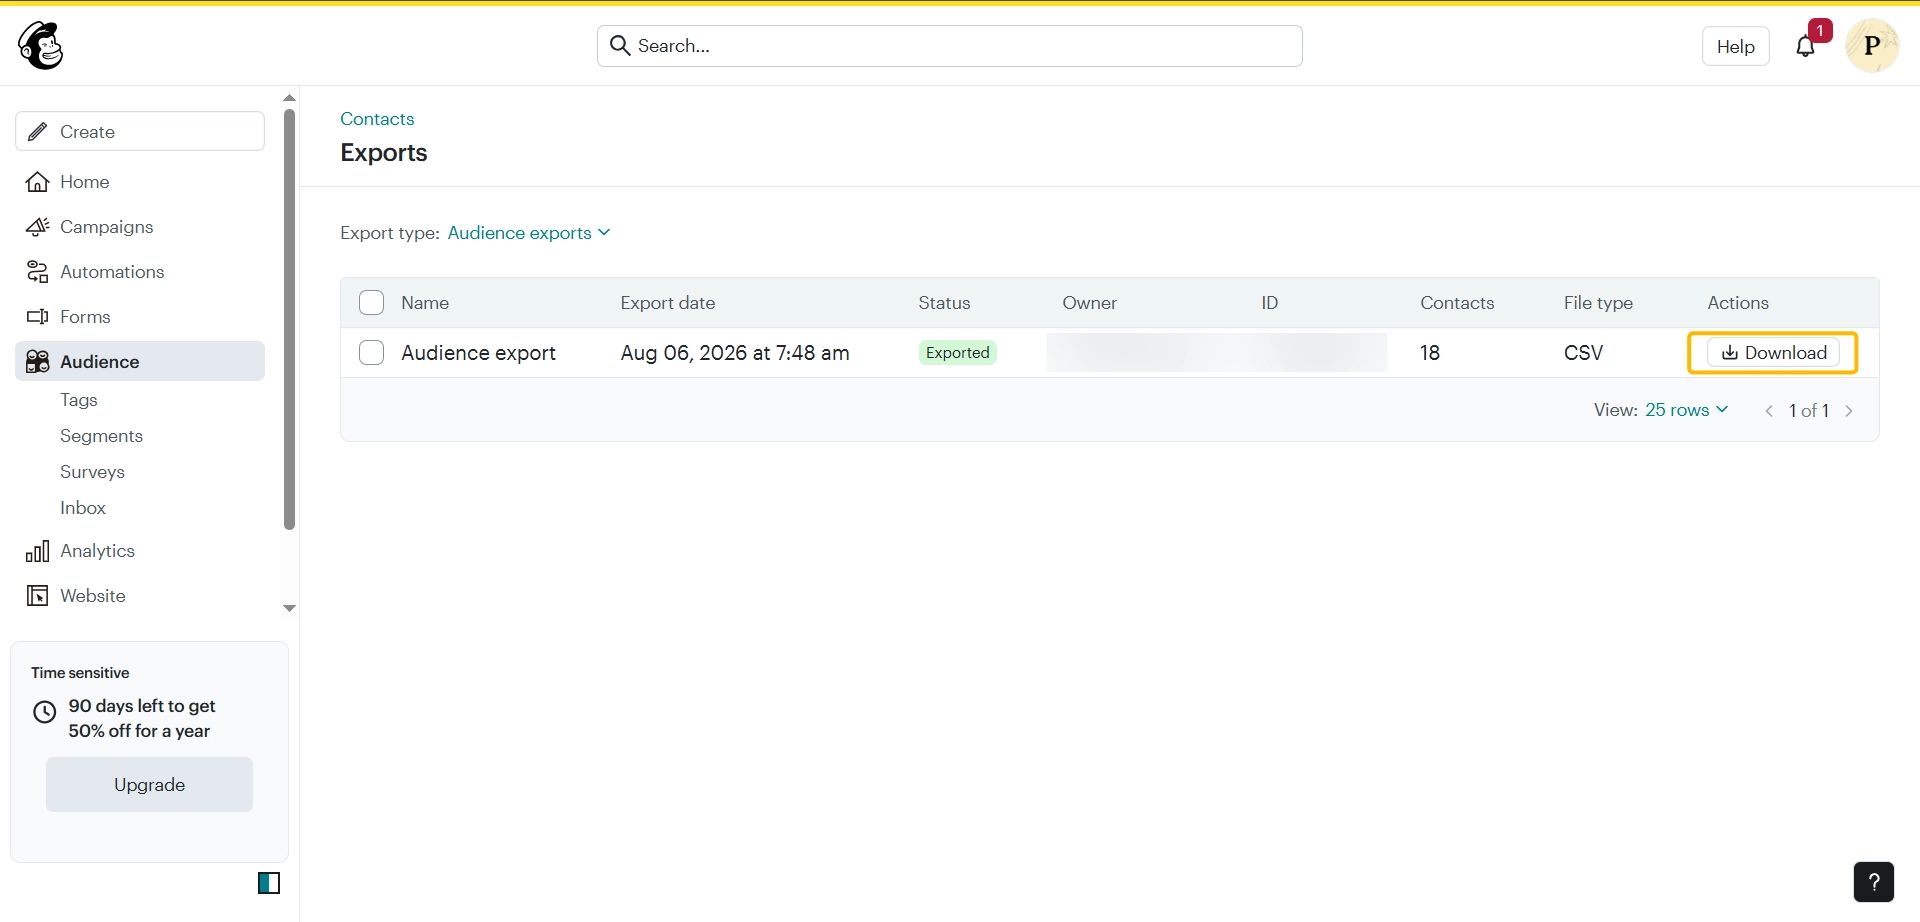
Wait while Mailchimp prepares the export.
Mailchimp generates the export in the background. Once ready, you'll receive an email with a download link, and the export will also appear in your export history.
Choose the correct CSV file
The download is a ZIP archive containing separate CSV files for different contact statuses.
File | Import? | Reason |
|---|---|---|
subscribed | Yes | Active subscribers you want to migrate |
unsubscribed | No | These contacts opted out of receiving emails |
nonsubscribed | Usually no | Contacts who never subscribed to your newsletter |
Review the CSV
Open the subscribed CSV in Excel, Google Sheets, or another spreadsheet application, and check that email addresses look correct, names appear in the expected columns, custom fields contain the expected values, and subscription dates are present.
If you find problems, it's usually easier to fix them in Mailchimp and export a fresh CSV than to edit the file manually.
Step 4: Import a Small Test Batch
Before importing your entire audience, test with a handful of subscribers. If something is mapped incorrectly, it's much easier to fix four subscribers than an entire mailing list.
Import the test file
Navigate to Tools → Import.
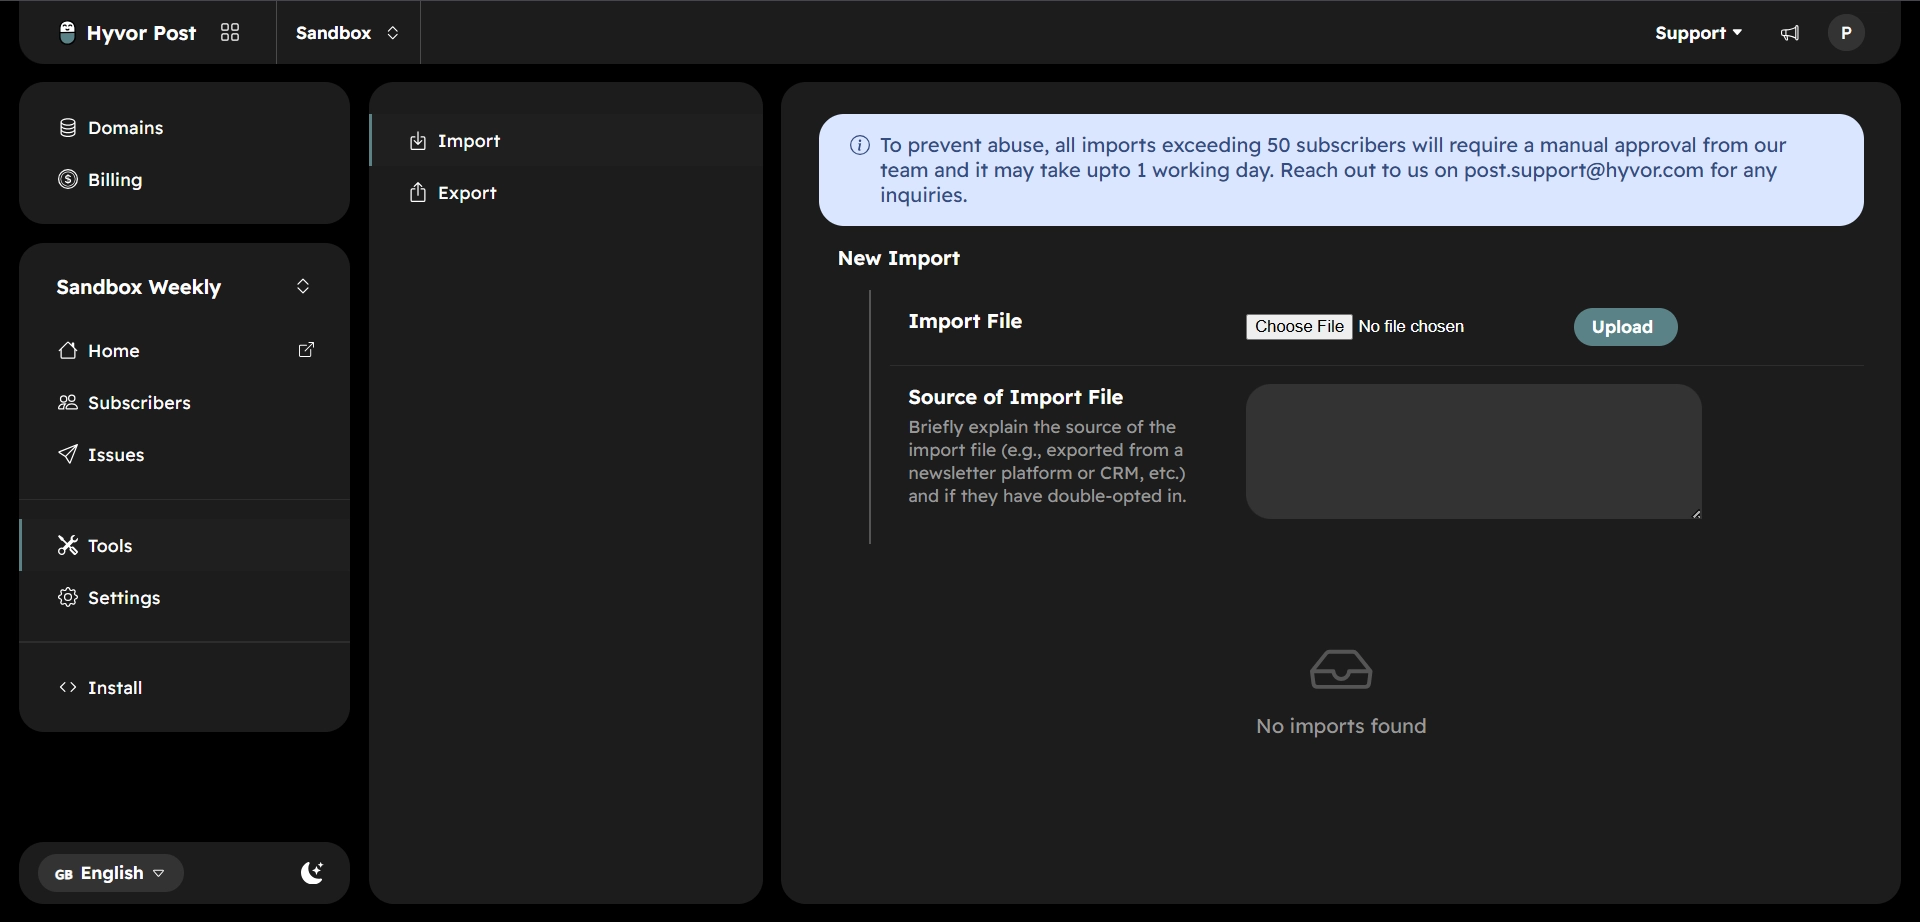
Choose your test CSV file and enter the source of the import. Then click Upload.
Map your columns
Map each CSV column to the corresponding field in Hyvor Post. At a minimum, verify these mappings:
Email → Email
Lists → TAGS
Subscribed At → OPTIN_TIME
Subscribe IP → OPTIN_IP
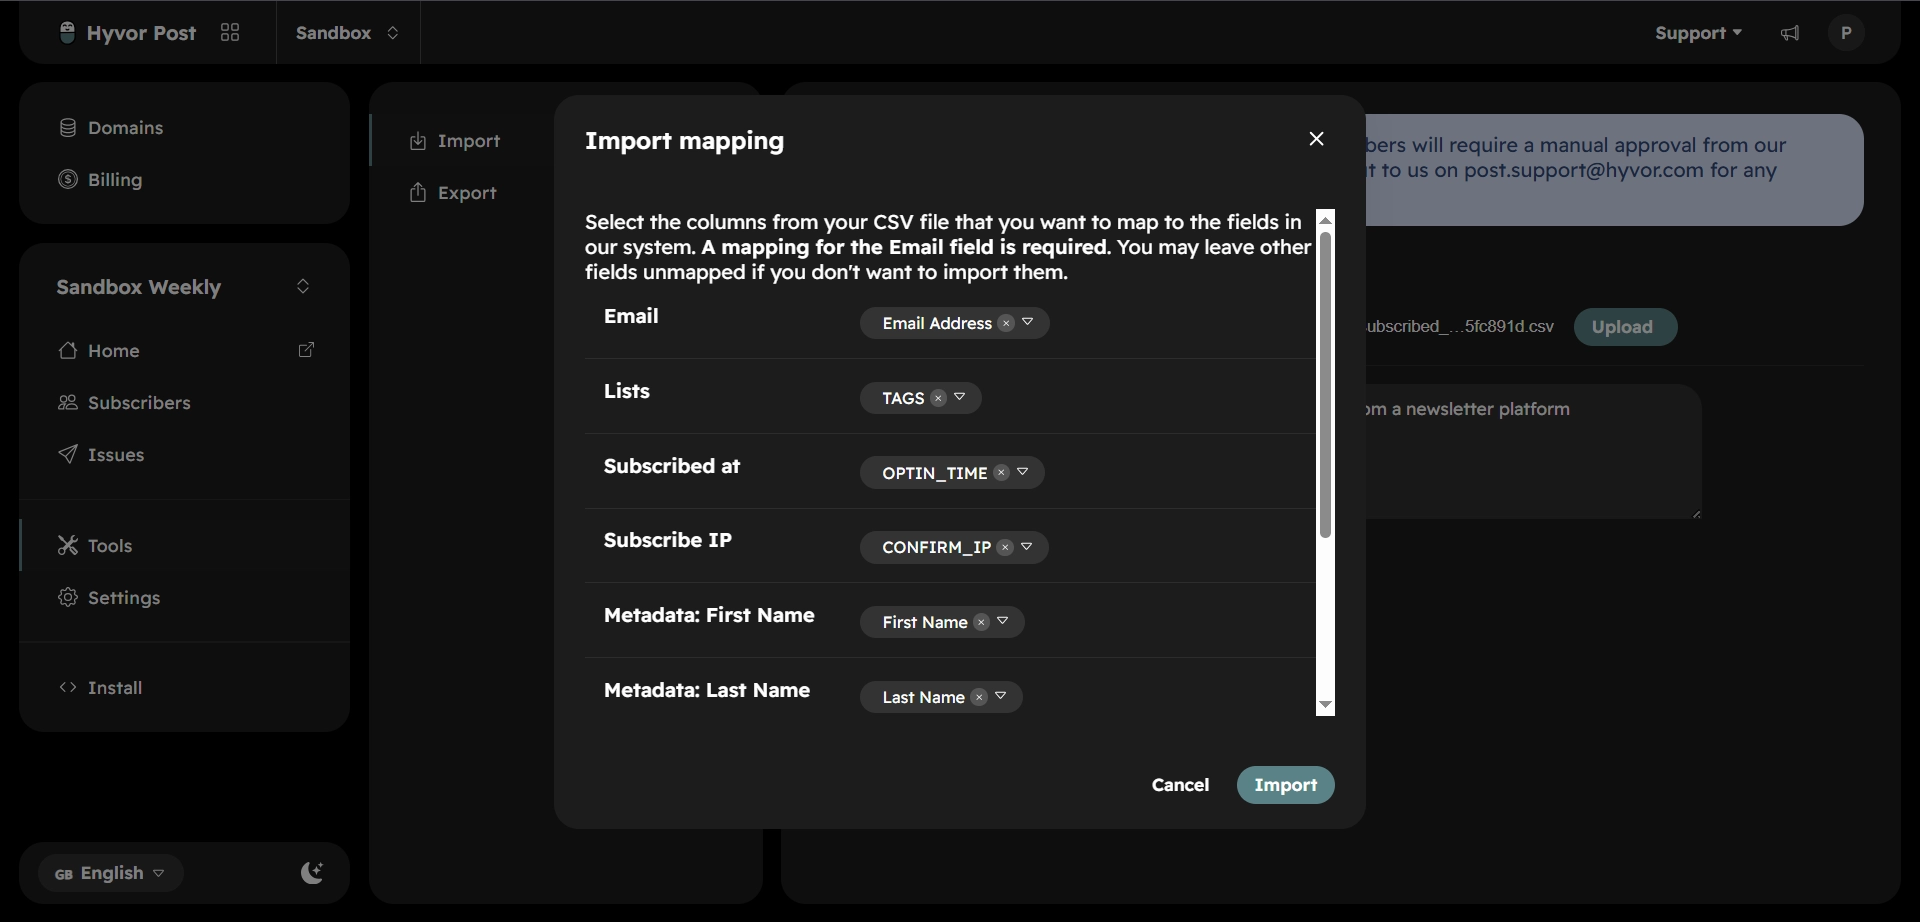
Map any additional custom fields to the metadata fields you created in Step 1, then click Import. A test import completes almost immediately.
Verify the results
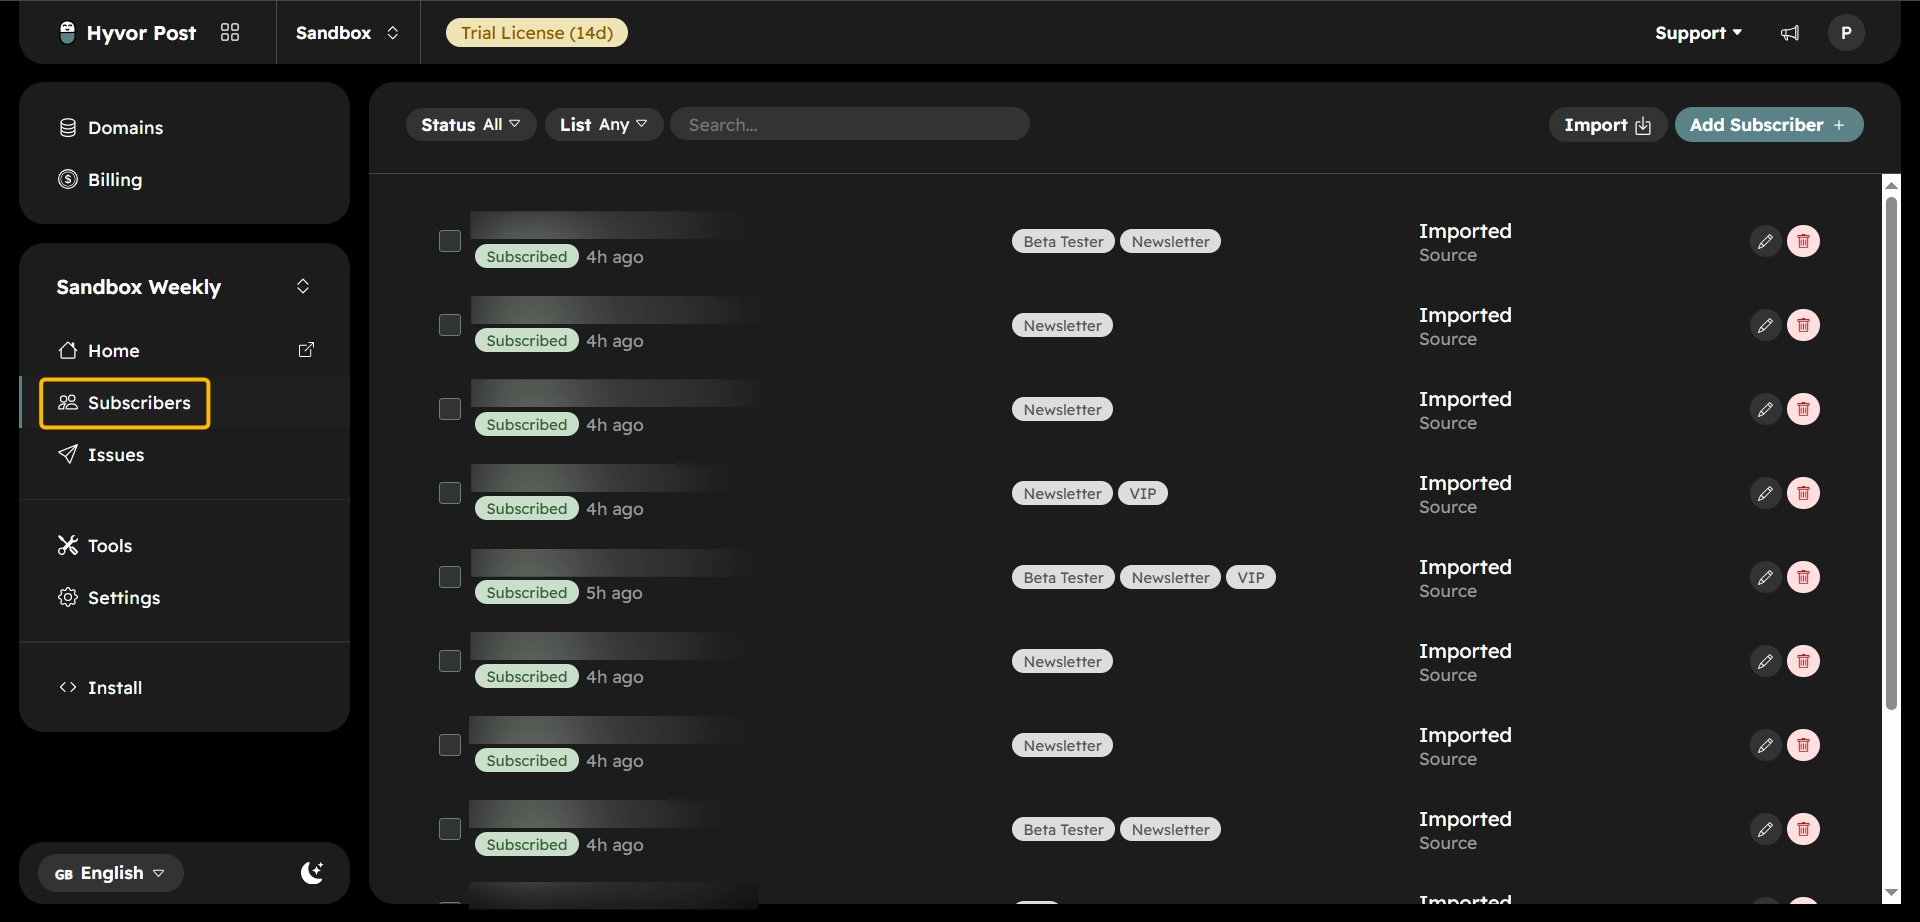
Open your Subscribers page and check each imported subscriber: names appear correctly, subscribers belong to the correct lists, and custom metadata imported correctly.
Step 5: Import Your Full Audience
Before starting, note the current number of subscribers in your newsletter. You'll use it to verify the migration afterwards.
Then repeat the process from Step 4: go to Tools → Import, upload the subscribed CSV, review the column mappings, and start the import.
Wait for approval, if required
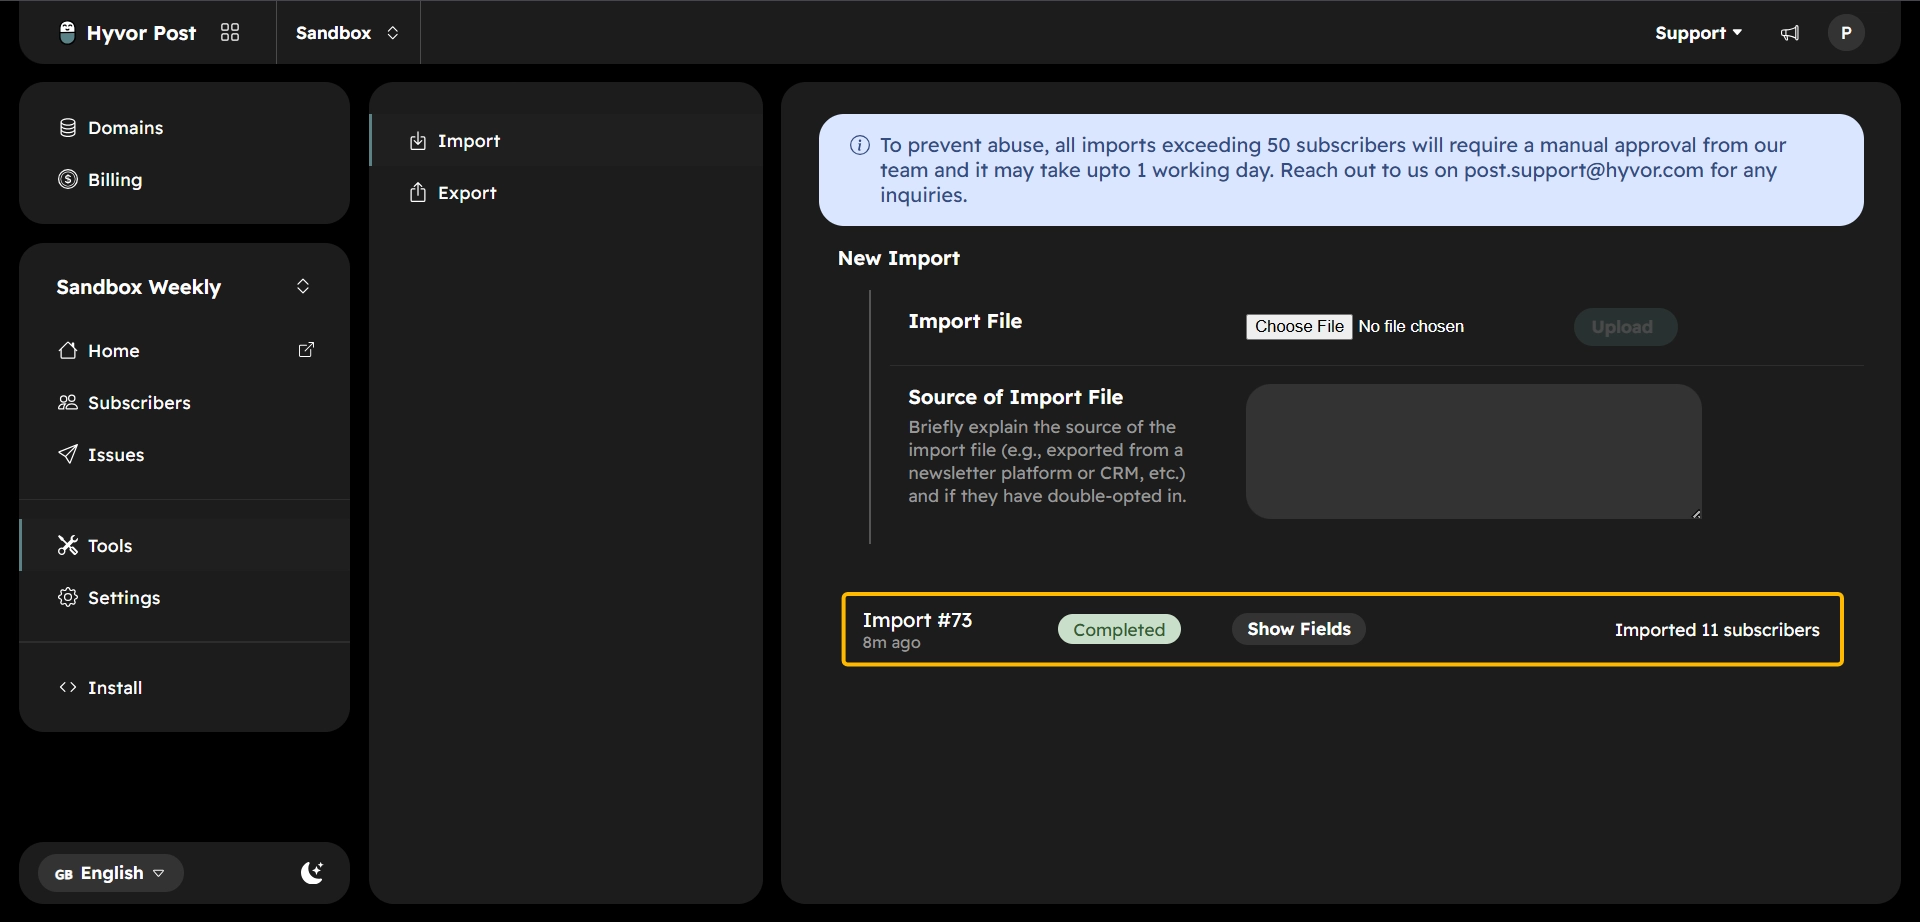
Imports of more than 50 subscribers require manual approval. Your import enters a pending state, begins automatically once approved, and can be monitored from the Import page. Approval usually takes up to one working day. If your migration is time-sensitive, contact the Hyvor Post support team.
Verify the migration
When the import finishes, check that the subscriber count matches your expectations, and that names, lists, and metadata appear as expected. It's also worth searching for a few subscribers you know well and checking their records individually.
Step 6: Replace Your Signup Forms
Your existing subscribers have been migrated. The final step is making sure future subscribers are added to Hyvor Post instead of Mailchimp.
This is one of the most commonly overlooked parts of a migration. If your website continues using Mailchimp signup forms, new subscribers will keep being added to your old audience even after you've migrated.
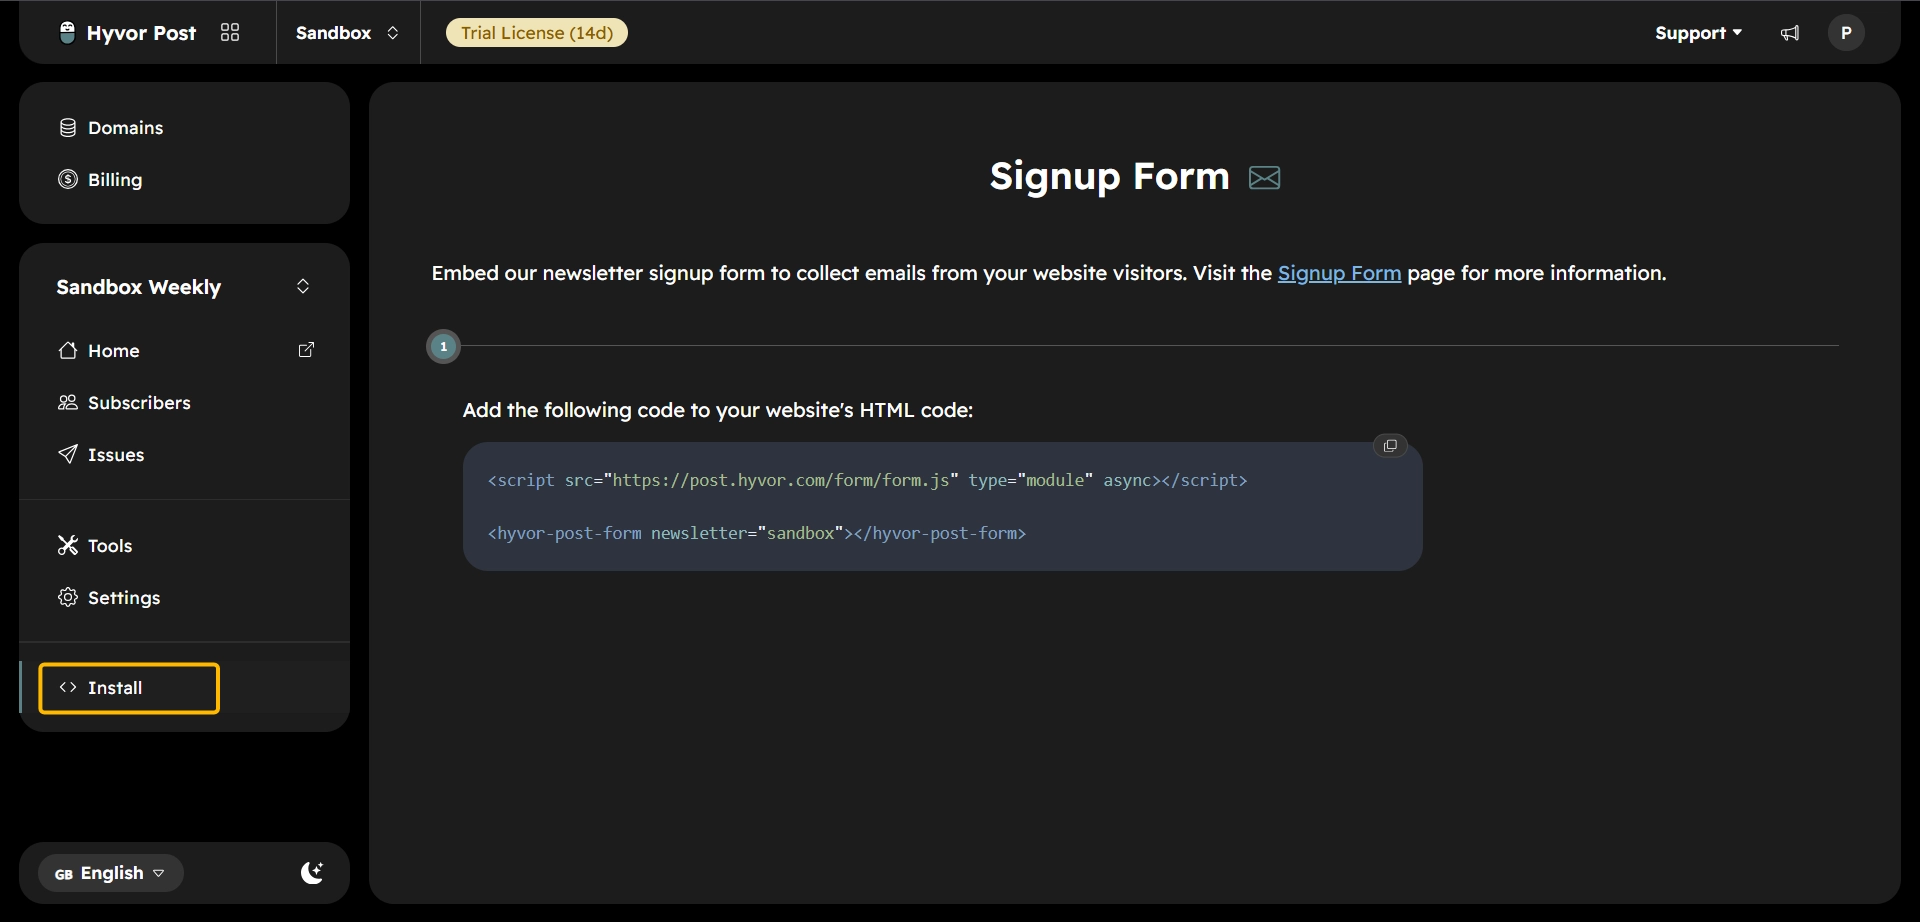
Embed the Hyvor Post signup form
You can embed Hyvor Post's signup form on your website by adding the code in the Install section into your website's HTML code.
Replace your existing forms
Update every location where visitors can subscribe: your website, landing pages, blog sidebars and footers, newsletter popups, contact pages, link-in-bio pages. Where you're using embedded Mailchimp forms, replace the embed code with the new code from Hyvor Post.
Capture subscribers who joined during the migration
If people subscribed while you were migrating, they exist only in Mailchimp. Export your audience again and import the updated CSV. Hyvor Post matches subscribers by email address, so existing subscribers are updated rather than duplicated.
Always use a fresh export for this second import. Re-importing an older CSV may overwrite newer subscriber information with outdated data.
Test your new signup form
Subscribe using your own email address through your website. Verify that the subscriber appears in Hyvor Post, joins the expected list, has their metadata captured, and that the confirmation process works. This confirms your website is now connected to Hyvor Post rather than Mailchimp.
What Doesn't Migrate from Mailchimp to Hyvor Post
Migrating your subscribers is only part of the process. Some Mailchimp features don't have direct equivalents in Hyvor Post.
Email templates - Custom templates built in Mailchimp's editor, including merge tags, aren't transferred. You'll need to recreate them before sending your first newsletter.
Automations - Welcome emails, onboarding sequences, and other customer journeys don't migrate automatically. Recreate them separately after your subscriber migration is complete.
Campaign history - Previous campaigns remain in your Mailchimp account. If you'd like to keep a record of past newsletters, export or archive them before closing your account.
Engagement history and analytics - Hyvor Post doesn't track opens or clicks, and no engagement history is transferred. Only the subscriber information included in your CSV export is imported.
Troubleshooting Common Migration Issues
Problem | Possible Cause | Solution |
|---|---|---|
No subscribers were imported | The Email column wasn't mapped | Repeat the import with Email mapped |
Subscriber names are missing | Metadata fields weren't created before importing | Create the fields, then import again |
Subscribers appear in the wrong lists | The Lists column wasn't mapped correctly | Correct the mapping and repeat the import |
Some subscribers are missing | Invalid or malformed email addresses were skipped | Review the CSV for invalid rows, or export a fresh copy |
New subscribers still appear in Mailchimp | Old signup forms or integrations are still active | Replace every form and update any integrations that add subscribers |
Frequently Asked Questions
Can I start sending newsletters immediately after migrating?
Yes. Once your newsletter has an active subscription, you can begin sending immediately. Even without one, you can create your newsletter, import subscribers, draft newsletters, and send test emails to yourself.
Are subscriber email addresses shared with third parties?
No. Emails sent through Hyvor Post are delivered using Hyvor Relay, HYVOR's first-party email delivery service. Subscriber email addresses aren't shared with third-party email providers.
Can I import subscribers more than once?
Yes. Hyvor Post identifies subscribers by email address, so existing subscribers are updated rather than duplicated. For best results, always import a fresh export from Mailchimp.
Final Migration Checklist
Before cancelling your Mailchimp account, make sure you've completed the following.
Prepare
Created your Hyvor Post newsletter
Recreated your subscriber lists
Created metadata fields for custom subscriber information
Export and import
Cleaned your Mailchimp audience
Exported the correct subscribed CSV
Completed a successful test import
Imported your full subscriber list
Verified subscriber counts and sample records
Website
Replaced Mailchimp signup forms
Tested a new subscription from your website
Final checks
Sent yourself a test newsletter
Verified that new subscribers appear in Hyvor Post
Saved a backup of your Mailchimp export
Archived any campaigns or templates you want to keep
Conclusion
Migrating from Mailchimp to Hyvor Post is a straightforward process when completed in the right order. By preparing your newsletter first, testing your import with a small batch of subscribers, and replacing your signup forms before retiring Mailchimp, you can move your newsletter without losing important subscriber information.
Take a few minutes for the final checks above before cancelling your Mailchimp account. Once you're satisfied that the migration is complete, you can confidently continue growing your newsletter with Hyvor Post.

Comments