Buttondown is a strong product built for independent creators, complete with paid subscriptions, tipping, and open and click tracking. Those are real strengths if you need them. But what if you don't? What if you're a team sending a straightforward newsletter, with no interest in charging subscribers or watching who opens what? This is where Hyvor Post comes in. We're a focused, independent alternative built around privacy and simplicity. As a small team based in France building a tight-knit product, we care deeply about every detail, including making sure your experience switching to us is a good one.
This guide walks you through how to migrate from Buttondown to Hyvor Post: setting up your newsletter, exporting and importing your subscribers, replacing your signup form, and checking everything landed correctly before you close your Buttondown account.
- Before you read further: paid subscriptions
- Why switch from Buttondown to Hyvor Post?
- Before you begin
- Step 1: Set up your Hyvor Post newsletter
- Step 2: Export your subscribers from Buttondown
- Step 3: Import a small test batch
- Step 4: Import your full list
- Step 5: Replace your signup form
- What doesn’t migrate from Buttondown to Hyvor Post
- Troubleshooting common migration problems
Before you read further: paid subscriptions
Hyvor Post does not support paid newsletters. If you run paid subscriptions through Buttondown, the paid side of your newsletter has nowhere to go. You can still migrate your subscribers’ email addresses, but their payment status and premium access will not come with them.
If that applies to you, it is better to know now than after five steps of work.
Why switch from Buttondown to Hyvor Post?
Buttondown does a lot well, and if you need paid subscriptions, tipping, or tracking, it is still the better choice. Teams that migrate from Buttondown to Hyvor Post usually do it for the opposite reason: they want less, not more. Here is what actually differs:
Tracking is absent rather than optional. Buttondown lets you turn open and click tracking on or off. Hyvor Post has no tracking at all, with no setting to enable it. That’s a property of the platform, not a choice a future admin could reverse.
Email goes out through first-party infrastructure. Hyvor built its own delivery system, Hyvor Relay, rather than routing through a third-party provider.
Built with teams in mind. Multiple newsletters under one account, subscriber metadata for segmentation, team collaboration, and an API. It suits a company newsletter better than a one-person paid publication, since it has no paid-subscription tier at all.
If you rely on Buttondown features that Hyvor Post does not have, staying put is a perfectly reasonable decision. If you mostly want a clean, private way to email a list, the rest of this guide is for you.
Before you begin
A little preparation makes it easier to migrate from Buttondown to Hyvor Post without repeating steps later.
Prerequisites. A Buttondown account, a Hyvor Post account, and access to the website where your signup form is embedded. If you want to send from your own domain rather than the default subdomain, you will also need access to your DNS settings.
Prepare Hyvor Post before exporting. Hyvor Post stores subscriber information differently from Buttondown. Create your lists and metadata fields first, so your data has somewhere to land.
Large imports need approval. Imports of more than 50 subscribers are reviewed manually, usually within a working day. You don’t need to wait: set up your newsletter, create your metadata fields, and run a small test import while the full one queues.
Buttondown deletes some subscribers on a timer. With subscriber cleanup enabled by default, unsubscribed and blocked subscribers are removed after 7 days, unactivated and complained ones after 30. Your export is only a snapshot.
Keep your original export. Store the CSV somewhere safe before you edit anything. It is your backup if you need to start over.
Step 1: Set up your Hyvor Post newsletter
Doing this first saves you from importing twice.
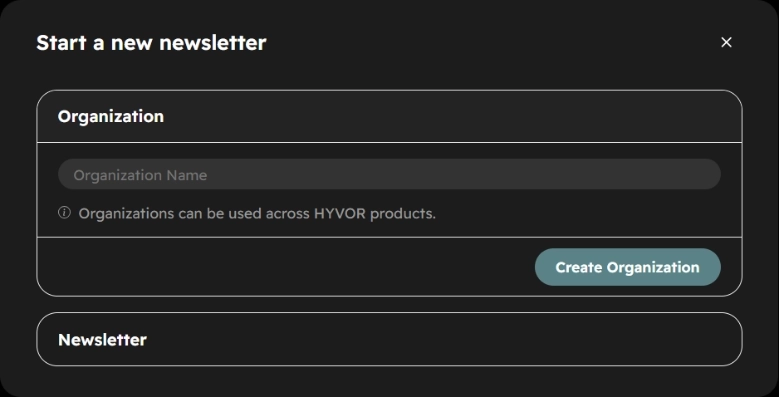
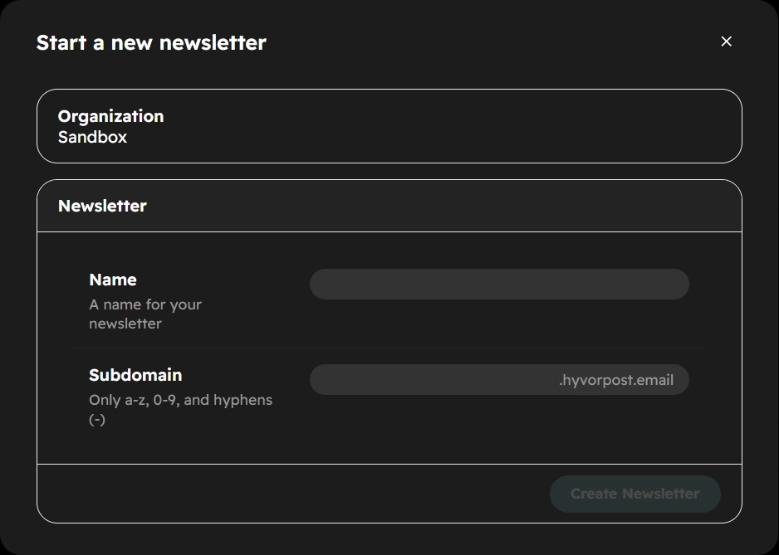
Create your newsletter
Create your Hyvor Post account and set up a newsletter. During setup you will configure your organization name, newsletter name, and newsletter subdomain.
Create your lists in Hyvor Post
Buttondown organises subscribers with tags; Hyvor Post uses lists for the same job. Your tags become lists during the import.
Open your Tags page in Buttondown and note down every tag you use. Then create a matching list in Hyvor Post for each one.
Click Create List in the Hyvor Post console.
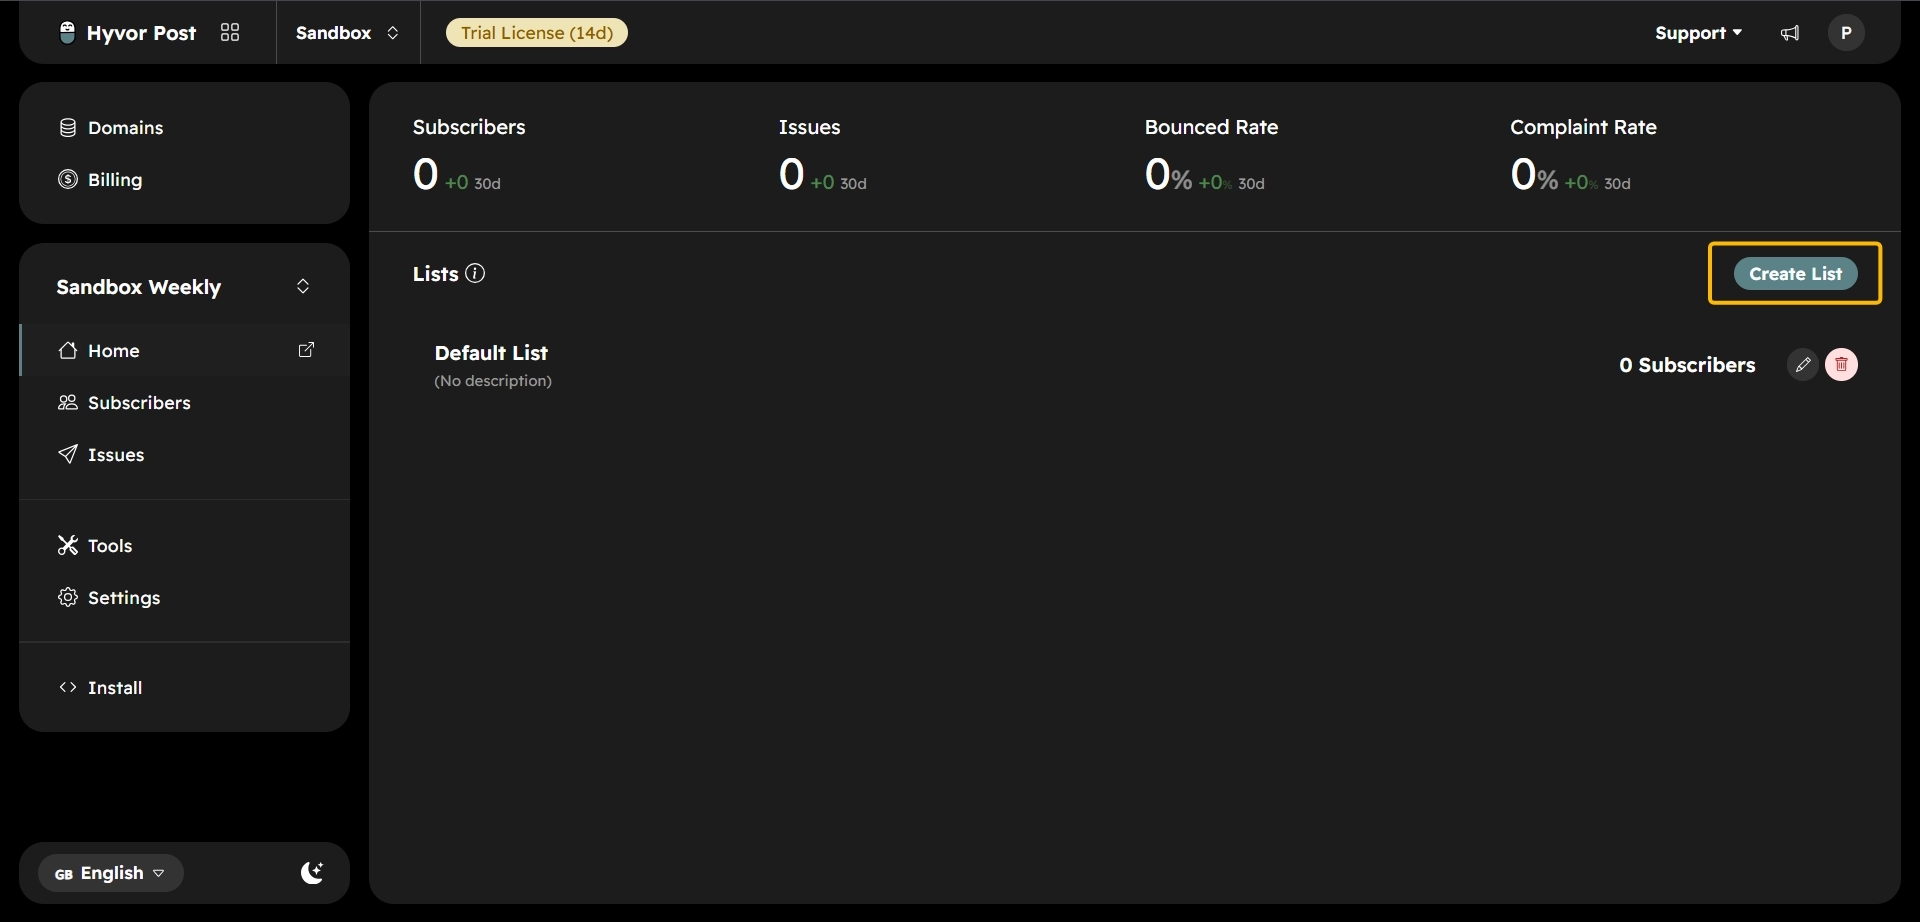
Enter a name and, optionally, a description.
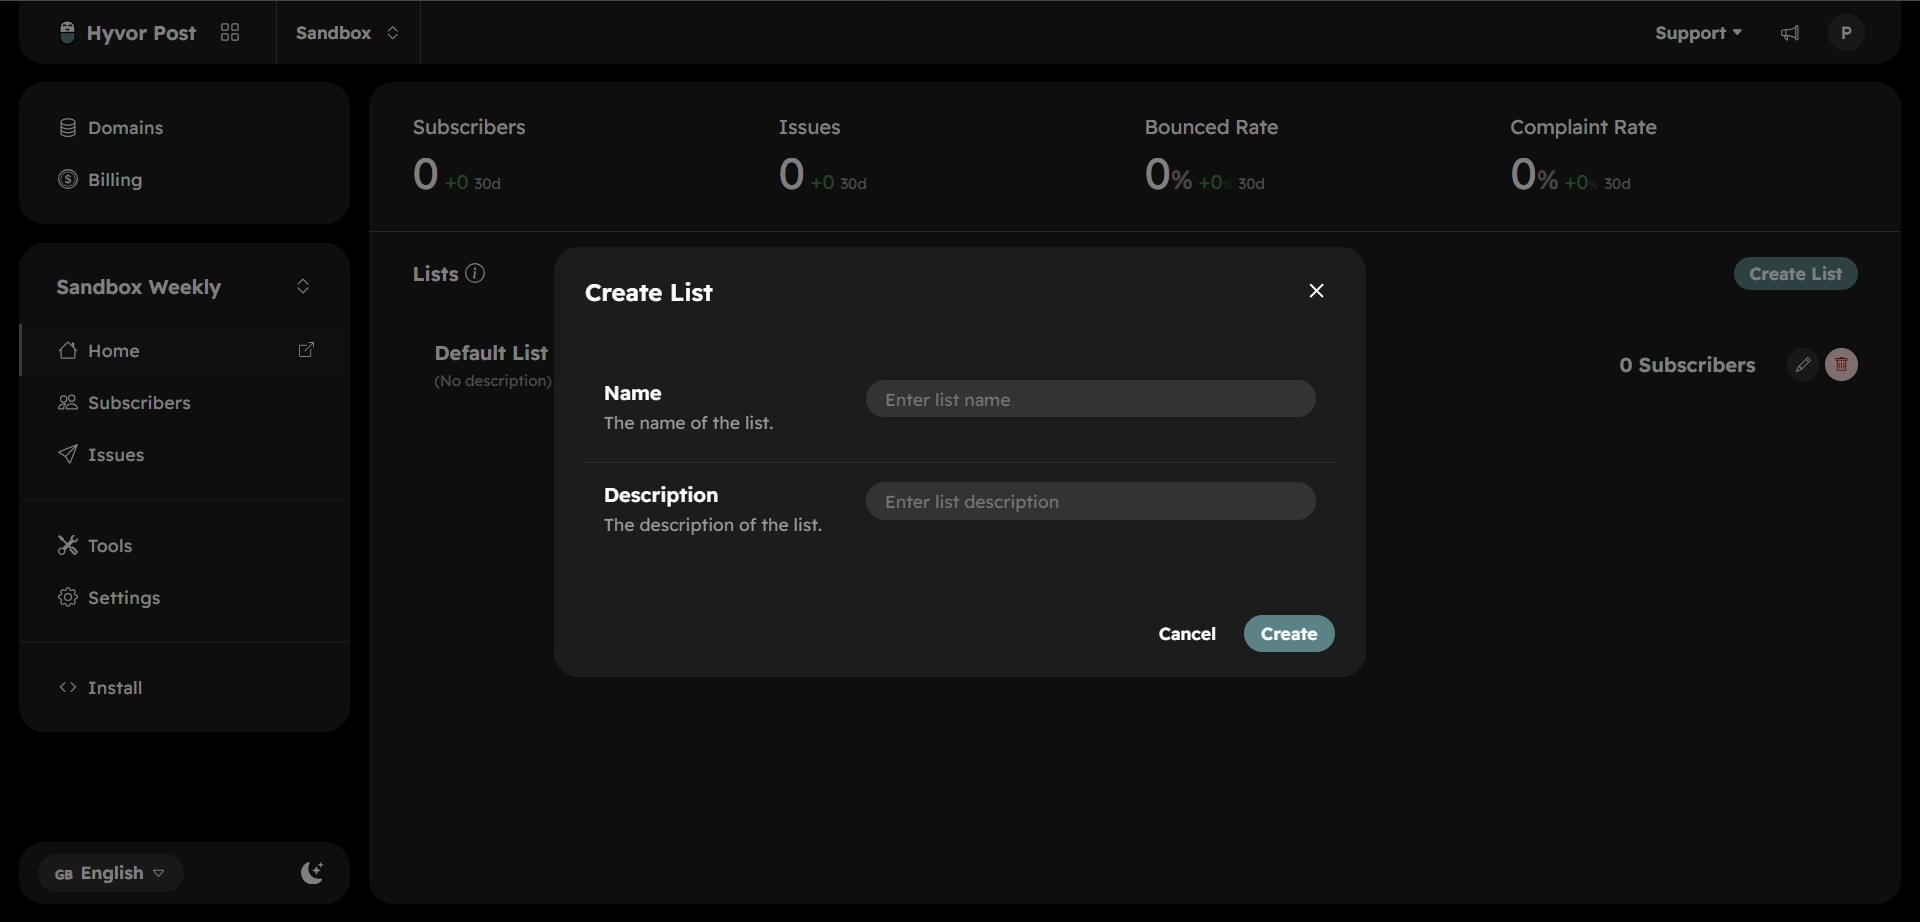
Save the list.
Use exactly the same spelling and capitalisation as your Buttondown tags. It makes the mapping step easier to check.
Create your subscriber metadata fields
Buttondown stores extra subscriber details, such as names, as metadata. Hyvor Post uses the same term, with one restriction: you can only map a column to a metadata field that already exists.
Open Settings → Subscriber Metadata → Add Metadata.
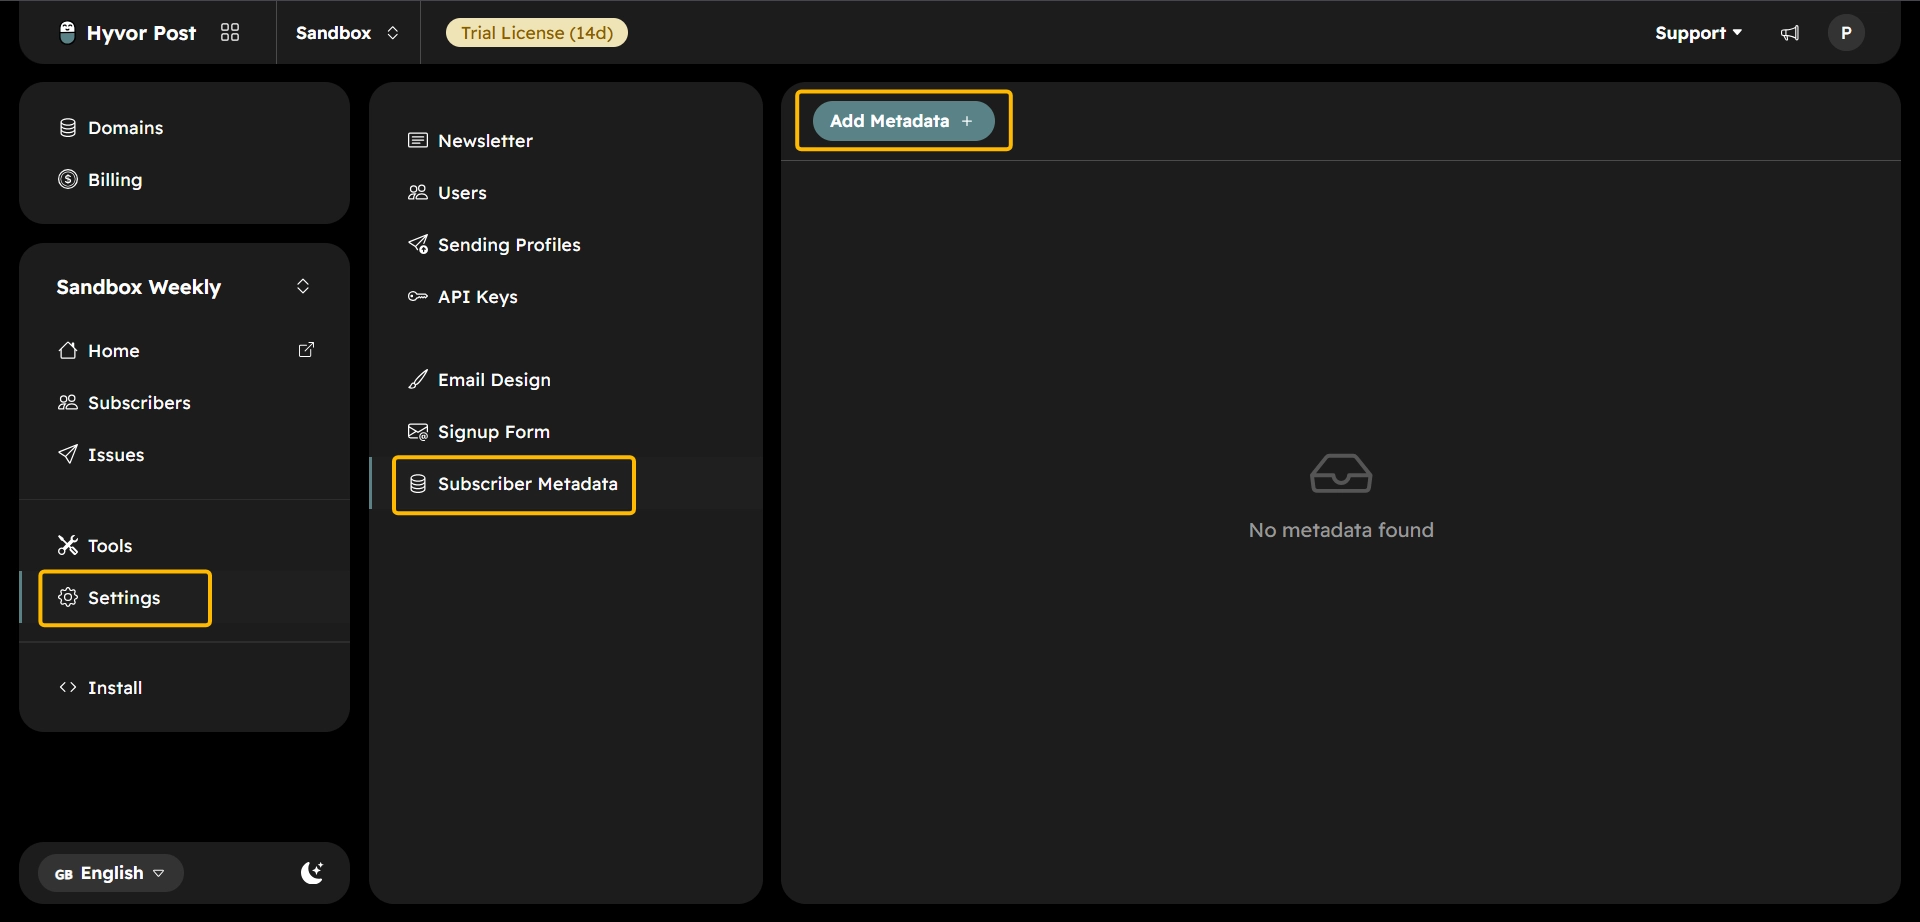
Enter a unique key and a display name.
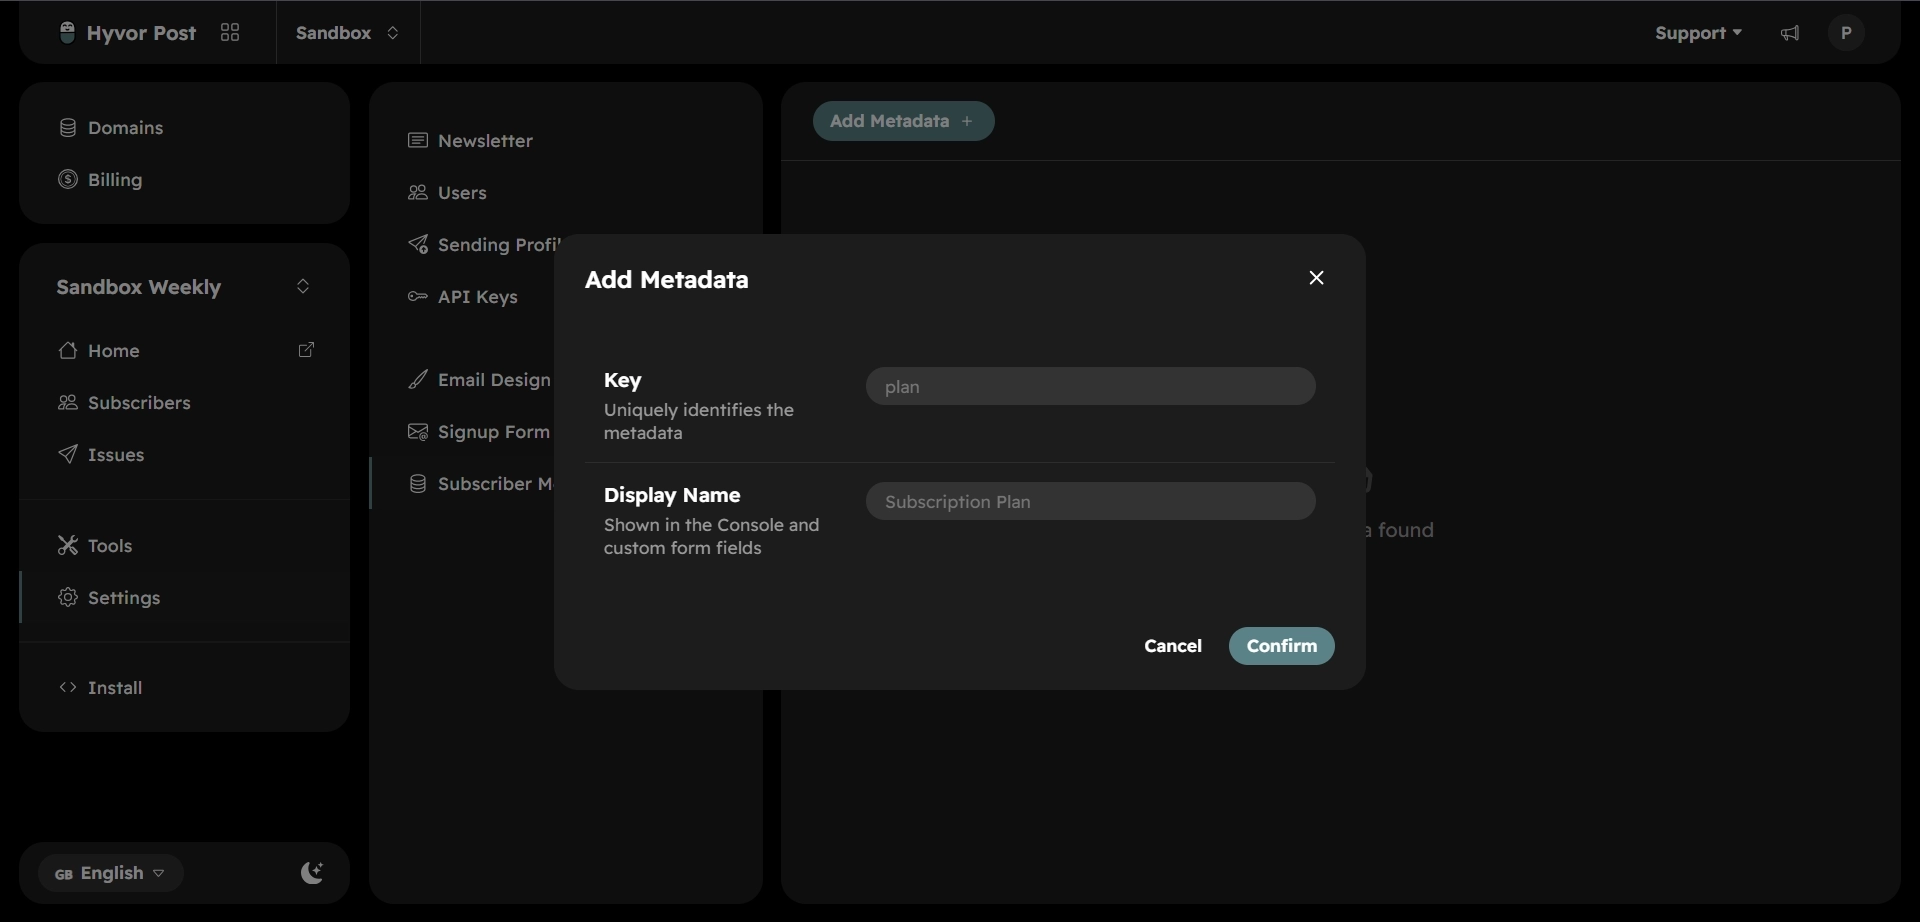
Save the field.
Create a field for every piece of information you want to keep. Check a subscriber record in Buttondown first, since your export will have one column per metadata key.
Two mappings to pay attention to
Two fields in Hyvor Post’s import are optional but cause trouble when skipped. Unmapped Lists assigns subscribers incorrectly; unmapped Subscribed At uses the import date instead of the real one, and your signup history is gone.
We’ll map both in Step 3.
Optional: send from your own domain
By default your newsletters send from a subdomain, like your-subdomain@hyvorpost.email. To use your own domain instead, open the Domain section, add it, and add the DNS record it generates to your DNS settings, then verify it there.
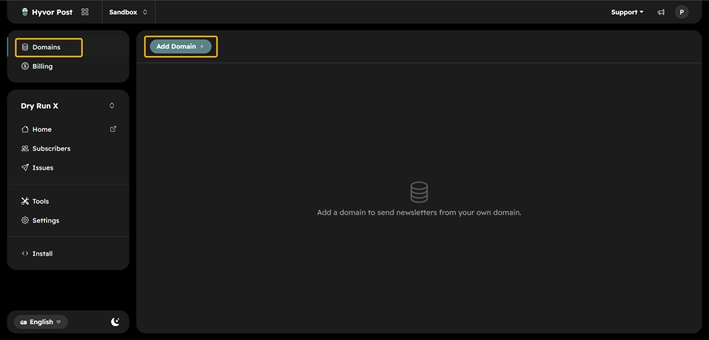
Once you verify it, you can use it to send emails from any newsletter in your organization.
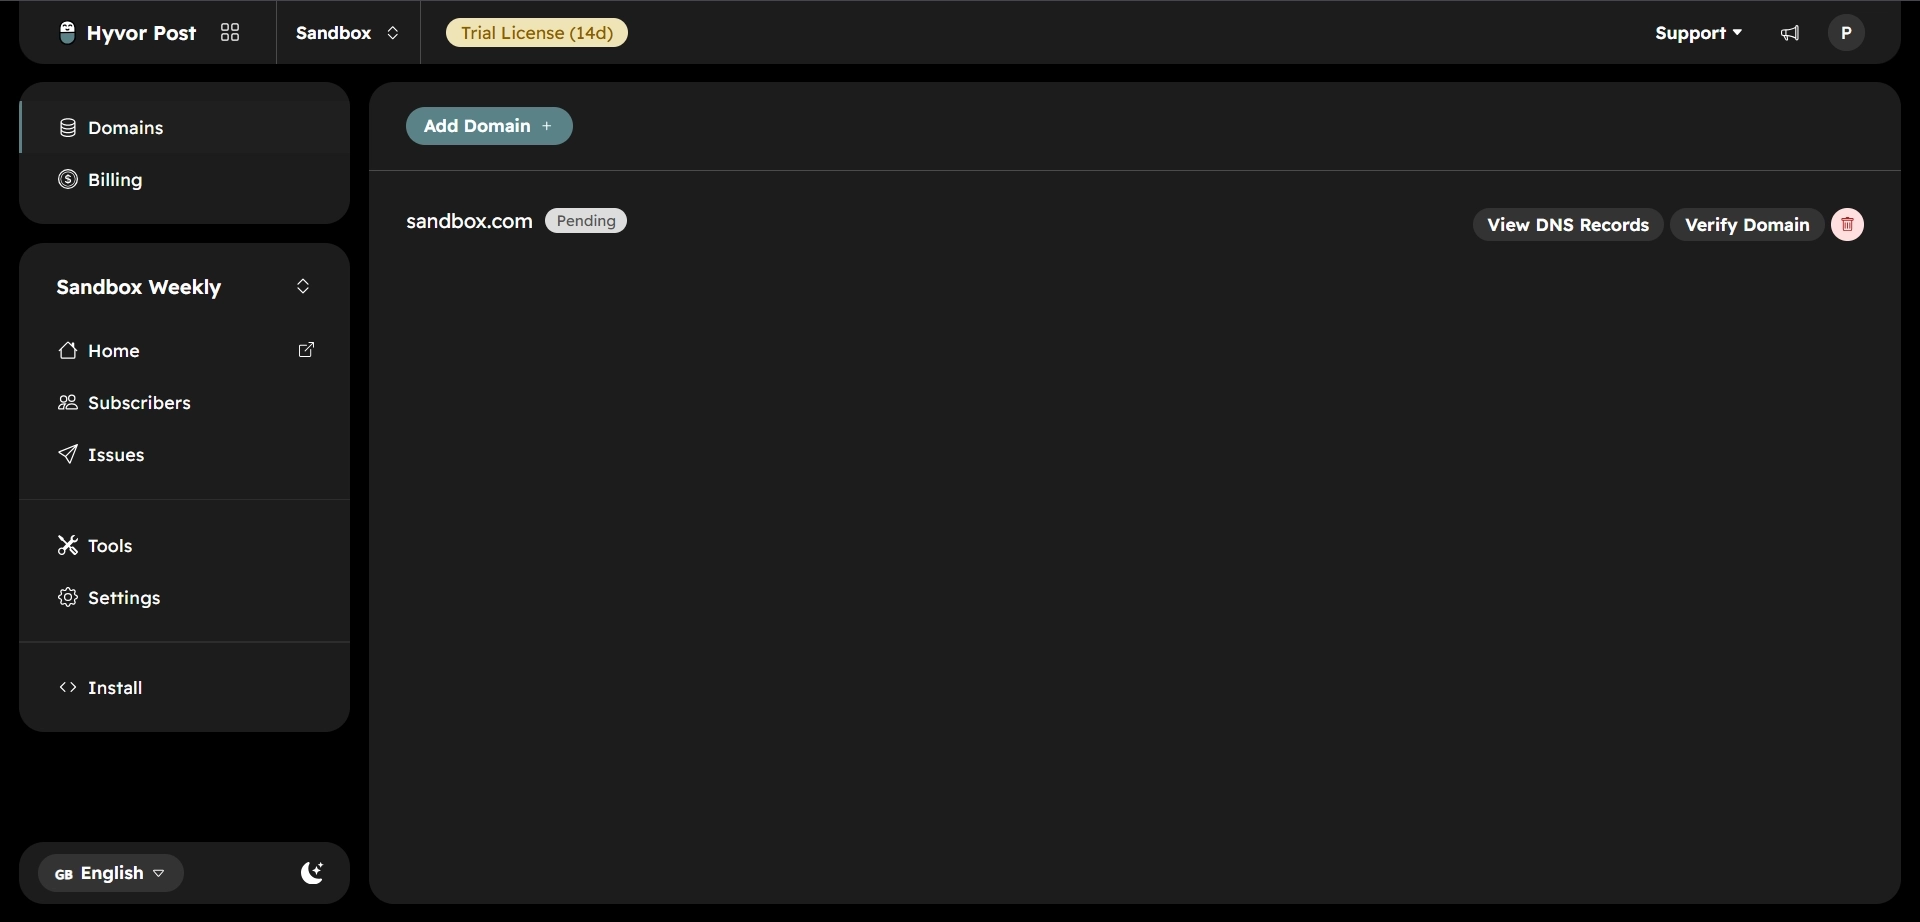
This isn’t required to migrate or start sending test emails, so it’s fine to return to later. DNS changes can take minutes to hours to propagate.
Step 2: Export your subscribers from Buttondown
This is where most of the work happens, and it is mostly clicking.
Filter to active subscribers first
Buttondown keeps everyone in one subscriber list: active people alongside anyone who unsubscribed, bounced, or never confirmed, distinguished by subscriber type. Export without filtering and you will email people who unsubscribed, which is illegal in most countries.
The fix is a filter, applied before you export.
Open your Subscribers page in Buttondown. Then filter by subscriber type, selecting Regular. Confirm the subscriber count shown matches what you expect.
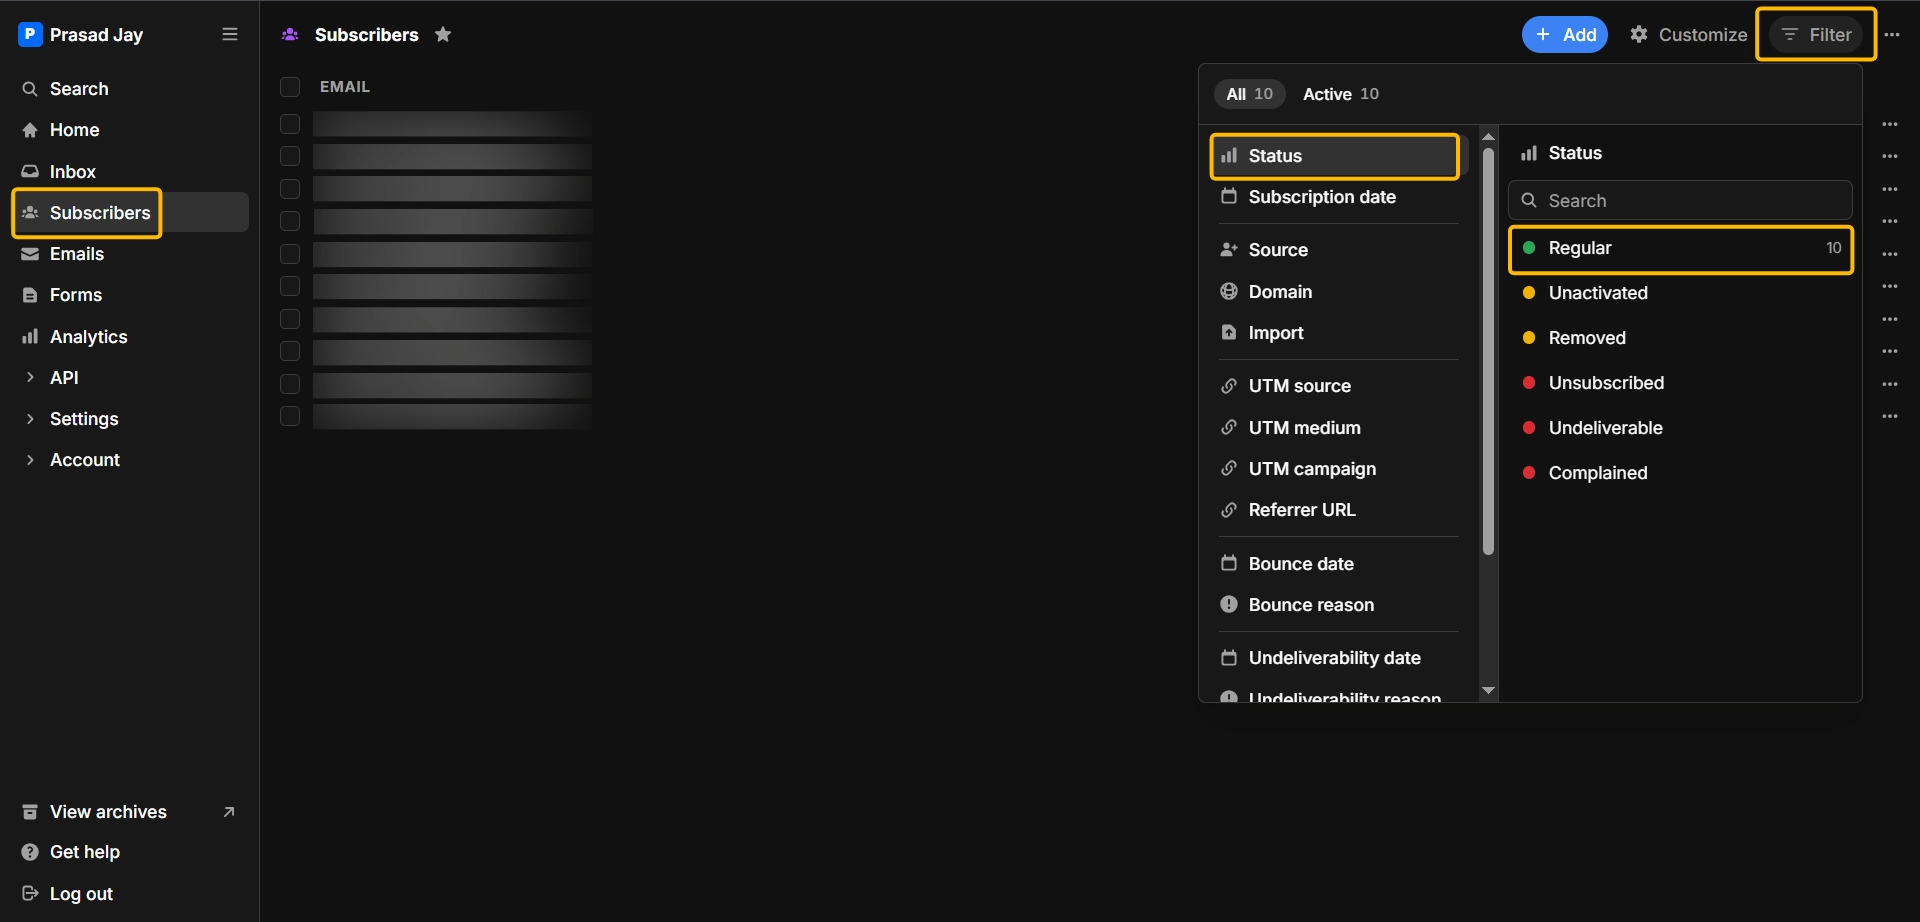
Here is what the main types mean and what to do with each:
Subscriber type | What it means | Import? |
Regular | Active, confirmed subscribers | Yes |
Unsubscribed | Asked to stop receiving your emails | Never |
Complained | Marked your email as spam | Never |
Undeliverable | Address bounced or does not exist | Never |
Blocked | Flagged by Buttondown’s spam filtering | Never |
Unactivated | Never confirmed their subscription | No |
Premium, gifted, trialed, and other paid states | Paid subscribers | See the note on paid subscriptions above |
Unactivated subscribers entered an address but never confirmed it, so importing them means emailing people who never finished opting in.
Choose your export columns
Click Export. The dialog shows your filtered count and lets you choose which columns to include.
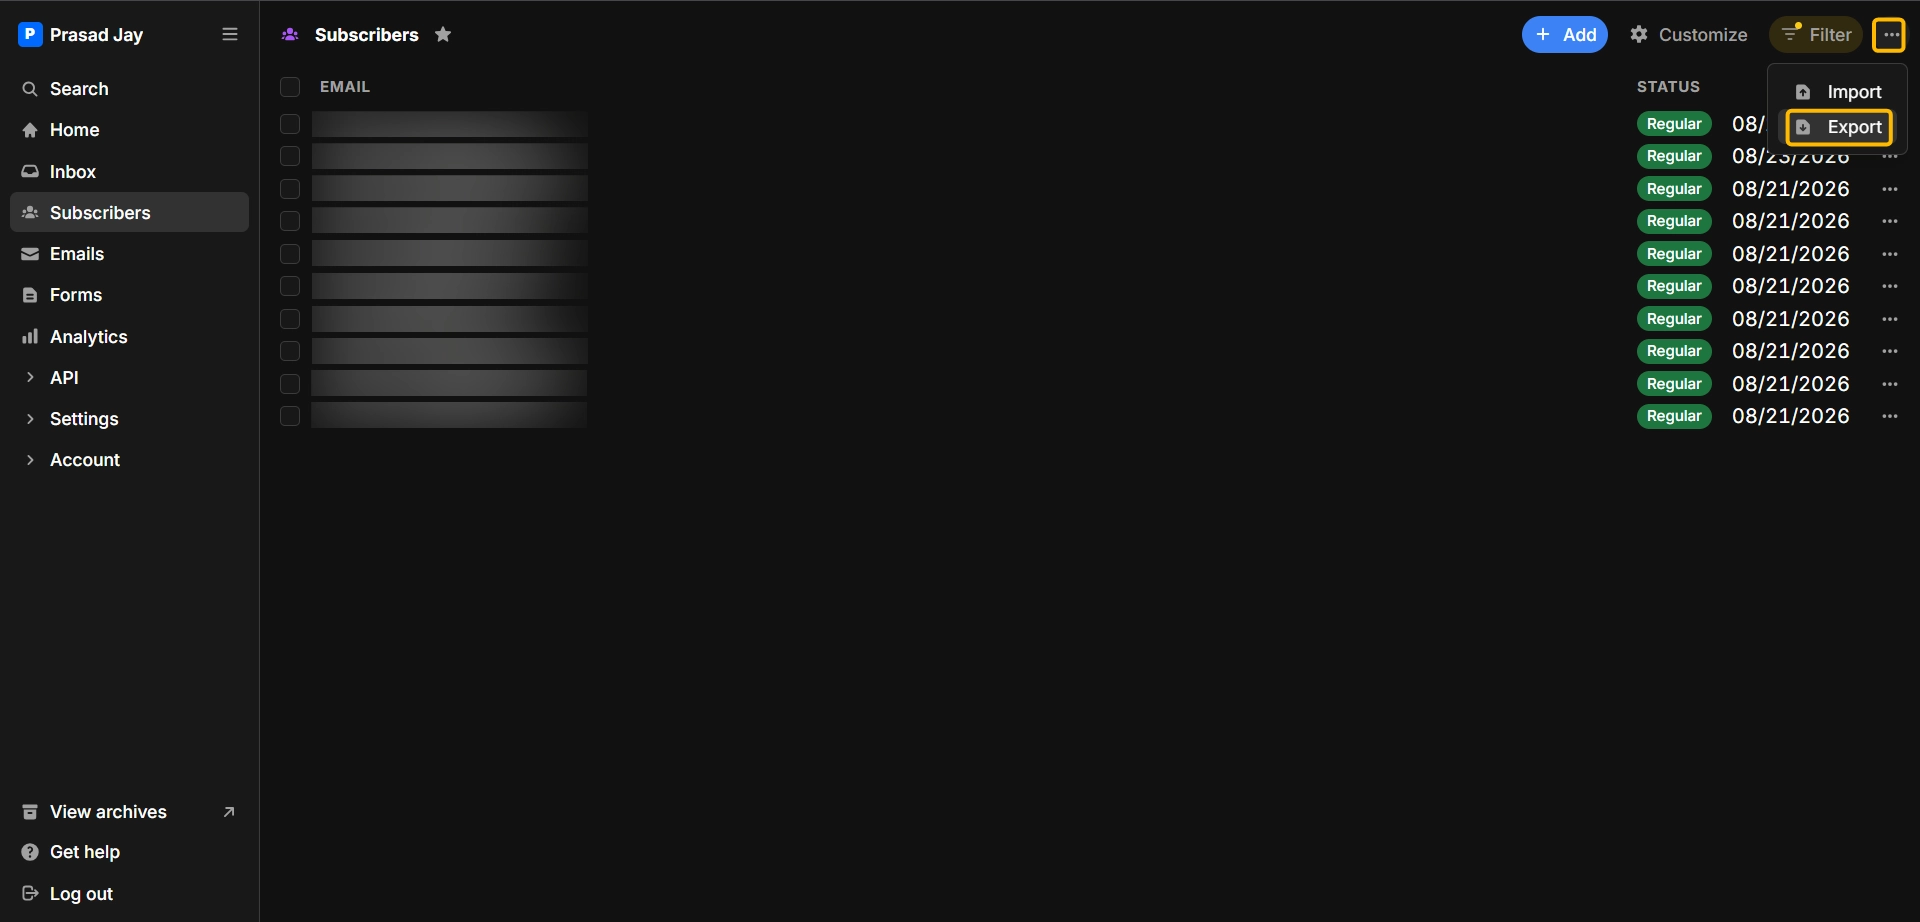
Deselect everything you do not need. At minimum you want:
Email
IP Address
Subscription Date
Tags
Metadata: * columns
Leave out ID, Secondary ID, Referrer URL, the UTM * columns, and Unsubscription Date. Then choose CSV and click Export.
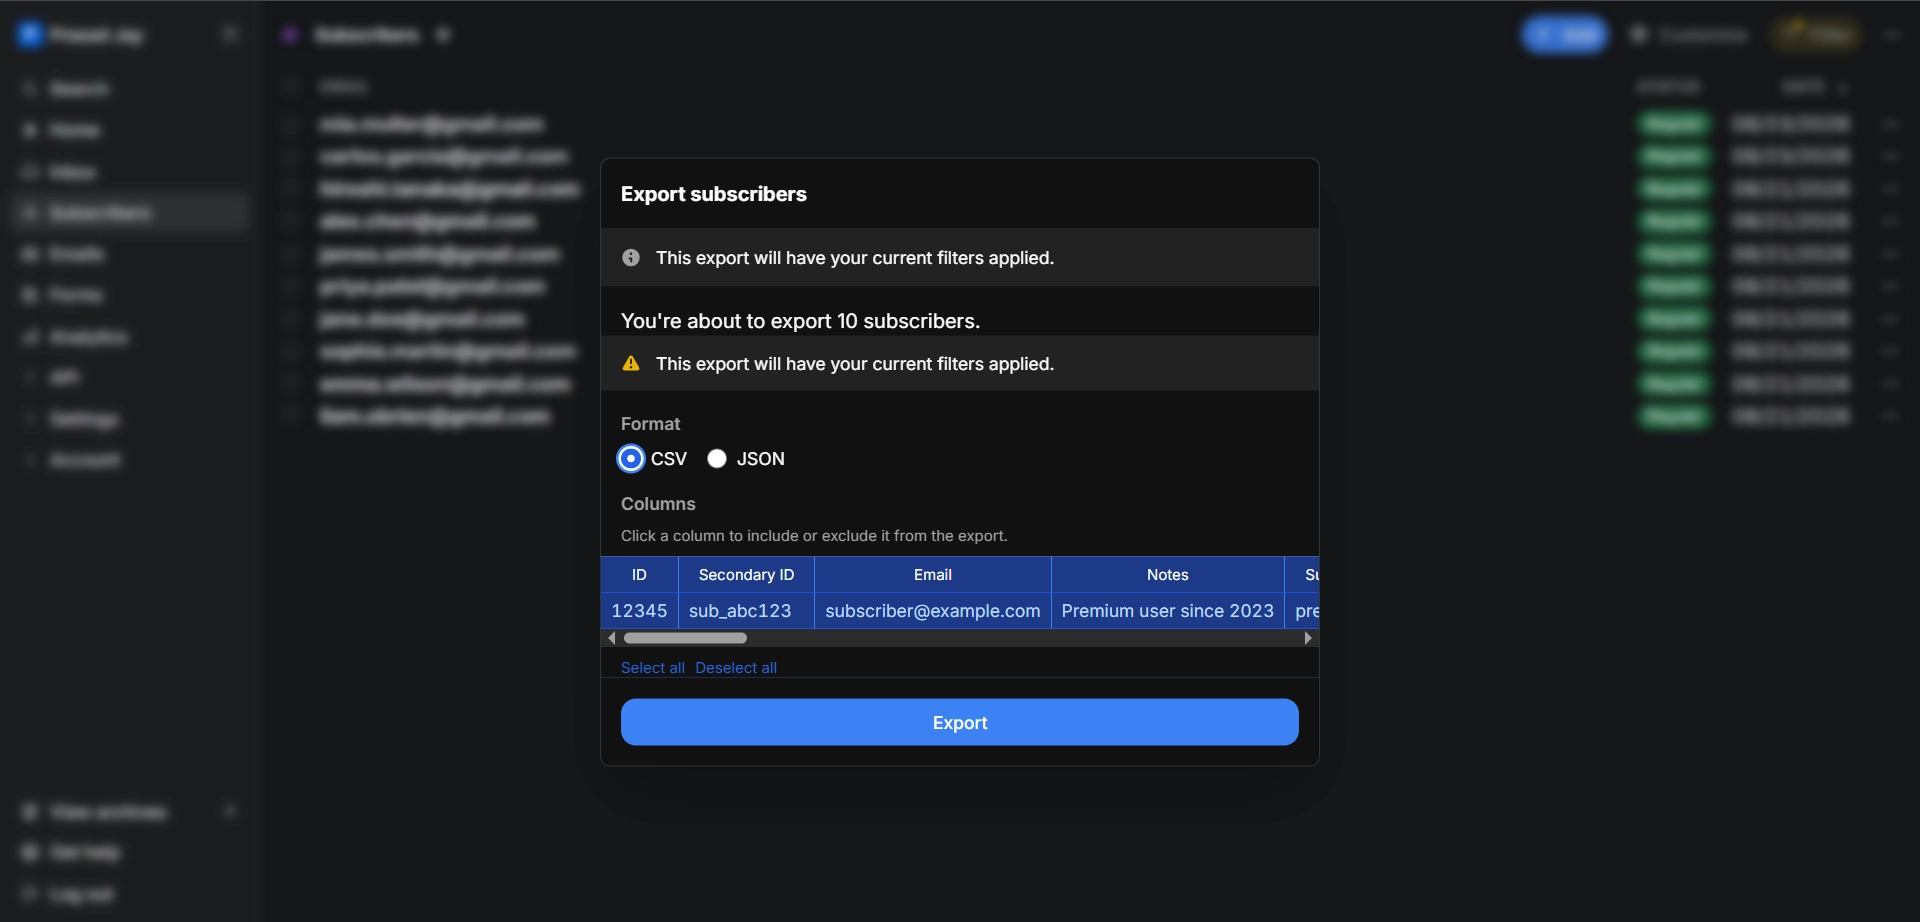
Check the exported CSV
Open the CSV in a spreadsheet and give it a quick look. Confirm the email addresses look right, the tags column is populated, names appear where you expect, and subscription dates are present.
Step 3: Import a small test batch
Before importing your entire audience, test with a handful of subscribers. If something is mapped incorrectly, it's much easier to fix four or five subscribers than an entire mailing list.
Upload the file to Hyvor Post
Go to Tools → Import in the Hyvor Post console. Choose your test CSV and enter a source for the import, such as Buttondown.
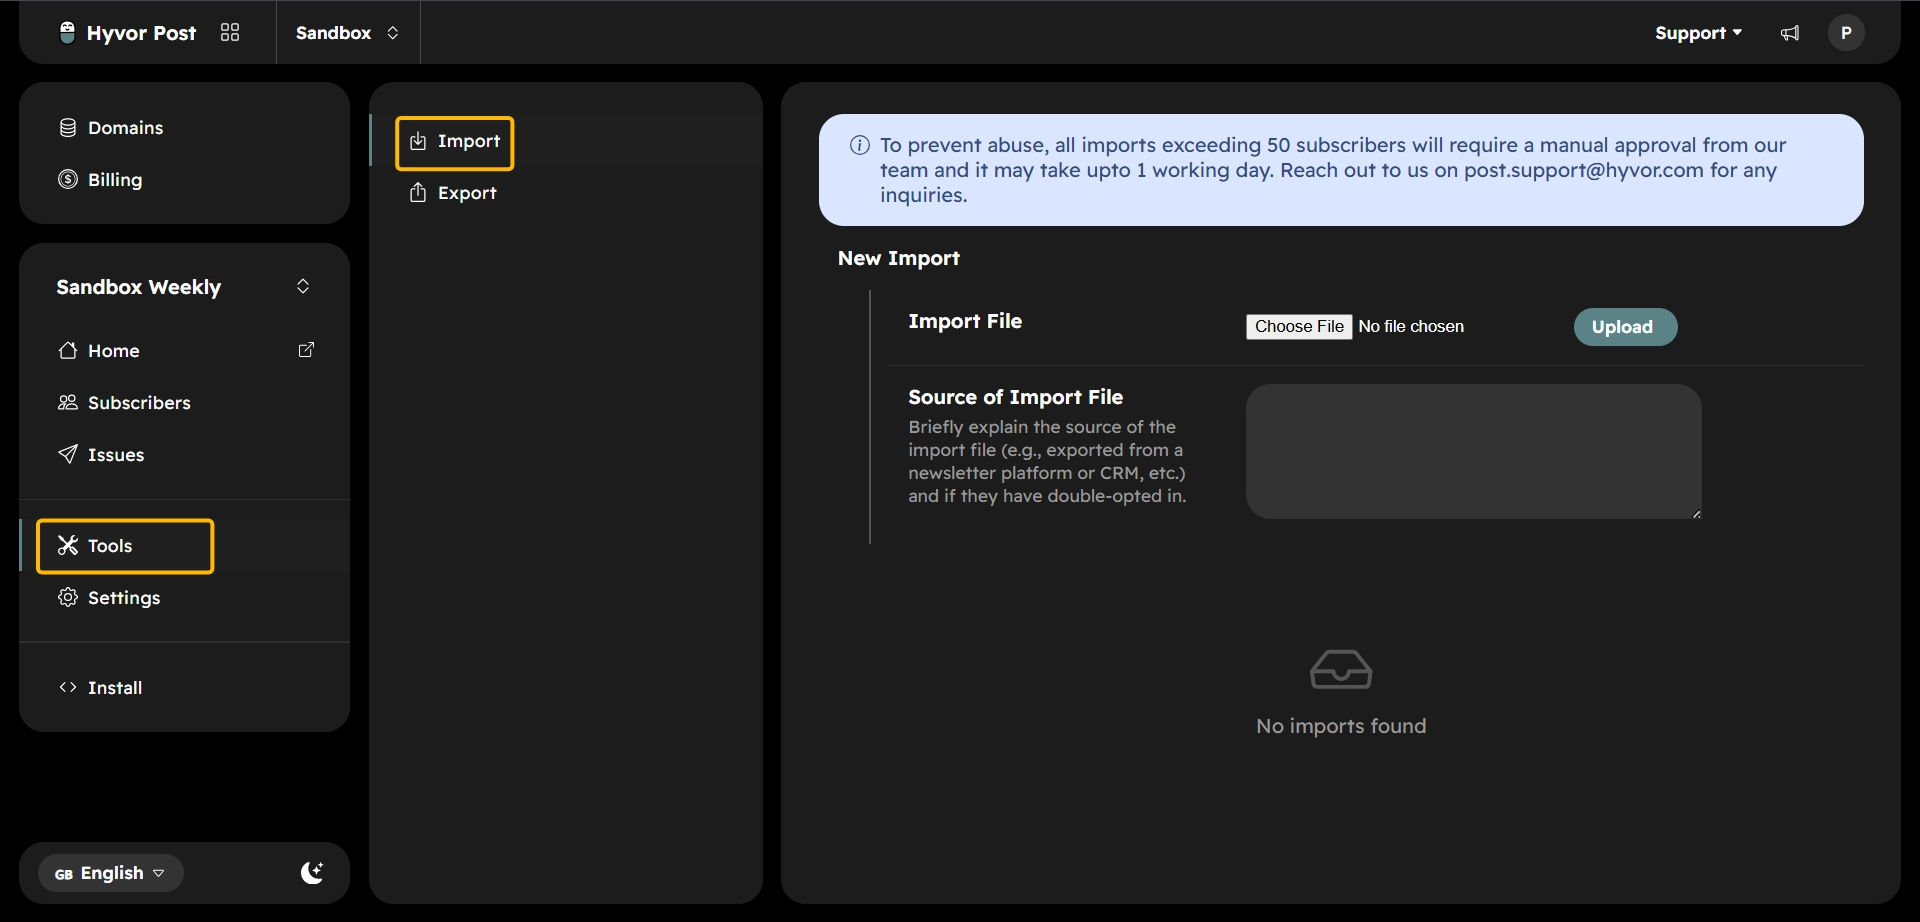
Then click Upload.
Map your Buttondown columns
Map each CSV column to the matching Hyvor Post field. Nothing is detected automatically, so check each dropdown rather than clicking through.
Hyvor Post field | Buttondown column |
Lists | tags |
Subscribed At | subscription_date |
Subscribe IP | ip_address |
Subscriber metadata | your metadata.* columns |
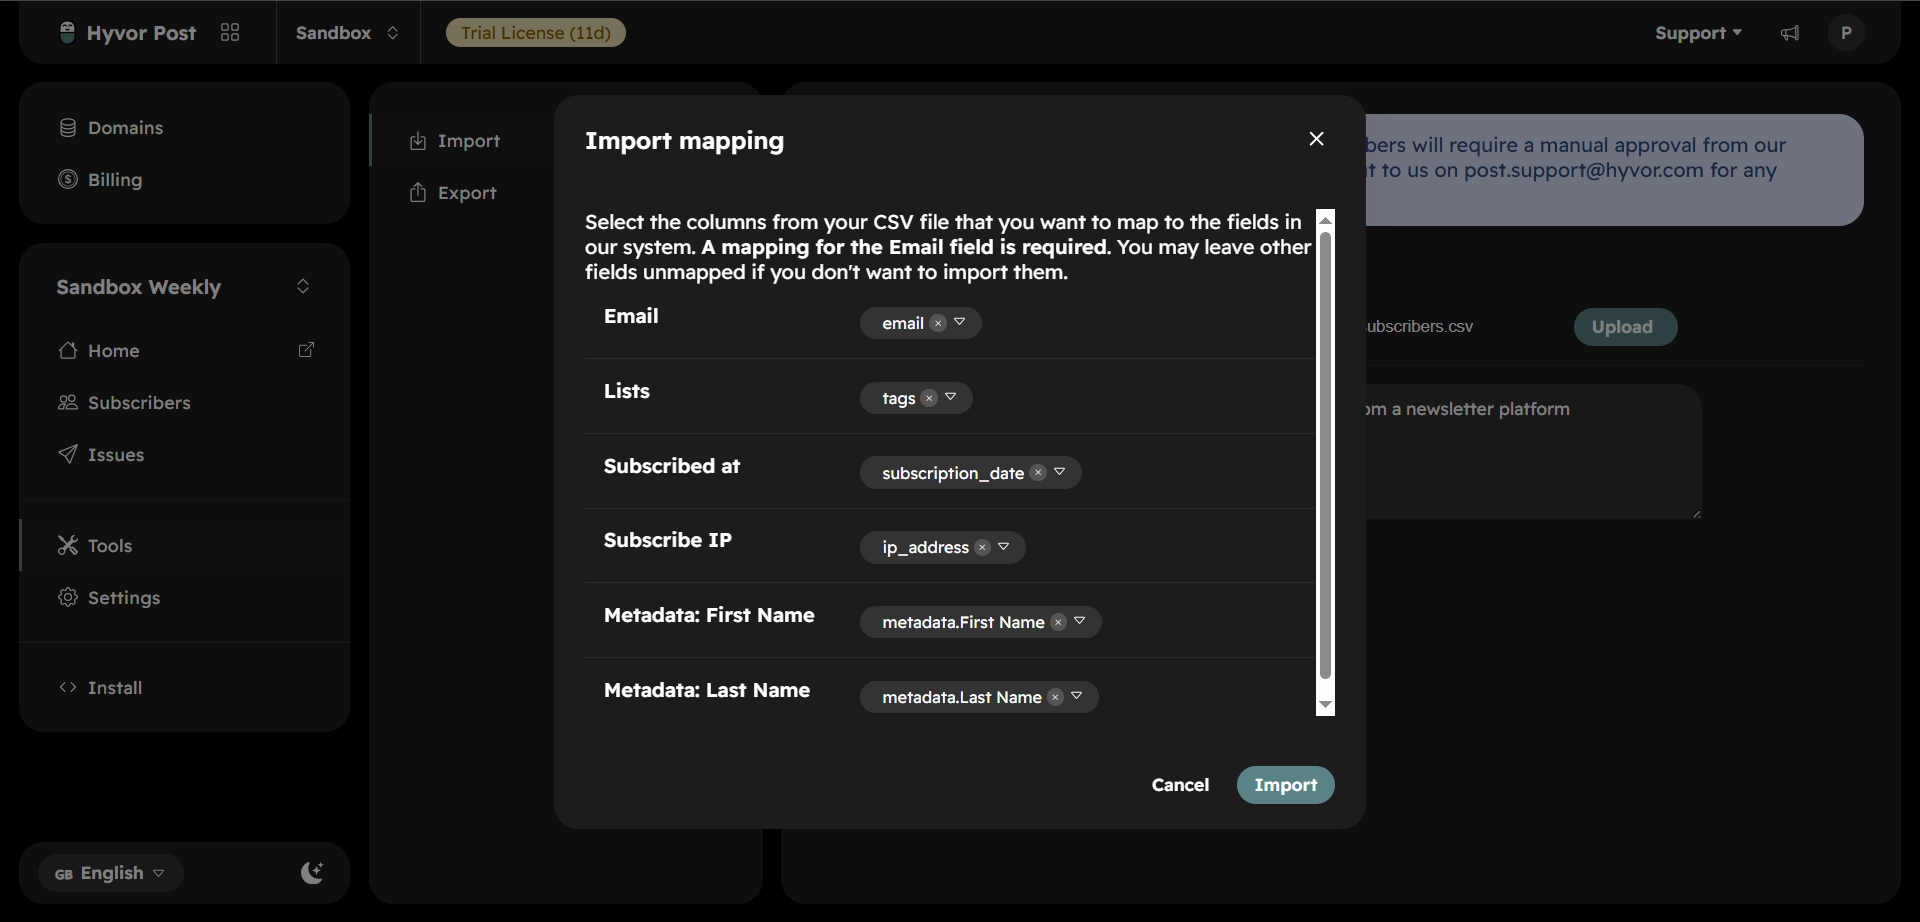
Click Import. A test import of a few subscribers finishes almost immediately.
Check the results
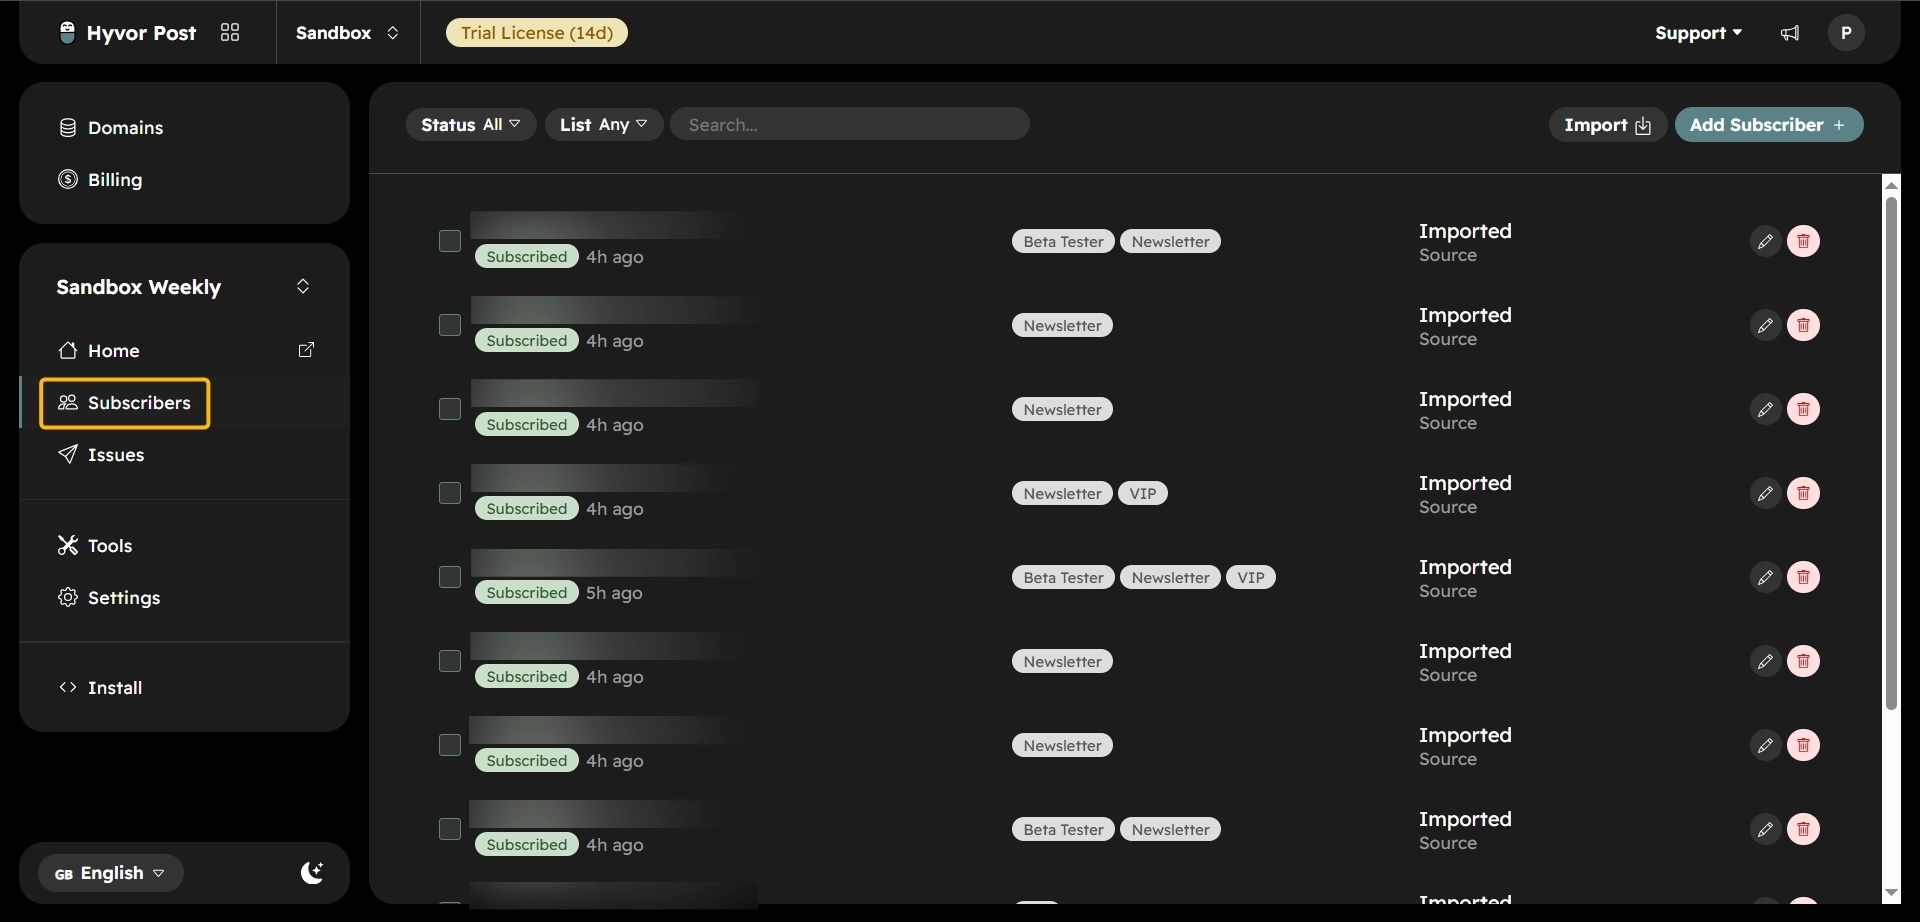
Open your Subscribers page and check each imported subscriber: names in the right metadata fields, correct lists, and subscription dates matching the file rather than today.
Step 4: Import your full list
Write down your current subscriber count first. You will use it to check the import afterwards.
Then repeat Step 3 with your full export. Go to Tools → Import, upload the CSV, check the mappings carefully, and start the import.
Wait for approval, if needed
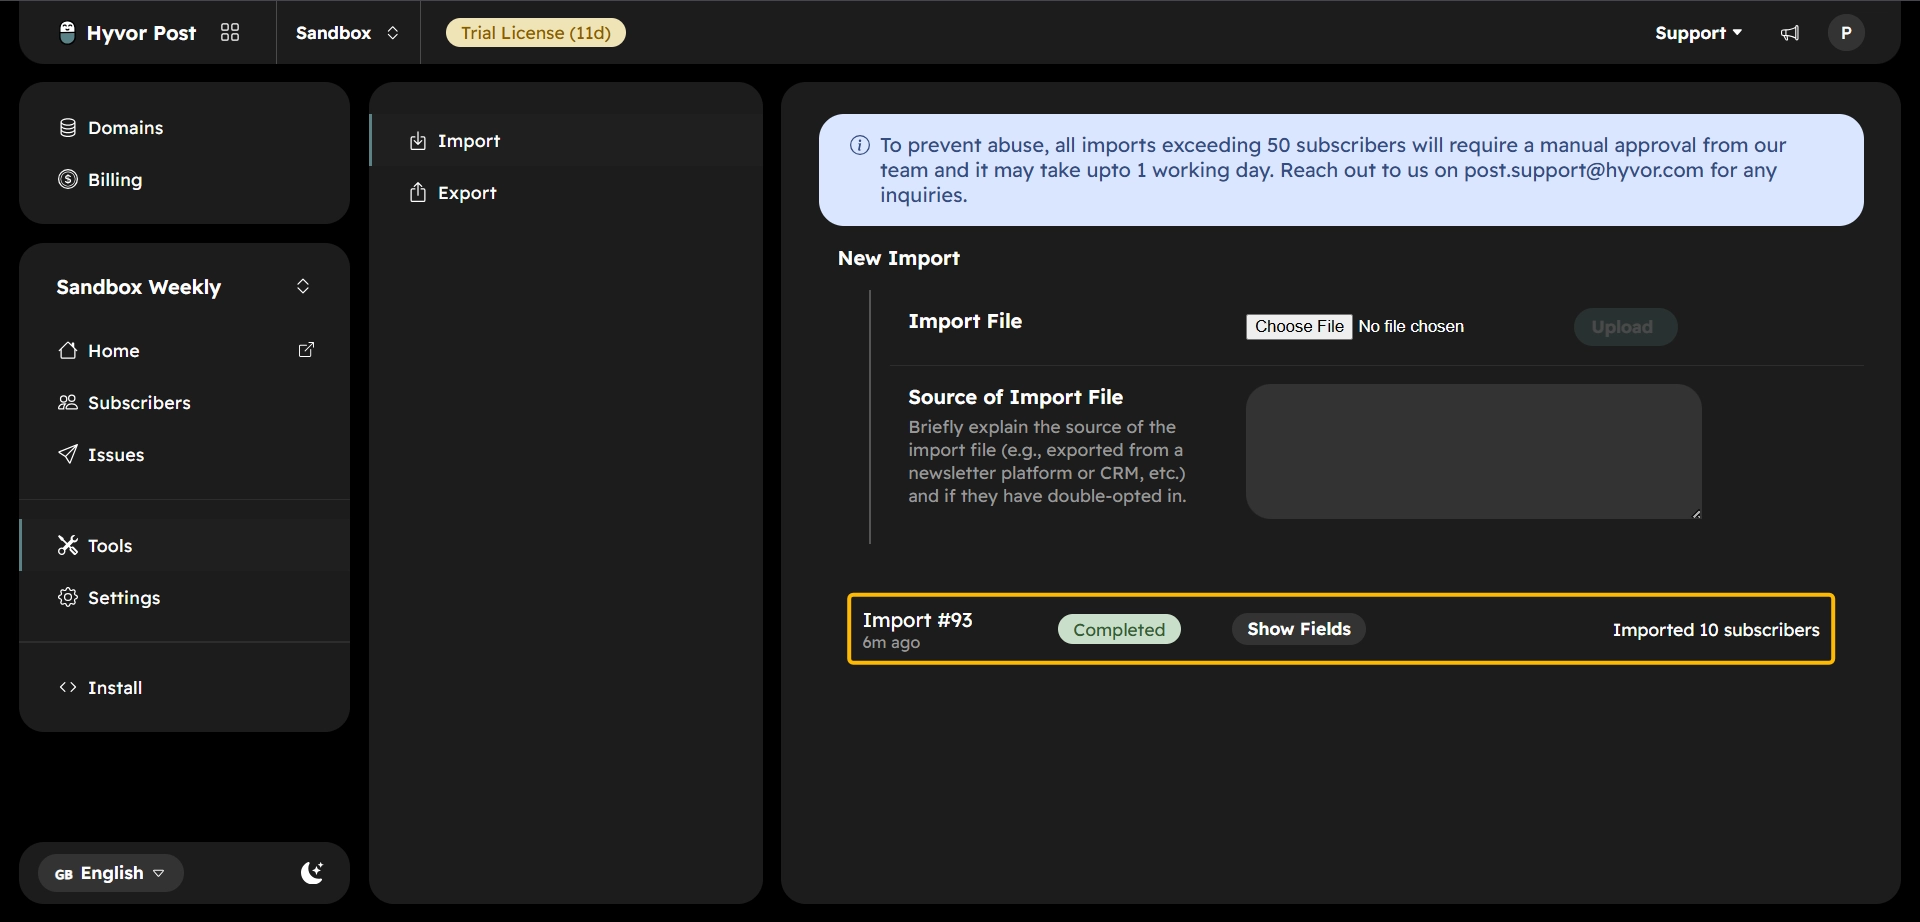
Imports over 50 subscribers are reviewed manually. Your import sits in a pending state, starts automatically once approved, and can be watched from the Import page. This usually takes up to one working day. If your migration is time-sensitive, contact Hyvor Post support.
Verify the migration
Check that your subscriber count rose by the number of rows in your file; a shortfall usually means malformed addresses were skipped. Then spot-check a few individual subscribers, ideally ones with awkward data: an accented name, several tags, an old signup date.
Step 5: Replace your signup form
Your existing subscribers have moved. Now make sure new ones arrive in the right place. This is the step people forget, and a leftover Buttondown form keeps feeding an account you’ve stopped using.
Add the Hyvor Post form
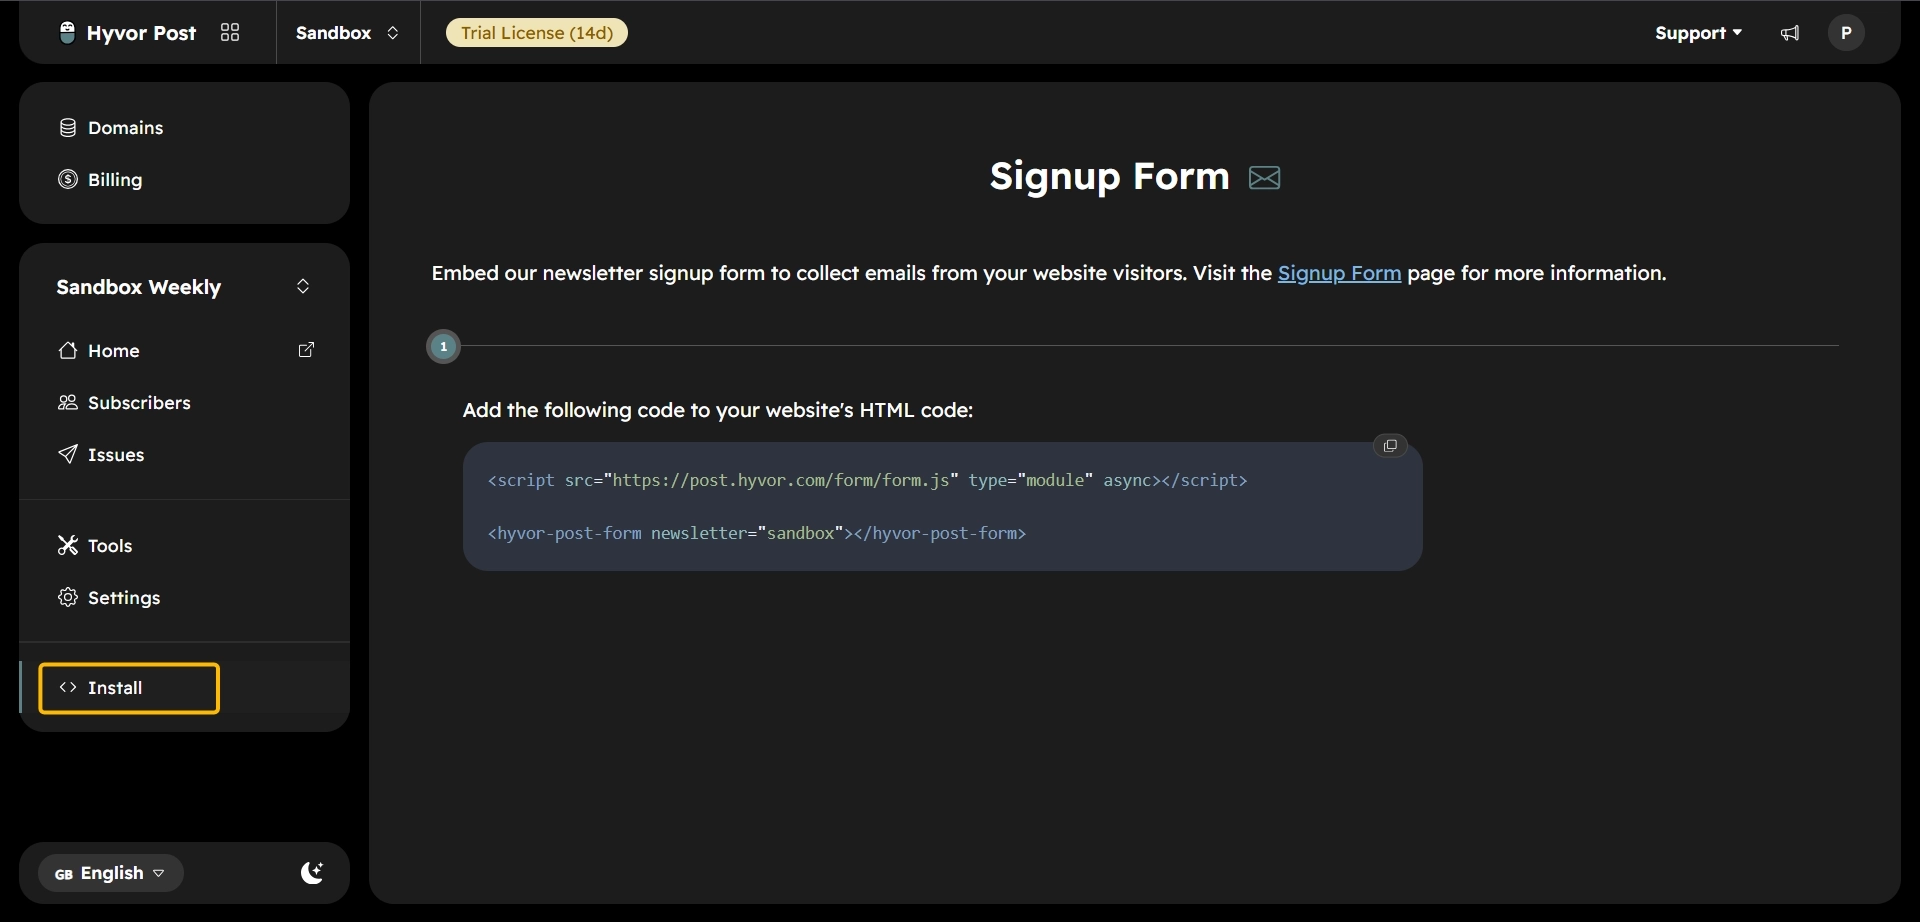
Copy the embed code from the Install section of your console and add it to your website’s HTML.
Replace every Buttondown form
Check everywhere a visitor could subscribe: your website, landing pages, blog sidebars and footers, popups, your link-in-bio page, and your Buttondown-hosted subscribe page if you have linked to it from anywhere.
Catch anyone who signed up during the move
People who subscribed while you were migrating exist only in Buttondown. Export again with the same filter and columns, and import the new file. You can import the whole thing rather than picking out new rows, since Hyvor Post matches by email address and updates existing records instead of duplicating them. Use a fresh export though, since an old CSV will push outdated values over newer ones.
Test your new signup form
Subscribe with your own email address through your website. Check that you appear in Hyvor Post, land in the expected list, and that the confirmation email arrives. That confirms your site is talking to Hyvor Post and not Buttondown.
What doesn’t migrate from Buttondown to Hyvor Post
Subscribers are only one part of what it takes to migrate from Buttondown to Hyvor Post. Several other things have no direct equivalent.
Paid subscriptions. As covered at the top, Hyvor Post has no paid-newsletter tier. Premium and gifted subscribers can be imported as ordinary subscribers, but their payment status will not come with them.
Your email archive. Past issues stay in Buttondown. Hyvor Post gives you an archive site, but it starts empty, so export your old emails before closing the account if you want to keep them.
Automations. Welcome sequences and other triggered emails are workflows, not data. There is no export for the logic, so you’ll need to rebuild them.
Engagement history. If you had open or click tracking enabled, that history doesn’t transfer and Hyvor Post won’t generate new numbers. Tell anyone who reports on those metrics before your first send, not after.
Troubleshooting common migration problems
Problem | Likely cause | Fix |
Nothing imported | The Email column was not mapped | Repeat the import with Email mapped |
Names are missing for some subscribers | Duplicate metadata keys, so only one column was mapped | Merge the columns and import again |
All names are missing | Metadata fields were not created before importing | Create the fields, then re-import |
Everyone has today’s date | Subscribed At was not mapped | Re-import with the column mapped |
Subscribers are in the wrong lists | Lists were not mapped, or list names do not match your tags | Check your list names and re-import |
Fewer subscribers than expected | Malformed addresses were skipped | Compare your CSV against the imported count |
Unsubscribed people are in your new list | The export was not filtered by subscriber type | Remove them, then re-export with the filter applied |
New subscribers still appear in Buttondown | An old form is still live somewhere | Find and replace the remaining forms |
Frequently asked questions
Can I start sending as soon as I’ve migrated?
Yes, with an active subscription. Without one, you can still create your newsletter, import subscribers, draft an issue, and send test emails to yourself.
Do I need to reformat my Buttondown export?
No. Tags, subscription dates, and metadata all import as Buttondown exports them, provided you select the right columns.
What happens if I import the same file twice?
Hyvor Post matches by email address, so a second import updates existing records rather than duplicating them. Use a fresh export, since the file you upload wins.
Are my subscribers’ email addresses shared with third parties?
No. Hyvor Post sends through its own delivery service, so your list isn’t passed to an outside provider.
Can I bring my paid subscribers across?
You can import their email addresses, but not their subscriptions. Hyvor Post does not support paid newsletters.
Migration checklist
Prepare
Created your Hyvor Post newsletter
Created a list for each Buttondown tag
Created your subscriber metadata fields
Export and import
Filtered your Buttondown subscribers to Regular
Selected only the columns you need
Exported and reviewed the CSV
Ran a successful test import
Imported your full list
Confirmed the subscriber count matches
Website
Added the Hyvor Post signup form
Removed every Buttondown form
Tested a real signup
Before closing Buttondown
Sent yourself a test newsletter
Imported anyone who signed up during the migration
Exported your email archive
Saved a backup of your subscriber export
Wrapping up
Migrating from Buttondown to Hyvor Post is a straightforward process when completed in the right order. By preparing your newsletter first, filtering your export to active subscribers, testing with a small batch, and replacing your signup form before retiring Buttondown, you can move your list without losing important subscriber information.
Take a few minutes for the final checks above before closing your Buttondown account. Once you’re satisfied that the migration is complete, you can confidently continue growing your newsletter with Hyvor Post.

Comments