Substack built something genuinely popular, and for a writer who wants an audience network, a mobile app, and paid subscriptions handled end-to-end, it still does that job well. But a newsletter platform that is also a social feed, a recommendation engine, and a payments processor is carrying a lot of weight. What if you only wanted the newsletter? This is where Hyvor Post comes in. We're a focused, independent alternative built around privacy and simplicity. As a small team based in France building a tight-knit product, we care deeply about every detail, including making sure your experience switching to us is a good one.
This guide walks you through how to migrate from Substack to Hyvor Post: setting up your newsletter, exporting and importing your subscribers, replacing your signup form, and checking everything landed correctly before you close your Substack publication.
- Before you read further: paid subscriptions
- Why switch from Substack to Hyvor Post?
- Before you begin
- Step 1: Set up your Hyvor Post newsletter
- Step 2: Export your subscribers from Substack
- Step 3: Import a small test batch
- Step 4: Import your full list
- Step 5: Replace your signup form
- What doesn't migrate from Substack to Hyvor Post
- Troubleshooting common migration problems
- Frequently asked questions
- Migration checklist
- Wrapping up
Before you read further: paid subscriptions
Hyvor Post does not support paid newsletters. If you run paid subscriptions on Substack, the paid side of your publication has nowhere to go. You can migrate your subscribers' email addresses, but not their payment status or premium access.
If that applies to you, it's better to know now than after five steps of work.
Why switch from Substack to Hyvor Post?
Substack has real strengths, and plenty of writers are happy there. Here is what actually differs.
Substack watches your readers closely. A Substack subscriber export can include information such as email opens, link clicks, post views, comments, shares, and other engagement data. But in Hyvor Post, there is no tracking at all, and no setting to turn it on.
Your newsletter is a newsletter, not a feed. In 2023, Substack launched Notes, which publishing consultant Jane Friedman describes as a Twitter-like interface layered on top of the newsletter, putting writers and readers into a visible, commenting, recommending community alongside their inbox. Hyvor Post does one thing: it sends your newsletter to the people who asked for it.
Built with teams in mind. Multiple newsletters under one account, subscriber metadata for segmentation, team collaboration, and an API. It suits a company newsletter better than a one-person paid publication.
If you rely on Substack's discovery, its app, or its support for paid subscriptions, staying put is a perfectly reasonable decision. If you mostly want a clean, private way to email a list, the rest of this guide is for you.
Before you begin
A little preparation makes it easier to migrate from Substack to Hyvor Post without repeating steps later.
Prerequisites. A Substack publication, a Hyvor Post account, and access to the website where you want your signup form. If you want to send from your own domain rather than the default subdomain, you will also need access to your DNS settings.
Substack has little subscriber data beyond email. There are no custom metadata fields, and tags don't carry over either. More on why in Step 2, but it is worth knowing before you plan anything around personalisation.
Large imports need approval. Imports of more than 50 subscribers are reviewed manually, usually within a working day. You don't need to wait: set up your newsletter and run a small test import while the full one queues.
Keep your original export. Store the CSV somewhere safe before you edit anything. It is your backup if you need to start over.
Step 1: Set up your Hyvor Post newsletter
Doing this first saves you from importing twice.
Create your newsletter
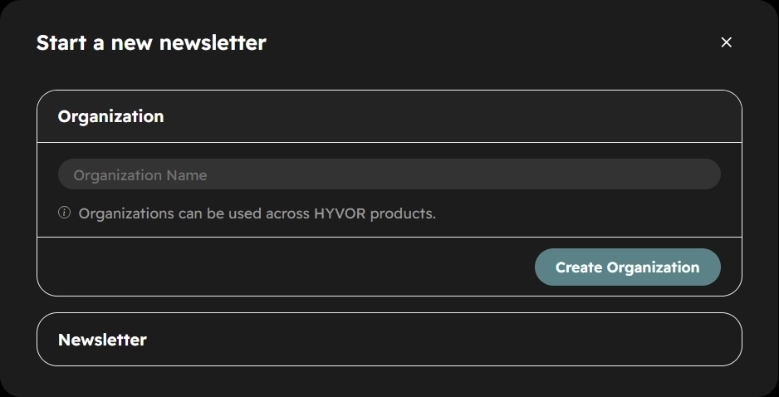
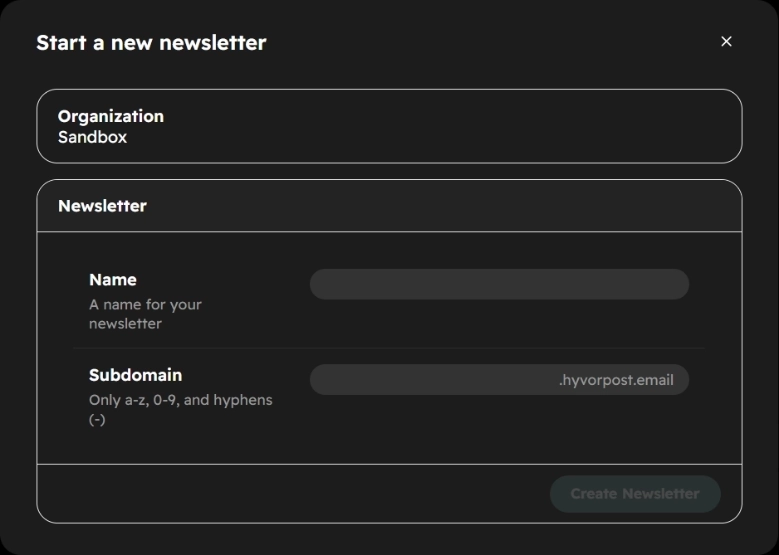
Create your Hyvor Post account and set up a newsletter. During setup, you will configure your organization name, newsletter name, and newsletter subdomain.
Create your lists
Hyvor Post organises subscribers into lists. Create the ones you plan to use before importing.
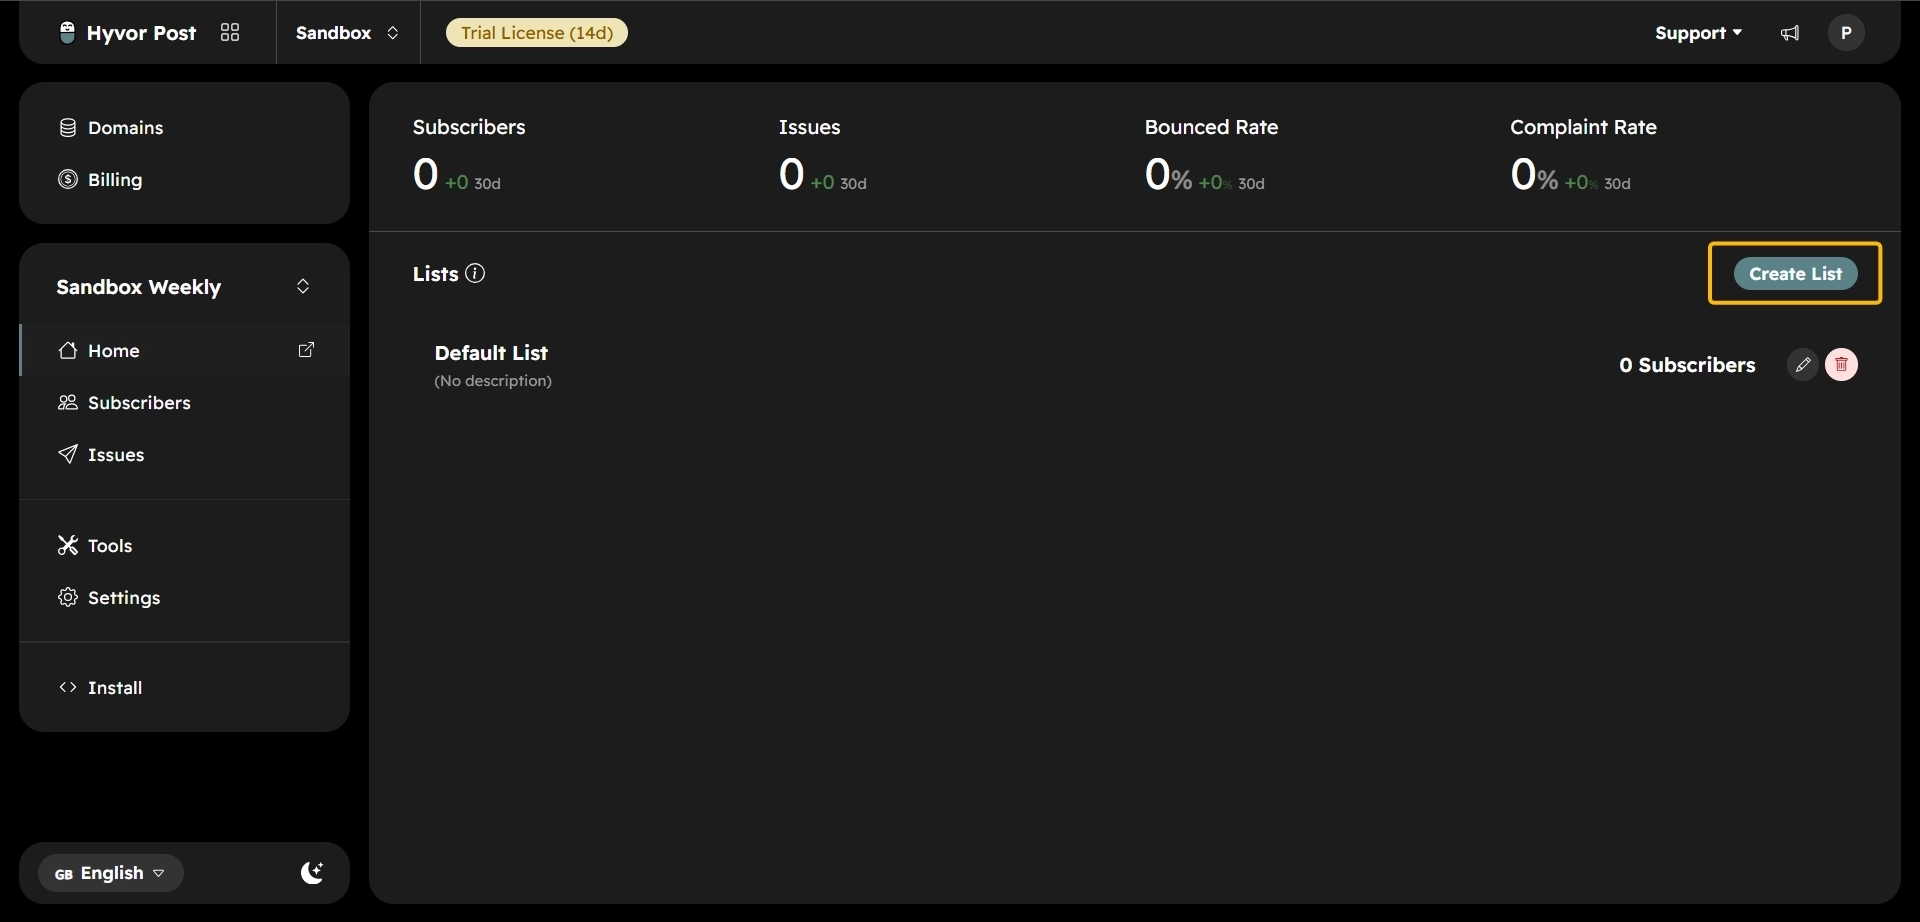
Click Create List in the console.
Enter a name and, optionally, a description.
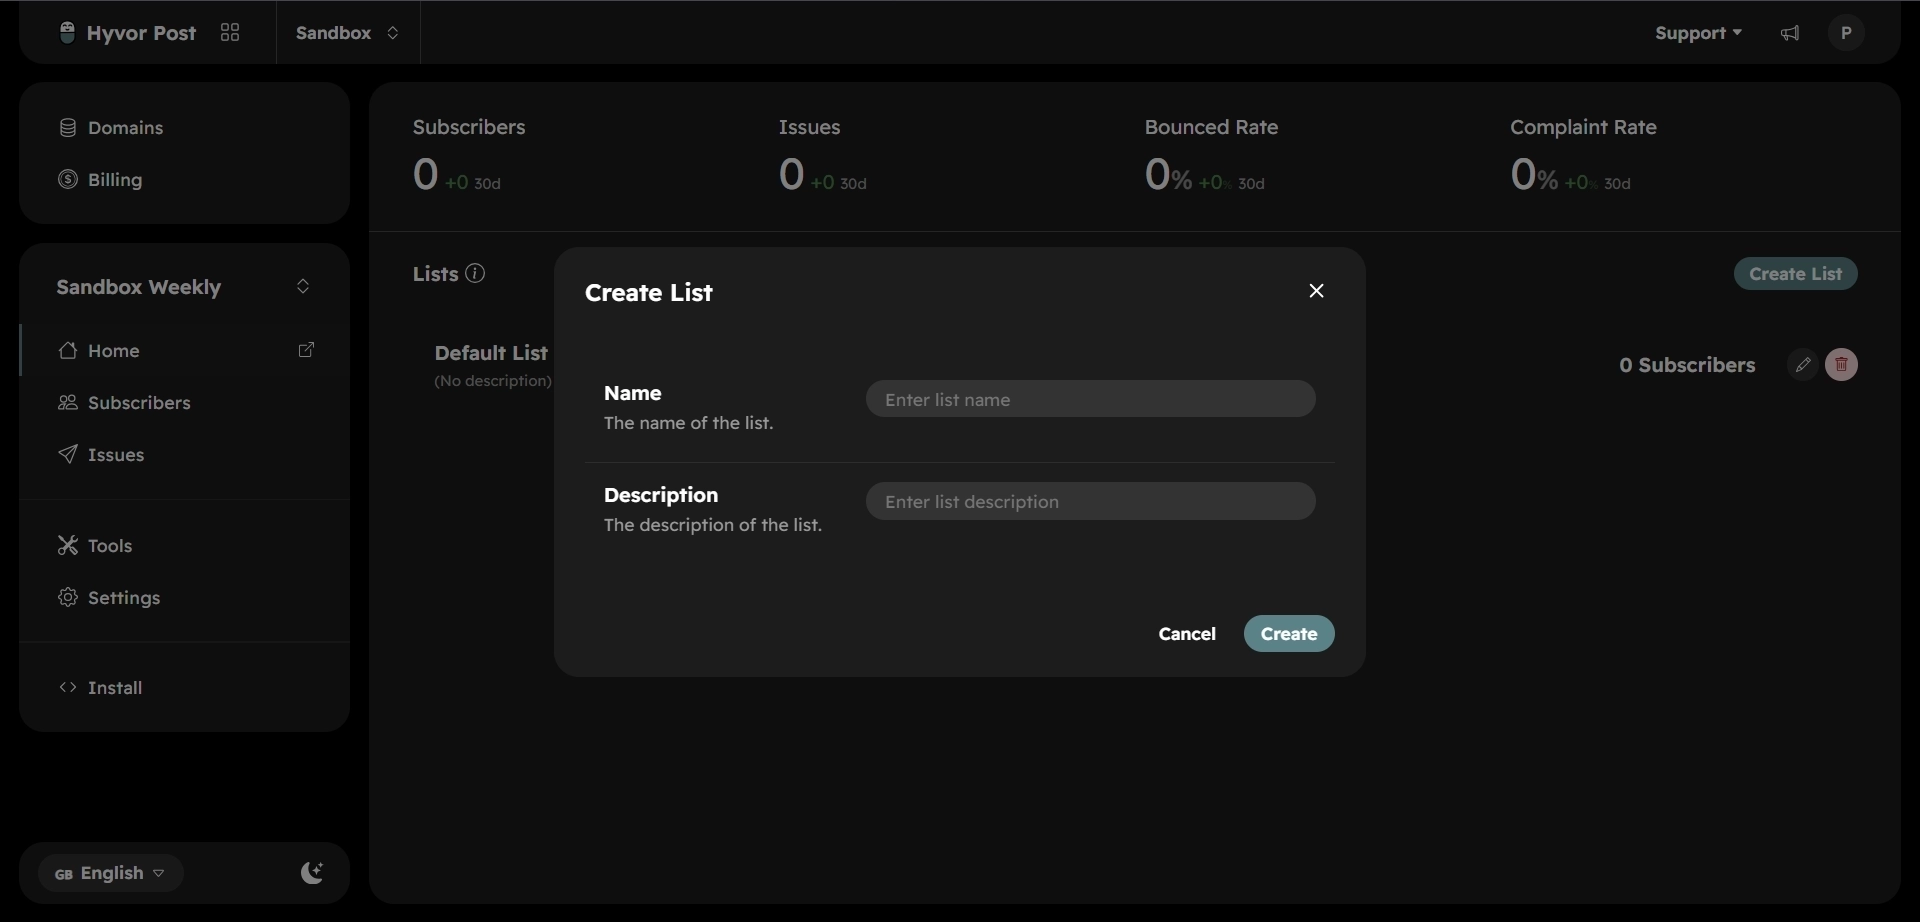
Save the list.
Two mappings to pay attention to
Hyvor Post treats Subscribed At as optional, but skipping it costs you something you cannot recover. Leave it unmapped, and every subscriber is stamped with the import date instead of the date they joined. The same applies to Lists: leave it unmapped and subscribers are added to every list you have created.
We'll handle both in Step 3.
Optional: send from your own domain
By default, your newsletters send from a subdomain, like your-subdomain@hyvorpost.email. To use your own domain instead, open the Domain section, add it, and add the DNS record it generates to your DNS settings, then verify it there.
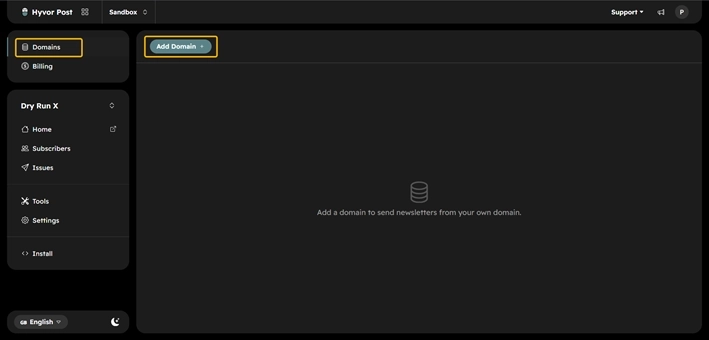
Once you verify it, you can use it to send emails from any newsletter in your organization.
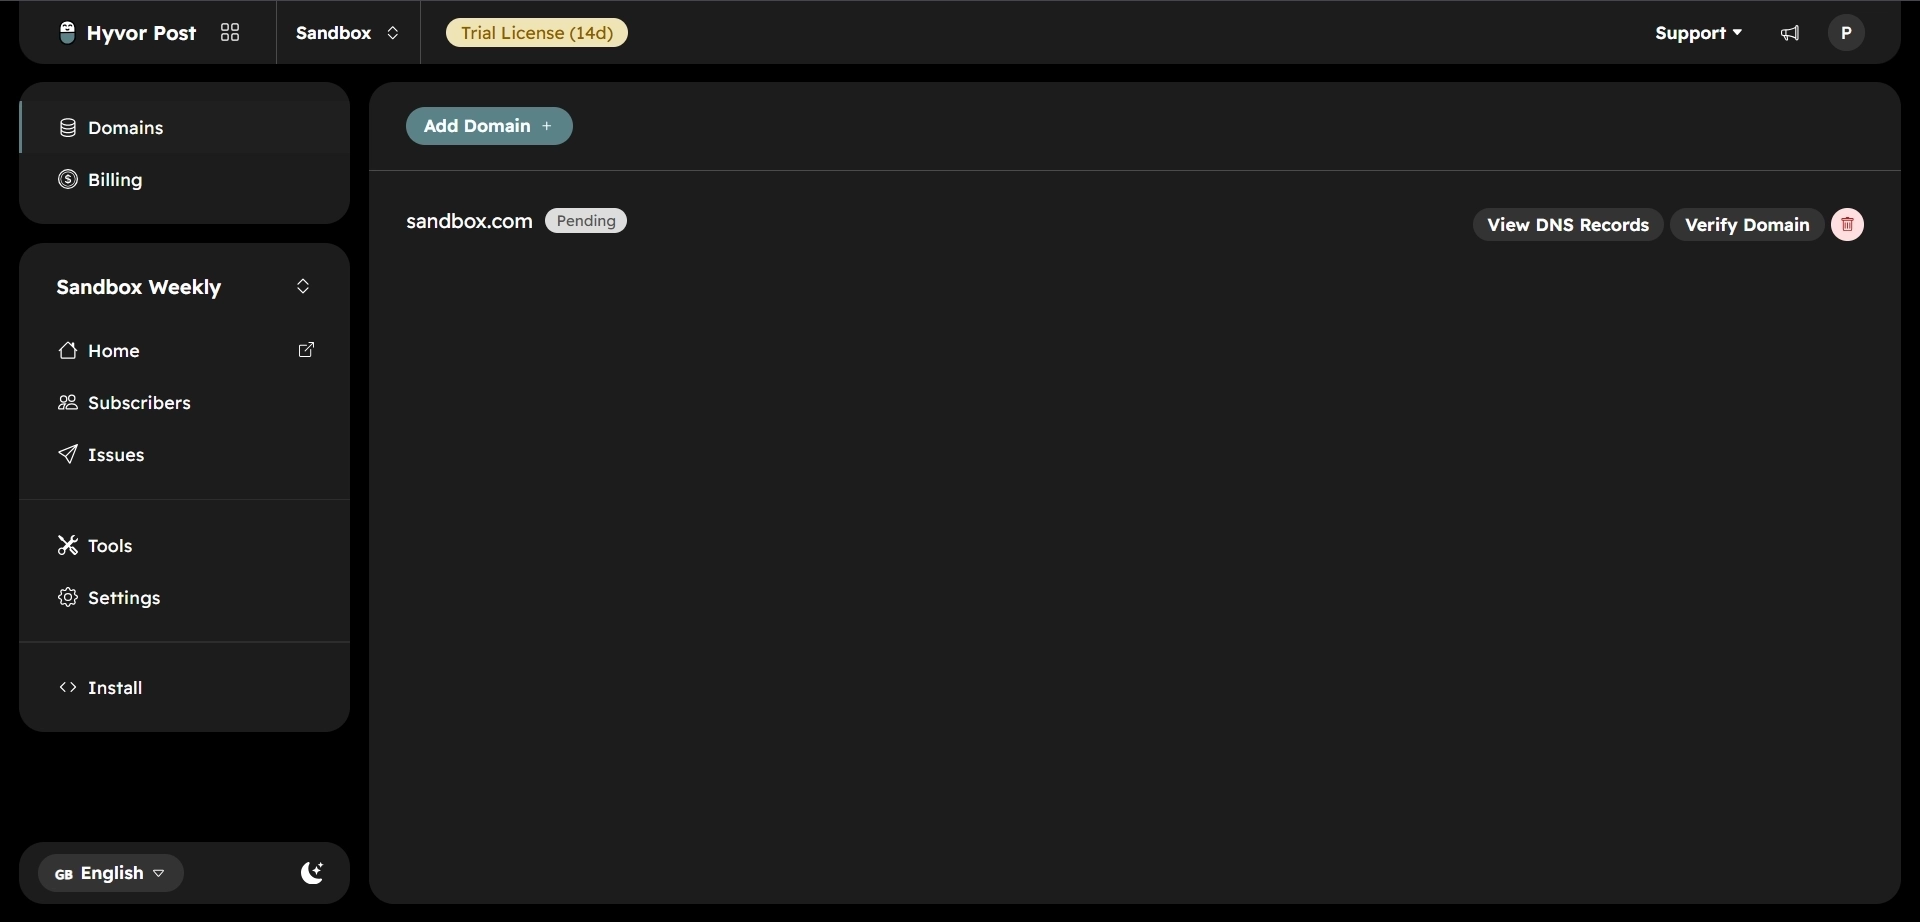
This isn't required to migrate or start sending, so it's fine to return to later. DNS changes can take minutes to hours to propagate.
Step 2: Export your subscribers from Substack
What you can and cannot take with you
Set expectations before you click anything, because Substack's export is narrower than most.
Names are mostly missing, and there are no custom fields at all. The export does have a Name column, but it is only populated when a subscriber happens to have their own Substack account with a display name set, not from anything collected at signup. Substack confirms it is not currently possible to export a file with subscriber names for that reason. Treat anything in the column as incidental, not a field you can rely on.
Tags do not export, even when made visible. Making the tags column visible on your dashboard and exporting "visible columns only" still produces a file with no tags column, so there is no way to reconstruct tag-based groups from the export alone.
No IP addresses. Substack's export does not include subscriber IP data at all, so there is nothing to map to Hyvor Post's Subscribe IP field.
Run the export
Open Subscribers → All Subscribers. Then apply a filter for the subscribers you want.
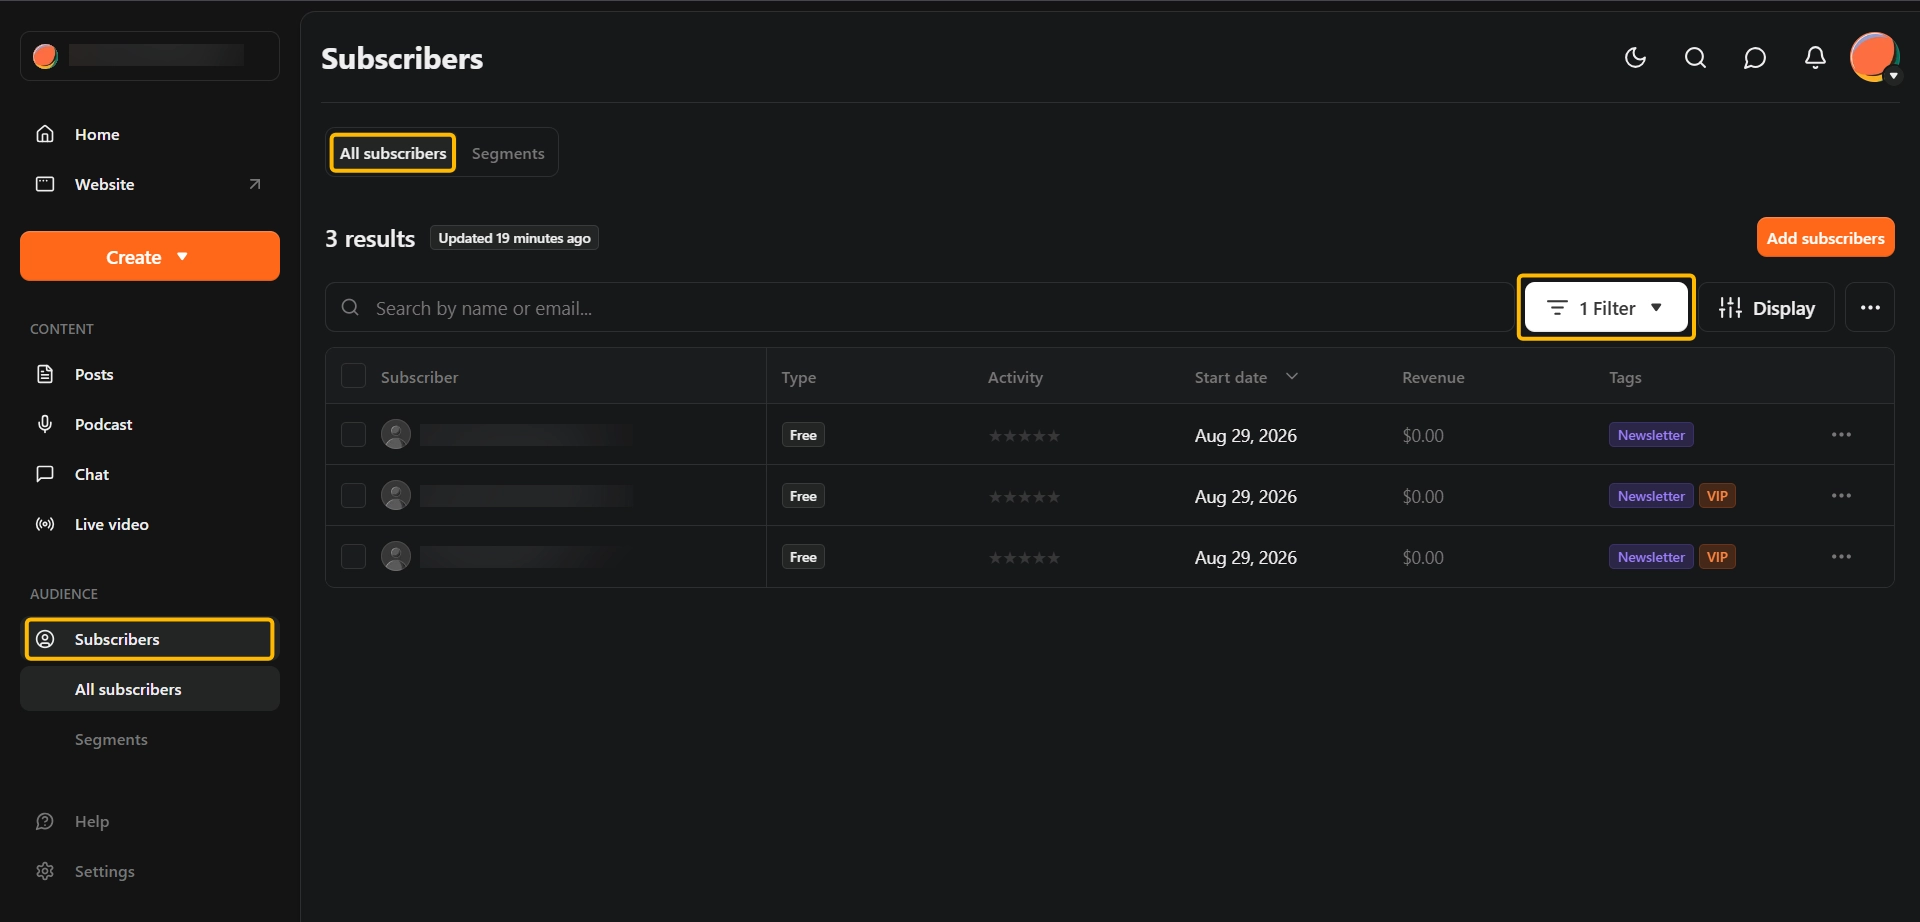
Click Export.
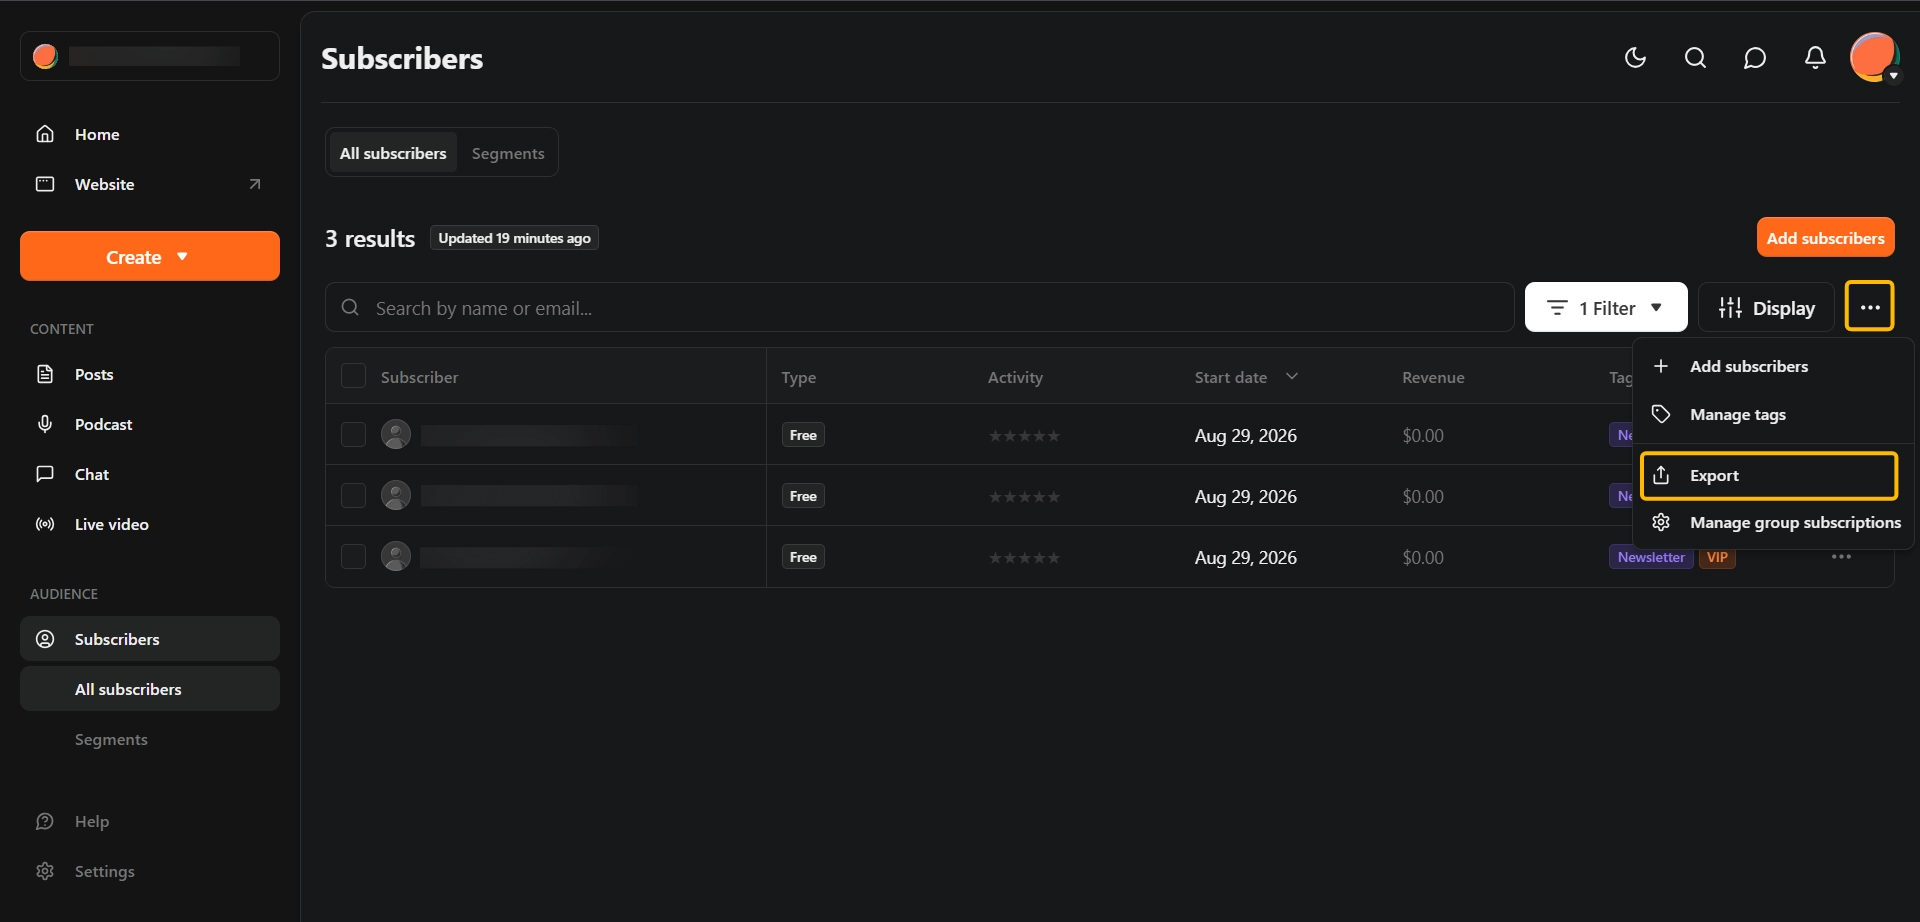
Choose all columns or visible columns only.
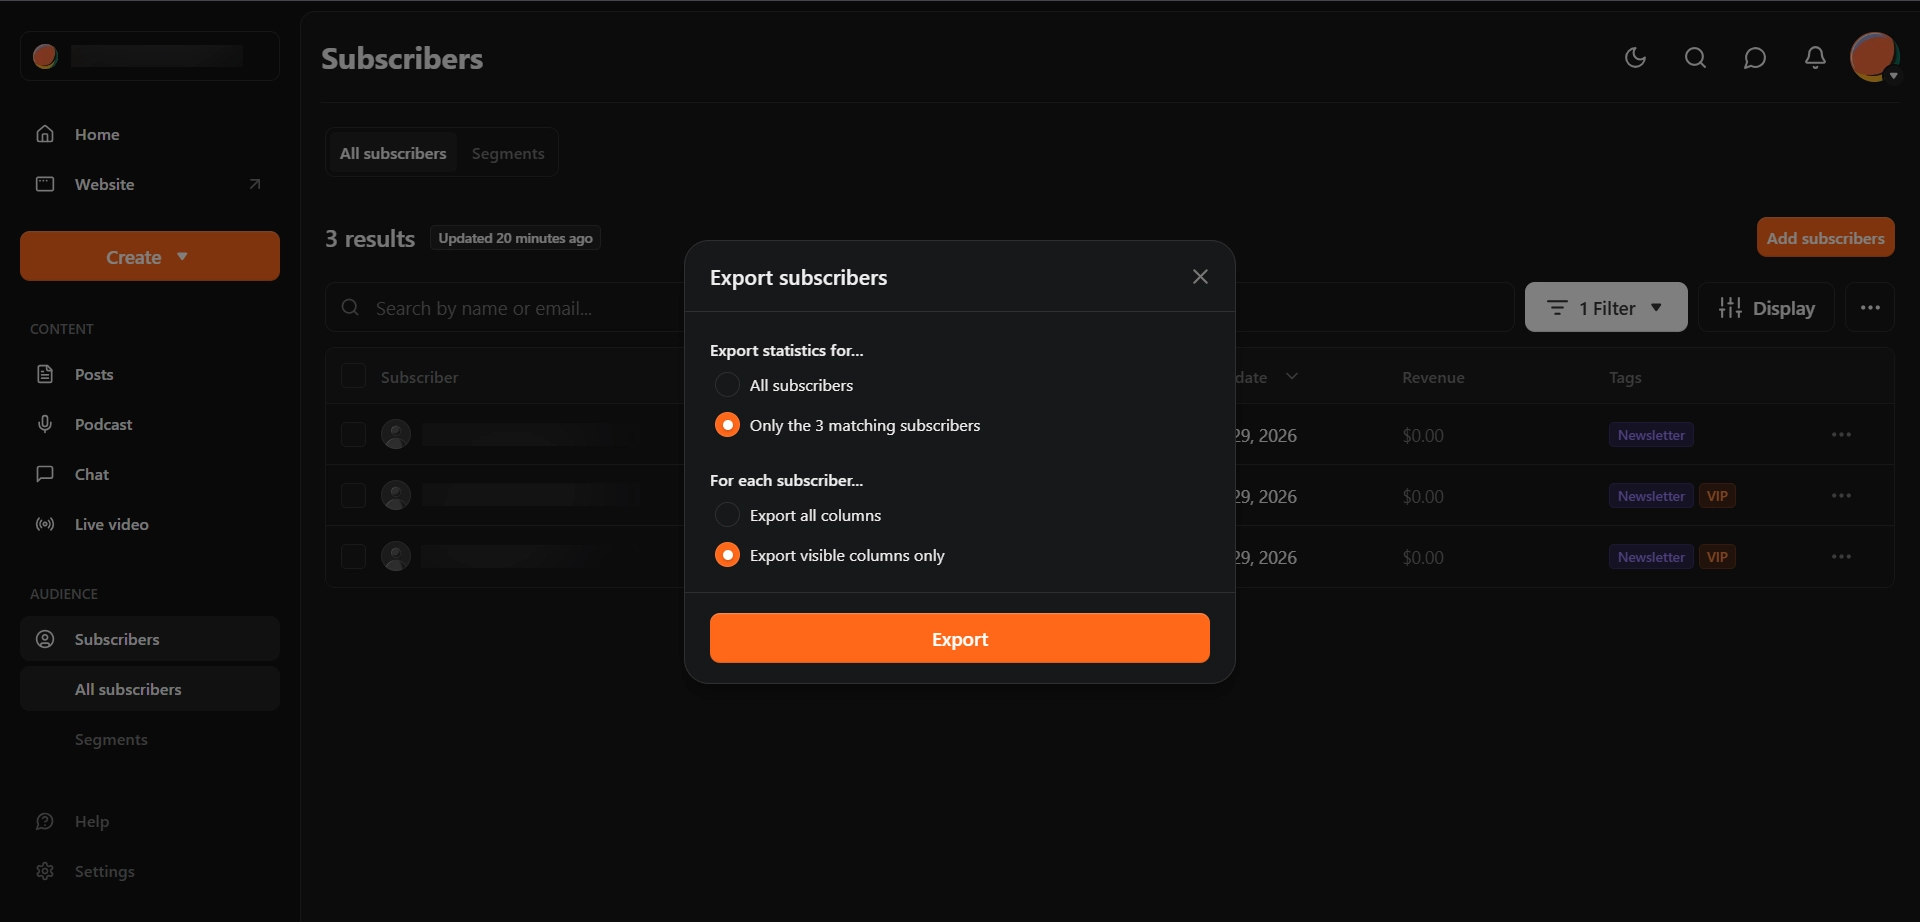
Substack prepares the file, and when it is ready, download it with Download last export.
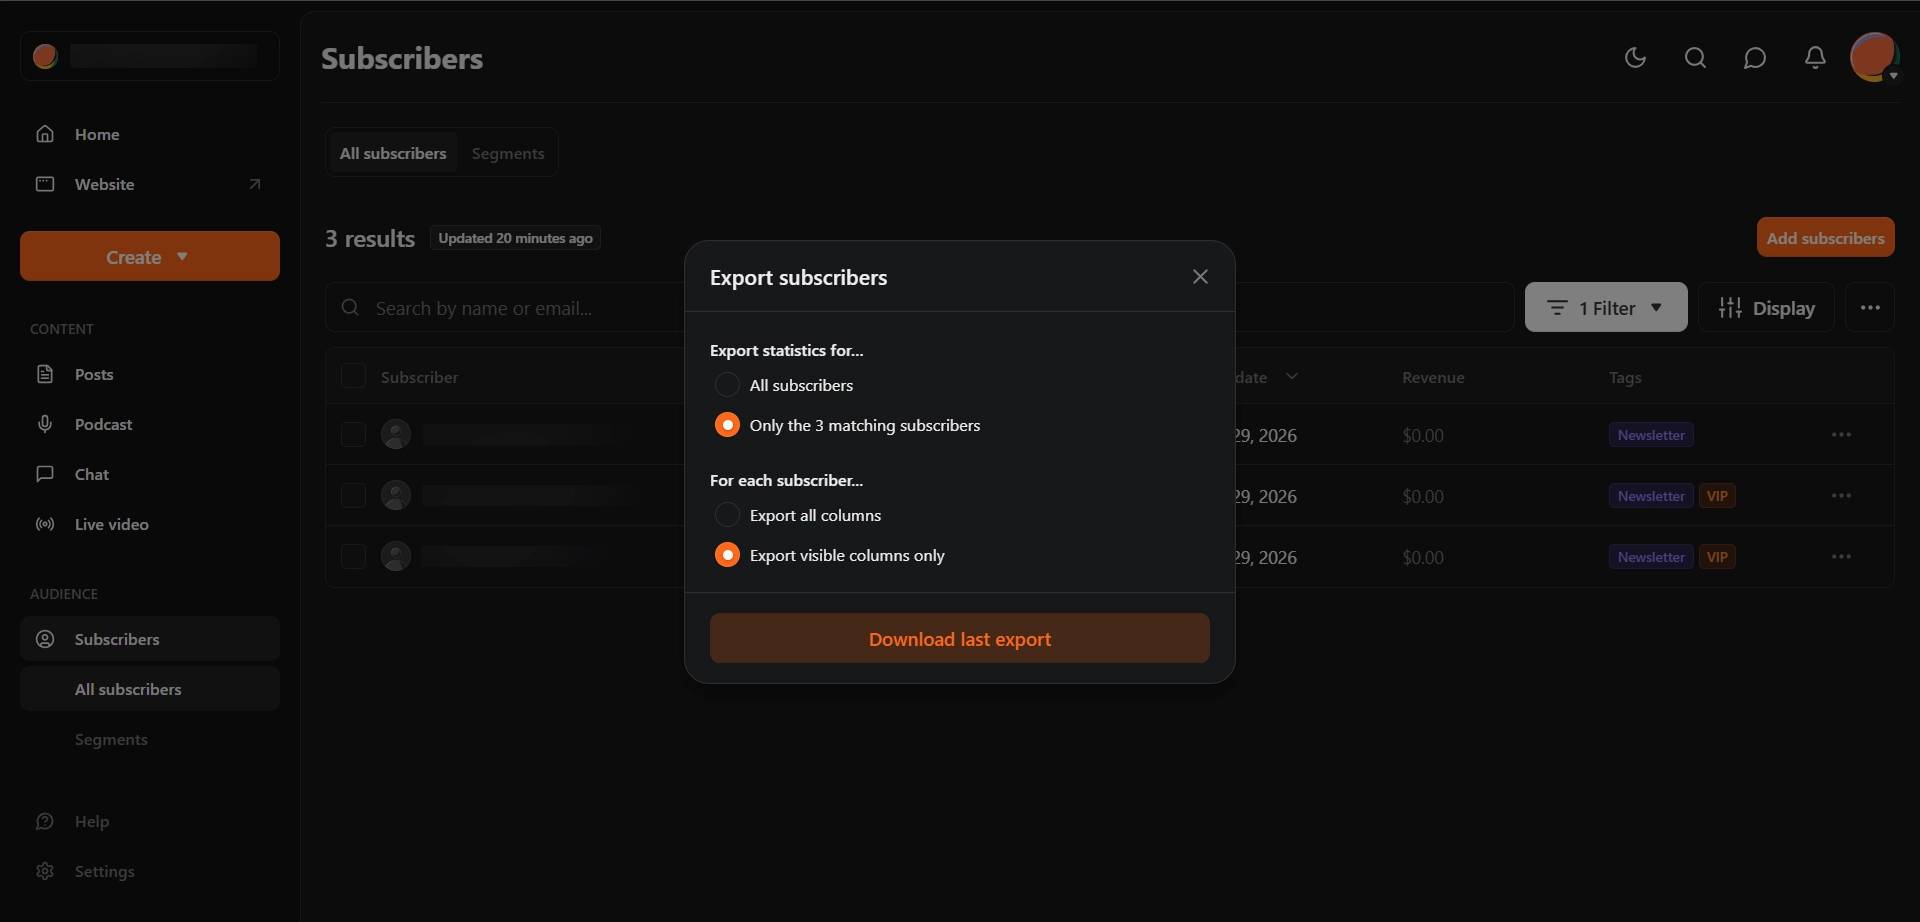
Either column option works. "All columns" gives you every available column; most of the engagement data you have no use for on a platform that doesn't track. "Visible columns only" is narrower and easier to map. Filtering has a useful side effect too: if you filter for the subscribers you actually want to email, anyone who has left your list is excluded without you having to think about it.
Check the exported CSV
Open the file in a spreadsheet and confirm the email addresses look right, the start dates are populated, and the row count matches what your Subscribers dashboard showed.
Step 3: Import a small test batch
Do not import three thousand people to find out whether your mapping is right. Copy your export, keep four or five rows, and import that first. It stays under the 50-subscriber approval threshold, so it runs immediately.
Upload the file to Hyvor Post
Go to Tools → Import in the console. Choose your test CSV and enter a source for the import, such as Substack.
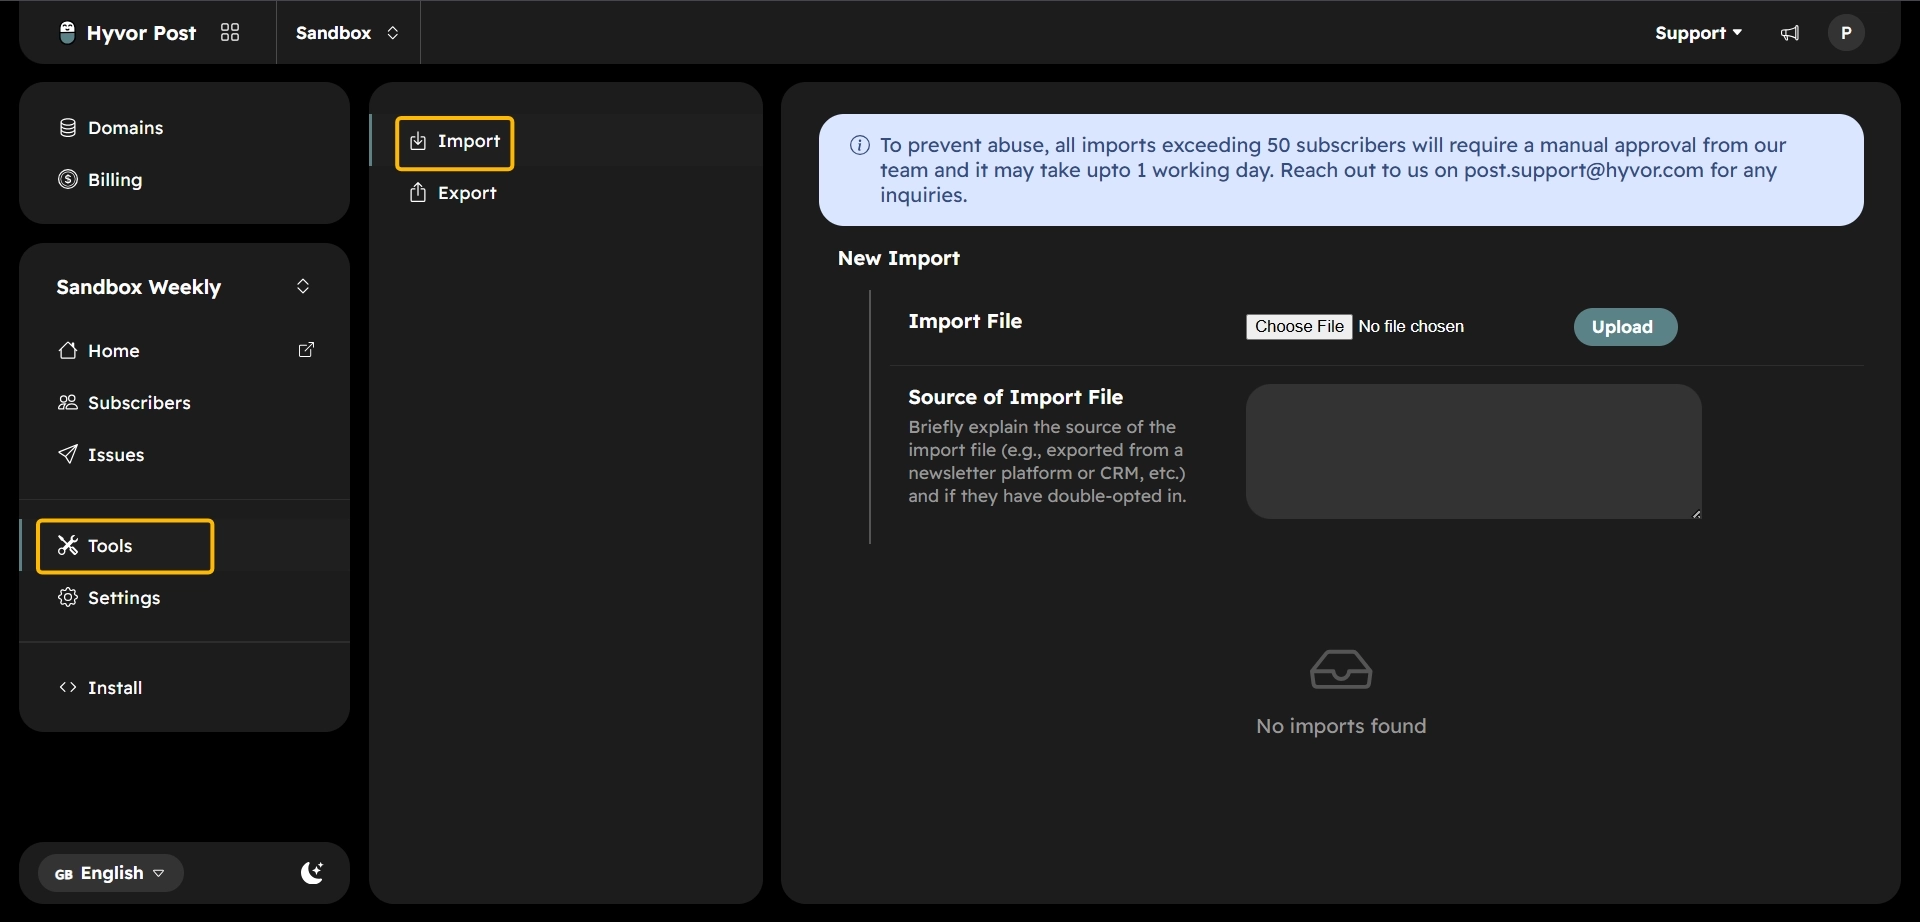
Then click Upload.
Map your Substack columns
Substack's column names are not the ones Hyvor Post uses, and nothing is detected automatically. Read each dropdown.
Hyvor Post field | Substack column |
Subscribed At | Start date |
Lists | no equivalent column |
Subscribe IP | no equivalent column |
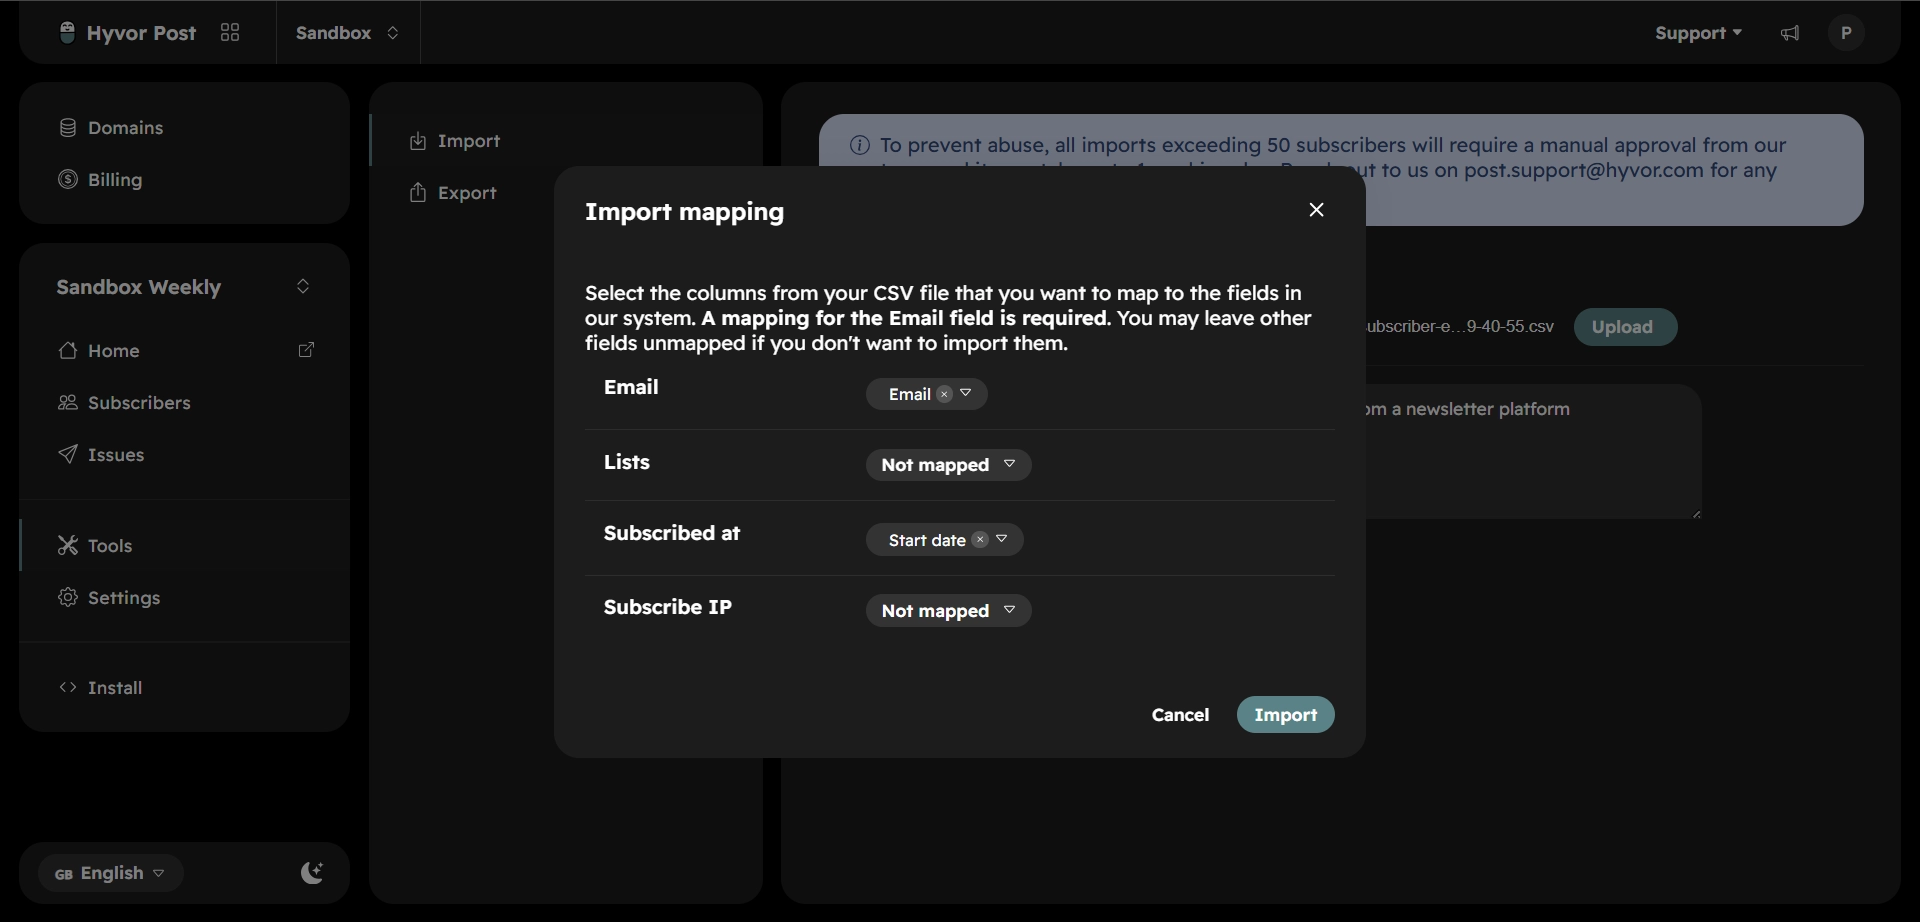
There is no Lists column to map, but you can build one yourself if your segmentation matters to you:
In Substack, filter your subscribers by one tag and export just that group, covered in Step 2.
Open the CSV in a spreadsheet and add a new column.
Fill every row in that column with the exact name of a list you already created in Hyvor Post.
Map that column to Lists during import.
Repeat for each tag, importing a separate file each time.
Skip this and every subscriber joins every list instead.
Check the results
Open your Subscribers page and check each imported subscriber. Subscription dates should match the file rather than today.
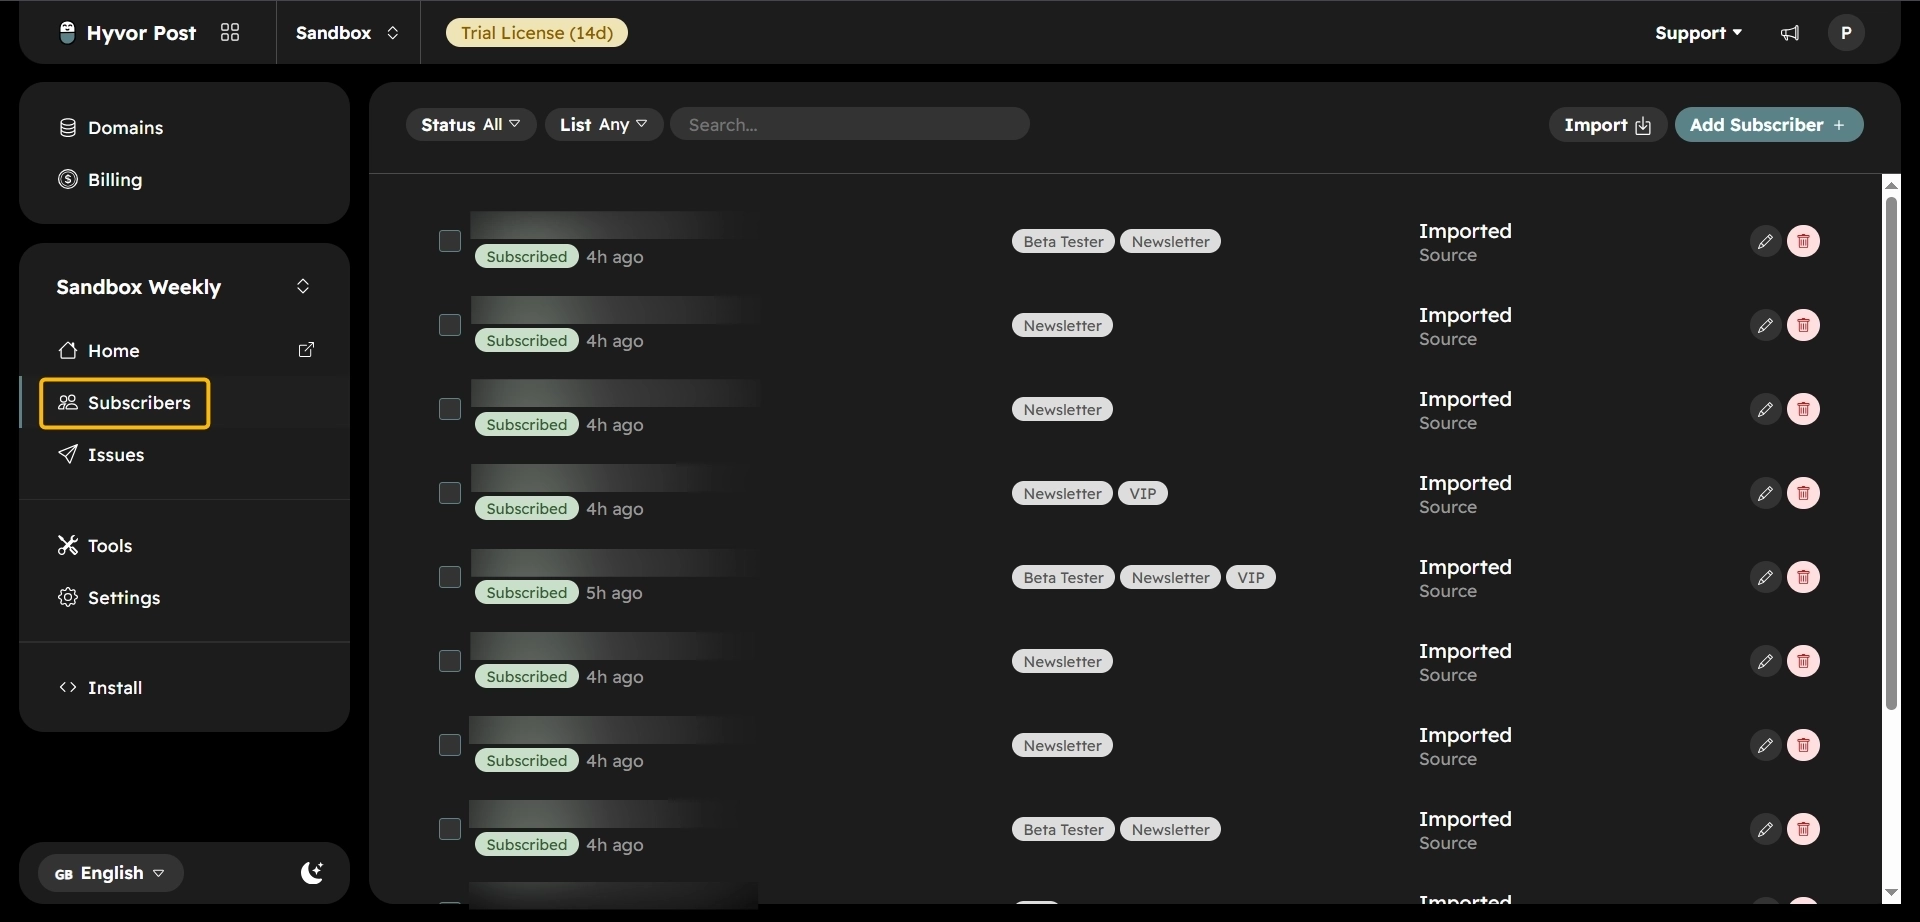
Step 4: Import your full list
Write down your current subscriber count first. Your test batch from Step 3 is already part of this file, so the count will not rise by the full row count alone; Hyvor Post matches those rows by email and updates them instead of adding them again.
Then repeat Step 3 with your full export. Go to Tools → Import, upload the CSV, check the mappings carefully, and start the import.
Wait for approval, if needed
Imports over 50 subscribers are reviewed manually. Your import sits in a pending state, starts automatically once approved, and can be watched from the Import page. This usually takes up to one working day. If your migration is time-sensitive, contact Hyvor Post support.
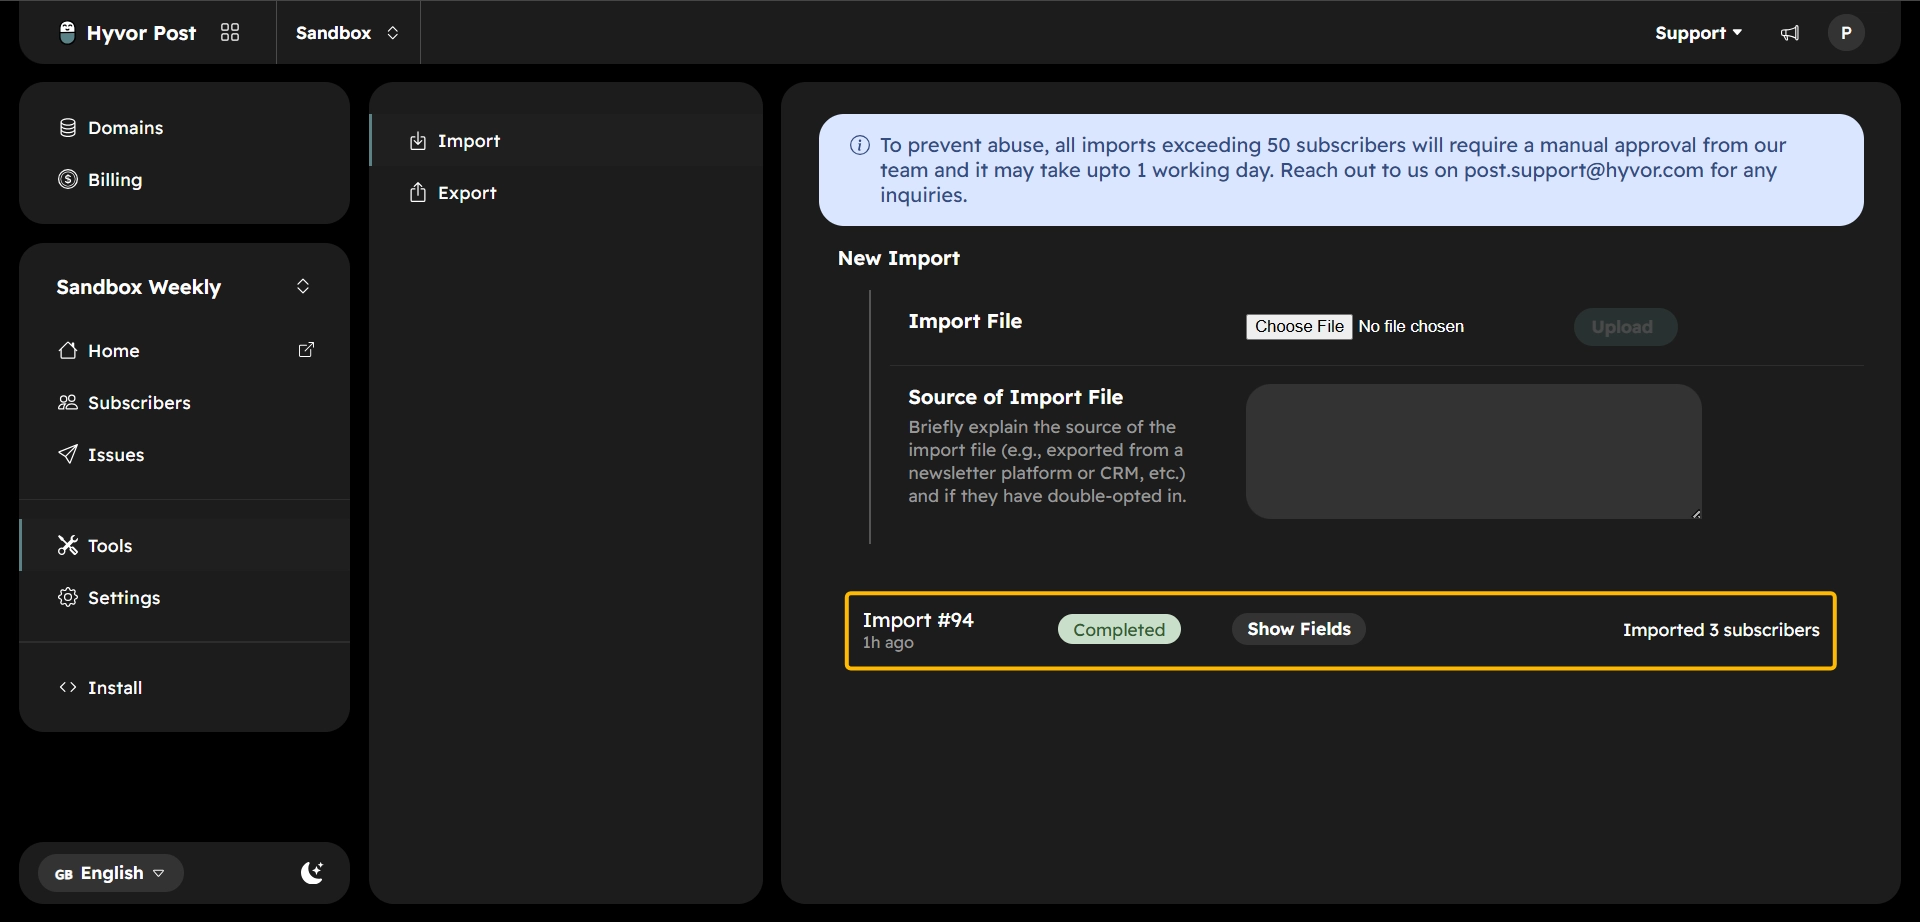
Verify the migration
Check that your final subscriber count matches what you expected once you account for the test batch you already imported. A shortfall usually means malformed addresses were skipped. Then spot-check a few individual subscribers, ideally ones with an old signup date.
Step 5: Replace your signup form
Your subscribers have moved. Now make sure new ones arrive in the right place.
Add the Hyvor Post form
Copy the embed code from the Install section of your console and add it to your website's HTML.
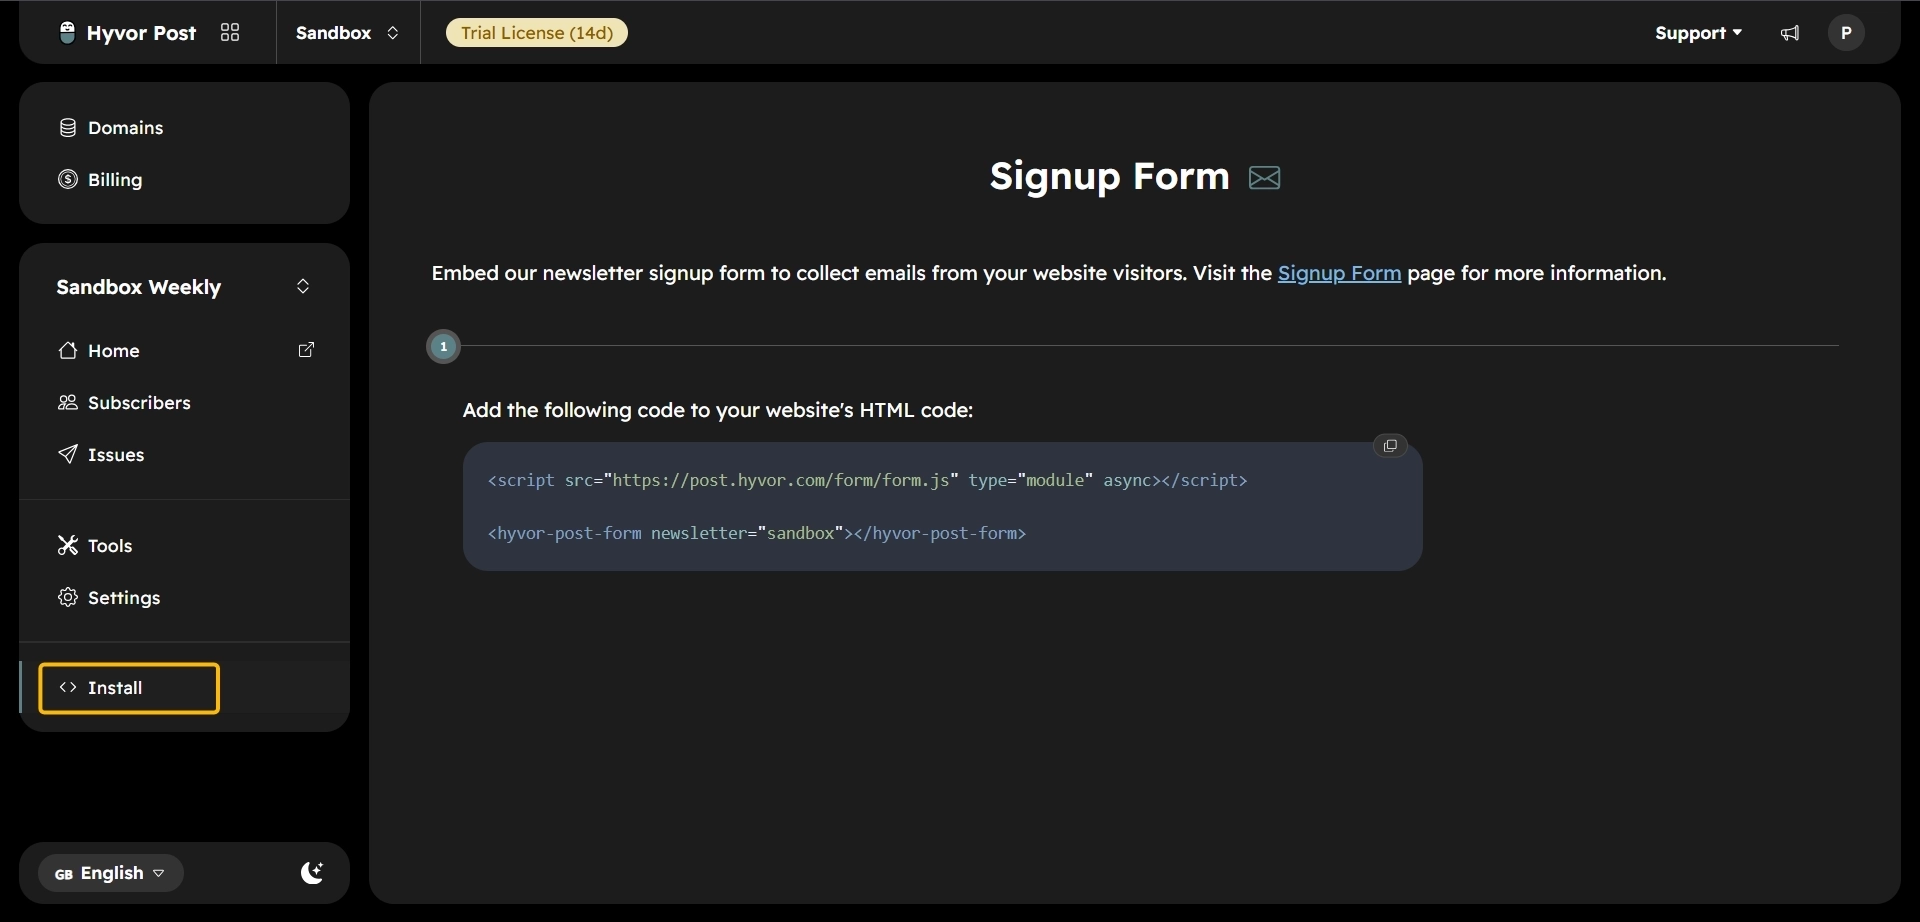
Point people away from Substack
This step is different from most migrations. Your Substack publication is a website with its own subscribe button, and it keeps collecting subscribers as long as it exists. Decide what happens to it: leave it up with a note pointing readers to your new home, or take it down.
Then check everywhere else you have linked it, including your social bios and email signature.
Catch anyone who signed up during the move
People who subscribed while you were migrating exist only in Substack. Export again with the same filter, and import the new file. You can import the whole thing rather than picking out new rows, since Hyvor Post matches by email address and updates existing records instead of duplicating them. Use a fresh export, though, since an old CSV will push outdated values over newer ones.
Test your new signup form
Subscribe with your own email address through your website. Check that you appear in Hyvor Post, land in the expected list, and that the confirmation email arrives.
What doesn't migrate from Substack to Hyvor Post
Subscribers are only one part of what it takes to migrate from Substack to Hyvor Post. Several other things have no direct equivalent, roughly in order of how much they are likely to matter to you.
Paid subscriptions. As covered at the top, Hyvor Post has no paid-newsletter tier.
Your archive. Past posts stay on Substack. Hyvor Post gives you an archive site, but it starts empty.
Comments, Notes, and followers. Substack's social layer has no counterpart. Followers in particular are not subscribers, and there is nothing to export.
Engagement history. Every open, click, and view Substack tracked about your readers stays behind, and Hyvor Post will not generate new numbers to replace it.
Troubleshooting common migration problems
These are the problems that come up most often when people migrate from Substack to Hyvor Post.
Problem | Likely cause | Fix |
Nothing imported | The Email column was not mapped | Repeat the import with Email mapped |
Everyone has today’s date |
| Re-import with the column mapped |
Subscribers are in every list |
| Follow the Lists workaround in Step 3, then re-import |
Fewer subscribers than expected | Malformed addresses were skipped | Compare your CSV against the imported count |
New subscribers still appear on Substack | Your publication is still live and collecting | Add a notice or take it down |
Frequently asked questions
Can I start sending as soon as I've migrated?
Yes, with an active subscription. Without one, you can still create your newsletter, import subscribers, draft an issue, and send test emails to yourself.
What happens if I import the same file twice?
Hyvor Post matches by email address, so a second import updates existing records rather than duplicating them. Use a fresh export, since the file you upload wins.
Are my subscribers' email addresses shared with third parties?
No. Hyvor Post sends through its own delivery service, so your list isn't passed to an outside provider.
Can I bring my paid subscribers across?
You can import their email addresses, but not their subscriptions. Hyvor Post does not support paid newsletters.
Migration checklist
Use this checklist to migrate from Substack to Hyvor Post without missing a step.
Prepare
Created your Hyvor Post newsletter
Created your lists
Decided how Substack tags or sections map to those lists
Export and import
Filtered your Substack subscribers before exporting
Exported and reviewed the CSV
Checked the row count against your Substack dashboard
Ran a successful test import
Imported your full list
Confirmed the subscriber count matches
Website
Added the Hyvor Post signup form
Decided what happens to your Substack publication
Updated links in bios and signatures
Tested a real signup
Before you finish
Sent yourself a test newsletter
Imported anyone who signed up during the migration
Saved a copy of your Substack posts if you want them
Saved a backup of your subscriber export
Wrapping up
Migrating from Substack to Hyvor Post is a straightforward process when completed in the right order. By preparing your newsletter first, filtering your export before you download it, testing with a small batch, and replacing your signup form before you retire your publication, you can move your list without losing important subscriber information.
Take a few minutes for the final checks above before you close things down on Substack. Once you're satisfied that the migration is complete, you can confidently continue growing your newsletter with Hyvor Post.

Comments